
User`s guide
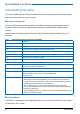
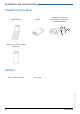
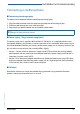
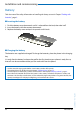
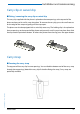
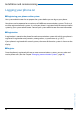
Table Of Contents
- Aastra 610d User’s Guide
- Content
- Operating and Display Elements
- System Information
- Security
- Dialling and Phoning
- Using the Display and Operating Elements
- Supplementary features
- Making and answering calls
- Dialling by name – Quick search
- Dialling from the phone book - Alpha search
- Dialling from the Call List of Unanswered Calls
- Dialling from the Call List of Answered Calls
- Dialling with Redial
- Dialling with a configured softkey
- Requesting a Callback
- To answer the callback request
- Call waiting with an internal user
- Answering Call Waiting
- Starting an Announcement
- Receiving an Announcement
- Private call with PIN
- Using functions while in a call
- Organising absences from the desk
- Functions for special situations
- Forwarding a call during the ringing phase
- Rejecting a call during the ringing phase
- Listening to Voice Mail
- Sending text messages
- Reading text messages
- Picking up a call
- Making a call on a third-party phone
- Suppressing your call number from your called party's phone display
- Tracing Malicious Calls
- Activating personal call routing
- Activating Ring alone
- Setting functions by remote control
- Making and answering calls
- Personalizing Your Phone
- Installation and commissioning
- Further information
- Index

Installation and commissioning
Aastra 610d 67
eud-1093/1.1 – I7.9 – 09.2009
Connecting a cordless phone
■ Connecting the charging bay
The phone can be operated without modifying the charging bay.
1. Plug the cable connector into the socket on the underside of the charging bay.
2. Feed the cable through the strain relief provided.
3. Plug the plug-in power adapter into an available socket outlet.
■ Power supply / Plug-in power supply unit
The power supply unit is rated for 100 V to 240 V AC (50-60 Hz). It is supplied with four inter-
changeable adapters, which means it can be used more or less worldwide. Where necessary, fit
the standard adapter head for your country to the power supply unit. As the plug-in power sup-
ply unit comes in two variants, the assembly differs slightly:
• Variant 1: Set the switch on the power supply unit to OPEN and slide the existing adapter
head upwards and out. Next fit the new adapter head to the power supply unit and lock it
into place using the switch (LOCK).
• Variant 2: First remove any adapter head that may already be fitted by pressing OPEN. Next
fit the new adapter head onto the power supply unit at a slight angle with the end marked
TOP at the top. Press it down until it clicks into place.
■ Software
New device software can simply be updated during operation using automatic firmware
updates, reducing maintenance costs as a result.
Note:
Plug designs vary from country to country.