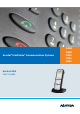
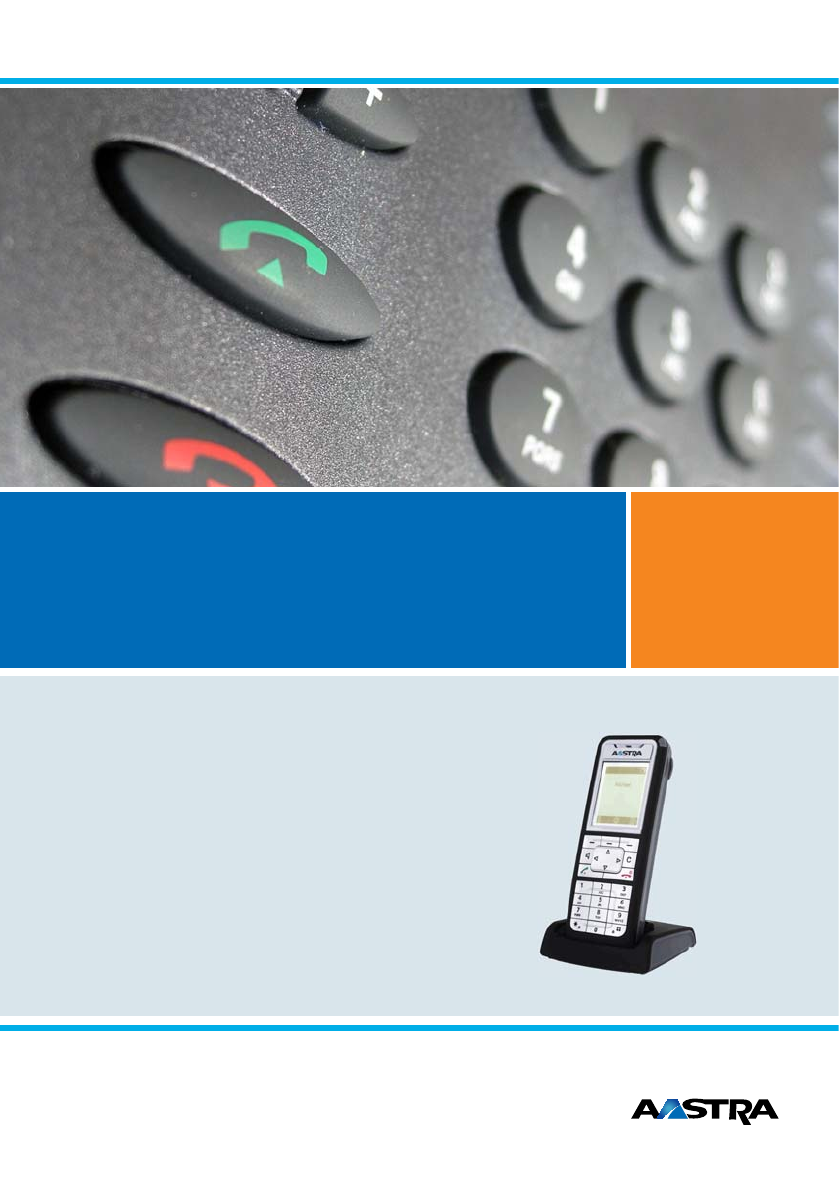
Ascotel® IntelliGate® Communications Systems Aastra 610d User’s Guide A150 A150 A300 A300 2025 2025 2045 2045 2065 2065
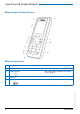
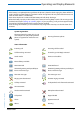
Operating and Display Elements Operating and Display Elements ■ Operating and Display Elements ■ Operating elements key Loudspeaker 2 LED indicator 3 Display 4 Side keys + / - In the state... Description LED as per Table in Chapter "LED indicator signals", page 23 short In a connection Adjusting the volume eud-1093/1.1 – I7.9 – 09.
Operating and Display Elements 5 key Press In the state... Description Left softkey/ foxkey short • Idle state • Menus • Call up complete menu • Executes displayed function above key. Middle softkey/ foxkey short • Idle state • Menu • Call up configured call number • Executes displayed function above key. Right softkey/ foxkey short • Idle state • Menu • Call up configured call number • Executes displayed function above key. approx 2 sec.
Operating and Display Elements 11 key Press In the state...
Operating and Display Elements Notes: • If the battery is completely discharged when the phone is placed in the charging bay, there will be no display initially until the battery has reached a certain charge level. This may take several minutes and does not mean there is a malfunction. • Even when the phone is switched off, the battery will still slowly discharge. • When the battery capacity is almost exhausted, a series of warning beeps sounds.
Operating and Display Elements Status information Not permitted Phone book Private phone number Business phone number Mobile phone number eud-1093/1.1 – I7.9 – 09.
System Information System Information ■ Trial licences Trial licences are available for various features and phones. With that licensed features can be used for a certain period license-free. ■ One Number user concept Your system administrator can set up phones for you that hold all the same phone number (one number user concept). You have only one name and phone number with which to identify yourself to your call partners, regardless of which of the phones you make your calls.
Security Security ■ Safety Information Failure to observe this information can be hazardous and infringe existing laws. Medical equipment The cordless phone must not be used near medical equipment, such as pacemakers or hearing aids. Availability of telephone connections Do not rely on your cordless phone as your only means of communication in emergency or critical situations. Availability cannot always be guaranteed. The device will be inoperable when mains power of the communications system fails.
Security Disposal Be sure to dispose of your device, batteries and its packaging in an environmentally compatible way. Electrical equipment does not belong in domestic waste. Deposit it at a return centre. Accessories Use original accessories or specifically approved accessories only. The use of other accessories may decrease performance or pose a risk to your health or safety.
Security ■ User information Your terminal has been supplied with a Quick User’s Guide, safety information and, where applicable, with other terminal-specific information. You will find this and other documents for your device at www.aastra.com/docfinder. More information on your terminal can be found in the documentation or your dealer’s homepage. It is your responsibility to inform yourself about the scope of functions, operation and proper use of your equipment.
Security ■ Trademarks The designations used in this document for software and hardware are registered trademarks and are thus subject to the relevant regulations. Ascotel® and Intelligate® are registered trademarks of Aastra Technologies Limited. Bluetooth® is a registered trademark of Bluetooth SIG, Inc. All other trademarks are trademarks of the respective proprietors. ■ Document information • Document number: eud-1093 • Document version: 1.1 • Valid upwards: I7.9 • © 09.
Content Dialling and Phoning . . . . . . . . . . . . . . . . . . . . . . . . . . . . . . . . . . . . . . . . . . . . . . . . . . . . . . . . . . . . 13 Answering Calls . . . . . . . . . . . . . . . . . . . . . . . . . . . . . . . . . . . . . . . . . . . . . . . . . . . . . . . . . . . . . . . . . . . . . . . . . . . 14 Making calls. . . . . . . . . . . . . . . . . . . . . . . . . . . . . . . . . . . . . . . . . . . . . . . . . . . . . . . . . . . . . . . . . . . . . . . . . . . . . . .
Dialling and Phoning The following sections explain how to make phone calls simply and the functions your phone offers you whenever you receive a call. Answering Calls . . . . . . . . . . . . . . . . . . . . . . . . . . . . . . . . . . . . . . . . . . . . . . . . . . . . .14 eud-1093/1.1 – I7.9 – 09.2009 Making calls . . . . . . . . . . . . . . . . . . . . . . . . . . . . . . . . . . . . . . . . . . . . . . . . . . . . . . . . .
Dialling and Phoning Answering Calls This section explains the procedure for answering a call. ■ Answering a Call Your phone is ringing and the LED indicator is flashing. To answer the call, proceed as follows: The volume of the ringing call can become very loud. Do not hold the sound aperture up to your ear. Press the Call key. Note: If the caller's phone number is received, it is shown on the display.
Dialling and Phoning Making calls This section explains the different ways you can make a call with your phone. ■ Dialling with the Phone Number You want to call someone and key in that person's phone number. With call preparation you can enter a phone number without it being dialled automatically, so you have time to check the number and, if necessary, correct it. The number is not dialled until you press the Call key. Enter a phone number in call preparation.
Dialling and Phoning ■ Using Your Phone in Hands-Free Mode You want other people to join the conversation or to have your hands free while making the call. The hands-free mode function activates the loudspeaker and the microphone. During a call: Press the Loudspeaker key. ➔ Hands-free operation is activated, is displayed. Notes: • Make sure the hands-free microphone is not obstructed. • The sound quality is improved if you set the volume of your phone to a low setting.
Dialling and Phoning ■ Using a Headset To make a phone call with the headset. If you answer a call in headset mode using the Call key or Loudspeaker key, the call is provided on the headset. Phone is ringing. To answer the call, proceed as follows: Press the Call key or Loudspeaker key. ➔ The call is provided on your headset. Press the Loudspeaker key. ➔ The phone’s microphone is switched on and the headset microphone is switched off.
Using the Display and Operating Elements The following sections explain how to operate your phone quickly and simply. Keys . . . . . . . . . . . . . . . . . . . . . . . . . . . . . . . . . . . . . . . . . . . . . . . . . . . . . . . . . . . . . . . . 19 Input . . . . . . . . . . . . . . . . . . . . . . . . . . . . . . . . . . . . . . . . . . . . . . . . . . . . . . . . . . . . . . . 20 Menu-Guided Navigation . . . . . . . . . . . . . . . . . . . . . . . . . . . . . . . . . . . . . . . . . . .
Using the Display and Operating Elements Keys ■ Pressing a Key A key may have various functions depending on the situation and the operating mode. The function activated depends on the number of times the key is pressed or whether it is pressed quickly or held down for a moment. Here are some examples: Press the softkey. Keep the softkey held down for a moment (about 2 seconds). ■ Softkey The 3 softkeys have variable functions. These functions are displayed above the key.
Using the Display and Operating Elements Input ■ Digit keys The characters are assigned to the digit keys as follows. Press the relevant digit key repeatedly until the character you want is displayed. -.
Using the Display and Operating Elements ■ Switching between Upper and Lower Case You want to switch between upper and lower case while making an input in text mode. Upper-case input is automatically activated when the first letter is entered. The text mode then automatically switches to lower-case input. You can use the softkey to switch manually between upper-case and lower-case input. a-->A Switching between upper case and lower case in text mode: Press the a-->A or > A-->a softkey.
Using the Display and Operating Elements Menu-Guided Navigation ■ Accessing the menu The phone is in standby mode: Press the navigation key to the right or the Menu softkey. ➔ The first menu entry is displayed. Use the vertical navigation key to scroll through the menu entries. Select Press the Select softkey. ➔ Accessing the displayed menu. ■ Navigation key You can retrieve a particular menu entry even more simply and efficiently using the navigation key.
Using the Display and Operating Elements ■ Enabling/disabling function You can enable or disable a function or a menu entry by selecting the entry you want and pressing the Select softkey. Select Enabling/disabling function: Press the Select softkey. ■ Resetting activated features You can deactivate again all the activated functions (e.g. Forwarding). Press the navigation key up. ➔ Activated features is opened. Or: Activated features are also available via the menu: Menu > Activated features.
Supplementary features The following sections explain the supplementary features provided by your phone for more efficient use. Making and answering calls . . . . . . . . . . . . . . . . . . . . . . . . . . . . . . . . . . . . . . . . . 25 Using functions while in a call . . . . . . . . . . . . . . . . . . . . . . . . . . . . . . . . . . . . . . . 32 Organising absences from the desk . . . . . . . . . . . . . . . . . . . . . . . . . . . . . . . . . . 34 Functions for special situations . . . . . . . . . .
Supplementary features Making and answering calls This section explains some convenient features provided by your phone for making a call. ■ Dialling by name – Quick search You want to make a call by entering a name. With quick search you only need to press the digit keys once for each letter even though several letters are stored under each key. An efficient algorithm provides quick search results.
Supplementary features ■ Dialling from the phone book - Alpha search You want to search for a user directly in one of the connected phone books. The surname and first name have to be separated by a space, for example "no s" for Noble Stephen. Ask your system administrator whether you should start with the surname or the first name. To find out to create a new contact in your private phone book, refer to the Chapter "Creating a new contact entry", page 59. Press the navigation key downwards.
Supplementary features Close Clearing the "Missed calls" display: Press the Close softkey. ➔ Deletes the display. The entry remains stored in the list of the last unanswered calls, is displayed. Note: Call list of missed calls is also available via the menu: Menu > Call lists > Missed calls. ■ Dialling from the Call List of Answered Calls You want to call back someone whose call you answered. Your phone automatically stores the phone number of this user in the call list.
Supplementary features ■ Dialling with a configured softkey You want to call a user whose phone number is stored under a softkey. You can call the user by pressing the corresponding softkey. To find out how to configure a softkey, refer to Chapter "Configuring keys", page 62. Press the configured softkey. ➔ The key’s allocated function is shown on the display. Press the Call key. ➔ The phone number displayed is dialled. ■ Requesting a Callback You want to talk to a certain person.
Supplementary features ■ To answer the callback request Someone has asked you to call back. The display shows Callback requested. Call Delete To answer the callback request: Press the Call softkey. ➔ The phone number is dialled. Clear callback: Press the Delete softkey. ➔ Callback is deleted. Note: As long as the callback is not answered or deleted by the system, it can be edited using Menu > Activated features > Delete or Answer. ■ Call waiting with an internal user You want to talk to an internal user.
Supplementary features ■ Answering Call Waiting You are in a call and hear the call waiting tone. Another user urgently wants to speak to you. You can either answer, deflect or reject the call. Answer Answering the call: Press the Answer softkey. ➔ 1.Your original call partner is put on hold. You are now connected with the party who initiated the call waiting.
Supplementary features Announcement OK Enter the call number and press the Announcement softkey. ➔ The call number is displayed. Note: You can also find the call number of the user you want in the phone book or in a call list. Confirm with the Ok softkey. ➔ User is made aware of the announcement. You can now talk. Or: You can also start the announcement using Menu > Call features > Announcement > User/Group.
Supplementary features Using functions while in a call This section explains the different options provided by your phone while you are in a call. ■ Enquiry Call During a Call You want to call someone else briefly without losing your current call partner. Then you want to resume your conversation with your original call partner. With the Enquiry call function you can call someone else in the middle of a call and put your original call partner on hold.
Supplementary features ■ Making a Conference Call You are in a call and have a call party on hold at the same time. You want to include the party on hold in the conversation and hold a conference call. With the conference function you can include a call party on hold in the current conversation. From the conference call you can initiate an enquiry call to someone else. You can broker between the parties of the conference and the enquiry call party.
Supplementary features ■ Parking a Call Partner You want to put your call partner on hold without using a phone channel as a result. You can park your call partner locally. A locally parked call partner can only be retrieved by the phone from which the function was initially carried out. Park Take back Press the Park softkey. ➔ Your call partner is now parked locally; is displayed. To retrieve a parked call party: Press the Take back softkey.
Supplementary features User Scroll to User and confirm with the Ok softkey. Enter the user’s call number and confirm with the Ok softkey. ➔ Forwarding is activated. Note: You can also find the call number of the user you are looking for in the redial list. Deactivating forwarding: Press Menu > Activated features > Reset. Notes: • If a call is to be forwarded only when you are already in a call, select Forwarding if busy.
Supplementary features ■ Forwarding to Voice Mail You cannot momentarily be reached on your phone. If you forward to your Voice Mail, a user can leave you a voice message. You can use the global greeting or your own greeting (see Chapter "Configuring Voice Mail", page 61). For more information on Voice Mail please refer to the "User’s Guide Voice Mail Systems". Activating forwarding: Press the navigation key to the right or the Menu softkey. Forwarding Scroll to Forwarding and press the Select softkey.
Supplementary features Enter the text and confirm with the Ok softkey. ➔ Forwarding is activated. Deactivating forwarding: Press Menu > Activated features > Reset. Note: If you activate another forwarding, your forwarding to message is deactivated. Functions for special situations This section explains the different options provided by your phone to deal with special situations. ■ Forwarding a call during the ringing phase You do not want to answer a call yourself but deflect it to another user.
Supplementary features ■ Listening to Voice Mail Your display shows Voice Mail from and the LED indicator is flashing red. Listen Listening to a new message: Press the Listen softkey. ➔ The message is played back. Or: Voice Mail is also available via the menu: Menu > Voice Mail > Inbox > Listen. Listening to all messages[a]: Listening to all messages is available via the menu: Menu > Voice Mail > Inbox > Listen all. Menu To delete the message: Press the navigation key to the right or the Menu softkey.
Supplementary features Select one of the text messages stored in the system and press the Select softkey. Adapt or expand the text and press the Send softkey. Select the destination and press the Select softkey. For user and group: Enter the phone number and press the Send softkey. ➔ The text message is sent. Note: If the display shows Not available, the text message could not be sent.
Supplementary features Pick up Scroll to Pick up and press the Select softkey. Enter the call number of the phone from which you want to pick up the call and confirm with the Ok softkey. Note: You can also find the call number of the user you want in the phone book or in a call list. ■ Making a call on a third-party phone You want to make a call on a third-party phone using your personal settings, for example on a colleague’s phone or in a meeting room.
Supplementary features ■ Suppressing your call number from your called party's phone display You do not want your call number to appear on the phone display of a called party in the public network[a]. You have two possibilities: • If you never want the phone number to be displayed, set CLIR permanent ein. • To suppress your call number display for certain calls only, select the function CLIR per call before dialling your party's call number.
Supplementary features ■ Activating personal call routing You wan to specify which of your phones shall ring when you receive a call. If your system administrator has set up a phone number with several phones for you as well as the call routings, you can specify which of your phones shall signal a call by using the personal call routing. Your system administrator can set up to 5 call routings. You can only answer a call on phones where the call is signalled.
Supplementary features ■ Activating Ring alone You want to specify which of your phones shall acoustically ring when you receive a call. If your system administrator has set up a phone number with several phones for you, you can specify which of your phones shall acoustically signal a call by using Ring alone[a]. When you have activated Ring alone on a phone, the acoustic ringing tone is deactivated for all other phones ( ). An incoming call is signalled in the display of all phones.
Personalizing Your Phone These sections explain how to adapt the phone’s basic settings to suit your personal requirements. Configuring cordless phone functions . . . . . . . . . . . . . . . . . . . . . . . . . . . . . . . 45 Display settings . . . . . . . . . . . . . . . . . . . . . . . . . . . . . . . . . . . . . . . . . . . . . . . . . . . . . 49 Setting the volume . . . . . . . . . . . . . . . . . . . . . . . . . . . . . . . . . . . . . . . . . . . . . . . . . . 50 Profile settings . . . . . . . . . .
Personalizing Your Phone Configuring cordless phone functions This section explains the procedure for making settings on your cordless phone. ■ Switching the cordless phone on/off You want to switch your phone on or off. Switching the phone off: Keep the End call key pressed down for approx. 2 seconds and answer Ok to the safety prompt. ➔ The phone is switched off. Or: Function is also available via the menu: Menu > Settings > General > Switch off. Notes: • You cannot switch the phone off in a call.
Personalizing Your Phone ■ Locking your phone You need to leave your desk and want to ensure that no-one can alter your phone's settings, look at your private data, or make outside calls from your phone. You can lock your phone with a PIN consisting of two to ten digits. First change the PIN as described in chapter "Changing the User PIN", page 54) or use the */# procedure *47 (see "User’s Guide */# Procedures").
Personalizing Your Phone Enter the PIN and confirm with the Ok softkey. Free Scroll to Free and confirm with the Select softkey. ➔ The phone is unlocked. ➔ To lock all your phones, execute the *33* # function code (see "User’s Guide */# Procedures"). ■ Activating range alarm and system busy beep You want to set the system parameters with your cordless phone. The Range alarm indicates that the connection between your phone and the system is weak.
Personalizing Your Phone Server alarm Scroll to Server alarm and press the Select softkey. Select the setting you want and switch on or off with the Select softkey. ■ Logging a cordless phone on/off See (also) the Chapter "Managing communication systems", page 56. ■ Linking the charging contact to direct call answer You want to choose whether to answer a call simply by lifting the phone out of its charging bay or whether you also need to press the Call key after lifting out the phone.
Personalizing Your Phone Display settings This section explains how to set display properties. ■ Setting the display You want to optimise the display settings.
Personalizing Your Phone ■ Setting the LED indicator You can activate or deactivate the following settings: • • • • In Service: The phone is switched on. Incoming call Info Appointment call: Function can only be set with a function code, see Chapter "*/# Procedures", page 64) • Hands-free operation • Battery empty Press the navigation key to the right or the Menu softkey. Settings Scroll to Settings and press the Select softkey. LED indications Scroll to LED indications and press the Select softkey.
Personalizing Your Phone Profile settings There are five different application profiles to adapt the phones to any given work situation, e.g. headset or conference mode. ■ Setting up a profile All your phone’s ringing properties are stored in the profiles. Three default profiles are factory-set: Normal, Meeting, Charging bay. You can set up to 5 profiles. A profile comprises a set of ringing and phone settings, which you can specify individually for each profile.
Personalizing Your Phone Modify Setting up a profile: 1. Scroll to the profile you want and press the Modify softkey. 2. Scroll to the setting you want and confirm your choice of setting with the Select softkey. ➔ The setting is stored. Note: To listen to all the ring properties use the Test softkey. Rename Renaming a profile: Scroll to the profile you want and press the Rename softkey. ➔ The setting is stored. Delete Delete profile: Scroll to the profile you want and press the Delete softkey.
Personalizing Your Phone Hands-free and headset settings This section explains other ways in which you can make calls with your phone. ■ Connecting a headset Connect your headset to the socket on the bottom left-hand side of your phone. The headset mode is then automatically activated. ■ Activating headset operation You have connected a headset and now want to activate the headset mode. A headset can be connected in parallel with the handset.
Personalizing Your Phone ■ Configuring the DTMF mode You want to be able to use your phone to control other equipment or to access certain services, such as remote polling of an answering machine or telebanking. For these services you need the DTMF mode[a]. In the DTMF mode each keystroke generates a tone. If for example you enter a call number during a call, your call partner will hear the tone signals. You can specify whether the DTMF mode should be generally activated or deactivated[a].
Personalizing Your Phone Enter the old PIN and confirm with the Ok softkey. ➔ The display shows New user PIN. Enter the new PIN and confirm with the Ok softkey. ➔ The display shows Confirm user PIN. Enter the new PIN a second time and confirm with the Ok softkey. ➔ New PIN is stored. Notes: • For each digit entered, the display shows an "*". • You can also change the PIN with the *47 function code (see "User’s Guide */ # Procedures").
Personalizing Your Phone ■ Entering display text for the idle state You want to change the text displayed by your phone in the idle state. In addition to the date and time you can enter a personal text for the text displayed in the idle state. Press the navigation key to the right or the Menu softkey. Settings Scroll to Settings and press the Select softkey. General Scroll to General and press the Select softkey. Idle text Scroll to Idle text and press the Modify softkey.
Personalizing Your Phone Rename Renaming a system: Scroll to the system you want and press the Rename softkey. Enter a new number and press the Save softkey. ➔ The setting is stored. Delete Deleting a system: Scroll to the system you want, press the Delete softkey and answer Ok to the safety prompt. ➔ The system is deleted. Select Switching system: Scroll to the system you want and confirm with the Select softkey.
Personalizing Your Phone Protection settings This section explains how you can protect yourself against certain types of call. ■ Activating protection against certain types of calls You want to protect yourself against certain types of calls. You can set that Do not disturb, Call waiting, Call intrusion, Announcement, Forwarding is not allowed on your phone. Ask your system administrator whether these functions are enabled on the system. Press the navigation key to the right or the Menu softkey.
Personalizing Your Phone Managing your private contacts This section explains how to manage your private contacts. ■ Creating a new contact entry You want to store your own phone numbers. You can store your own phone numbers as private contacts. For each contact you have the possibility of making several call number entries (Business , Mobile , Private ). You can specify one of these numbers as the standard call number, the one which is used whenever you do not make a particular selection.
Personalizing Your Phone Edit Delete To change an entry: Select the entry you want and press the Edit softkey. Modify the contact data and confirm with the Save softkey. To delete an entry: Select the entry you want and press the Delete softkey. ➔ The entry is now deleted. ■ Transferring a call number from the call list to the private contacts You want to transfer a call number from one of the call lists to your private contacts. You can add a phone number to an existing contact or create a new contact.
Personalizing Your Phone Configuring Voice Mail This section explains how to set your Voice Mail. ■ Managing a personal greeting You have the possiblity to record up to 3 different greetings (e.g. for absence or holiday)[a]. Enter the appropriate name for each greeting. If no personal greeting is activated or if none is available, the global greeting is activated automatically, provided it has been recorded. Contact your system administrator for more information.
Personalizing Your Phone Configuring keys This section explains how to assign phone numbers and functions to a configurable key. ■ Available keys You can store phone numbers and functions[a] directly on a softkey that are only retrievable in the idle position. You can assign each key with a specific type so you can trigger a particular action by simply pressing that key. Choice available: • Number key: Storing the phone number; • Function key: Activating/deactivating a function.
Personalizing Your Phone ■ Storing a function on a key – function key You want to retrieve a frequently used function - for example "call forwarding on no reply" using a single keystroke rather than having to enter it by hand. Usually the function is assigned so that you: • activate the function with the first keystroke, • and deactivate the command again with a second keystroke. New Keep the key you want pressed down for approx. 2 seconds.
Personalizing Your Phone Formulating Functions This section explains how to activate an individual function, for example call forwarding, using function commands and how to assign it to a key. ■ Function Commands You can use function commands to define a function to suit your personal requirements. A function can consist of one or more function commands, function codes, and the phone number. You can either carry out a function directly or store it on a function key (select Configurable function). Tab.
Installation and commissioning These sections explain the setup options available with your phone. Equipment provided . . . . . . . . . . . . . . . . . . . . . . . . . . . . . . . . . . . . . . . . . . . . . . . . 66 Options . . . . . . . . . . . . . . . . . . . . . . . . . . . . . . . . . . . . . . . . . . . . . . . . . . . . . . . . . . . . . 66 Connecting a cordless phone . . . . . . . . . . . . . . . . . . . . . . . . . . . . . . . . . . . . . . . . 67 Battery. . . . . . . . . . . . . . . . . . . . . .
Installation and commissioning Equipment provided Cordless phone Battery Charging bay and plug-in power supply unit with country-specific adapters Quick User's Guide and safety information Options Carry strap eud-1093/1.1 – I7.9 – 09.
Installation and commissioning Connecting a cordless phone ■ Connecting the charging bay The phone can be operated without modifying the charging bay. 1. Plug the cable connector into the socket on the underside of the charging bay. 2. Feed the cable through the strain relief provided. 3. Plug the plug-in power adapter into an available socket outlet. Note: Plug designs vary from country to country. ■ Power supply / Plug-in power supply unit The power supply unit is rated for 100 V to 240 V AC (50-60 Hz).
Installation and commissioning Battery Take also note of the safety information on handling the battery set out in Chapter "Dealing with batteries", page 9. ■ Inserting the battery 1. Push the battery cover downwards until it is released from the lock, then take it off. 2. Insert the battery with the contacts downwards. 3. Replace the battery cover and push it upwards until it locks. ■ Charging the battery The batteries are supplied uncharged. To charge the batteries, place the phone in the charging bay.
Installation and commissioning Carry clip or swivel clip ■ Fitting / removing the carry clip or swivel clip The carry clip supplied with the phone is placed on the two openings at the top end of the phone and pressed in until it snaps into place. To remove the carry clip, press the small recesses on the edge of the strap and gently pull the strap apart. The phone can also be equipped with a swivel clip accessory.
Installation and commissioning Logging your phone on ■ Registering your phone on the system Your system administrator has to prepare the system before you can log on your phone. Your phone can be operated on a maximum of 4 different communication systems. To do so, it must be registered on each system. As a rule your phone is registered with the communication system by your system administrator. Contact your system administrator for more information.
Further information The following sections contain more useful information about your phone. Troubleshooting . . . . . . . . . . . . . . . . . . . . . . . . . . . . . . . . . . . . . . . . . . . . . . . . . . . . .72 eud-1093/1.1 – I7.9 – 09.2009 Technical Data . . . . . . . . . . . . . . . . . . . . . . . . . . . . . . . . . . . . . . . . . . . . . . . . . . . . . .
Further information Troubleshooting This section contains a few tips on how to operate your phone if you encounter any problems. ■ Malfunctions The display shows: "System overload" At the moment no connection can be set up via the current system base. The phone is trying to set up a better radio connection with the same or a different system base. This message appears in standby mode only. The display shows: "No System" You have moved out of the coverage area; the radio connection is interrupted.
Further information System and software-related functions You want to activate a feature described in this User’s Guide but the system will not let you. Some systems or system versions do not support all the features. The corresponding text sections are identified by a letter inside square brackets [a]. The list below indicates which system versions support the relevant features. Contact your system administrator for more information. I7.9 [a] x [b] [c] eud-1093/1.1 – I7.9 – 09.
Further information Technical Data ■ Operation Standards DECT, GAP DECT encryption supported Frequency range 1880 MHz up to 1900 MHz Transmitted power 10 mW (average power per channel) Range • up to 300 m outdoors • up to 50 m in indoors ■ Interfaces Headset 2,5 mm jack ■ Battery charge and usage times Battery capacitance 850 mAh lithium-ion (Li-Ion) Operating time, talk time up to 12 hours Operating time, standby up to 100 hours Charging time in the charging bay 2 hours for fully charge
Index %, *,+... D */# Procedures . . . . . . . . . . . . . . . . . . . . . . . . . . . . . . . 64 Dealing with batteries . . . . . . . . . . . . . . . . . . . . . . . . . 9 Deflect . . . . . . . . . . . . . . . . . . . . . . . . . . . . . . . . . . . . . . . 37 Deleting a contact . . . . . . . . . . . . . . . . . . . . . . . . . . . . 59 Dialling . . . . . . . . . . . . . . . . . . . . . . . . . . . . . . . . . . . . . . . 13 Dialling by Name . . . . . . . . . . . . . . . . . . . . . . . . . . . . .
H Organising absences from the desk . . . . . . . . . . . .34 Hands-free mode and Ringing tone (Safety information) . . . . . . . . . . . . . . . . . . . . . . . . . . . . . . . . . . . 8 Hands-free operation . . . . . . . . . . . . . . . . . . . . . . . . . 16 Headset . . . . . . . . . . . . . . . . . . . . . . . . . . . . . . . . . . . . . . 17 P Inserting the battery . . . . . . . . . . . . . . . . . . . . . . . . . . 68 Installation . . . . . . . . . . . . . . . . . . . . . . . . . . . . . . . . . .
Supplementary features . . . . . . . . . . . . . . . . . . . . . . 24 Suppressing your call number . . . . . . . . . . . . . . . . 41 Switching the cordless phone on/off . . . . . . . . . . 45 System busy beep . . . . . . . . . . . . . . . . . . . . . . . . . . . . 47 System dependency . . . . . . . . . . . . . . . . . . . . . . . . . . 73 System Information . . . . . . . . . . . . . . . . . . . . . . . . . . . .7 T Technical Data . . . . . . . . . . . . . . . . . . . . . . . . . . . . . . . 74 Text mode .
Aastra 610d eud-1093/1.1 – I7.9 – 09.
Declaration of Conformity Aastra Technologies Limited hereby declares that the equipment Ascotel® IntelliGate® and the accessories there to comply with the basic requirements and other relevant stipulations of Directive 1999/5/EC. You will find the complete text of the declaration of conformity and other documents for this device and the Ascotel® IntelliGate® communications systems under: Ascotel® and Intelligate® are registered trademarks of Aastra.