
Technical data


I:
~ XLT-X, X17
NOTE: Make sure ‘that threads are clean and
appiy thread sealant to pipe threads and fittings.
1.
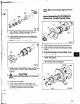
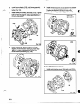
Install oil fill plug (113A), oil drain plug (408A), sight
glass (319), sight oiler plug (408J), 4 oil mist
connection plugs (408H), or grease fittings (193)
and grease relief plugs (113). and oil cooler inlet
and outlet plugs (408L, 408M) in bearing frame
(228A) (Fig. 83).
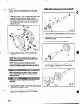
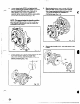
2. Install outboard bearing (112A) on shaft (122)
(Fig. 84).
NOTE: Regmaseable bearing has a single
shield. The outboard bearing is instailed with
shield toward impeller.
NOTE: There are several methods used to -
install bearings, The recommended method is
to use an induction heater that heats as well as
demagne tires the bearings.
Wear Insulated gloves when using a bearing
heater. Bearings will get hot and can cause
physical injury.
Shaft (122) may be heavy. Use care when
handling.
3. Place lock-washer (382) on shaft (122). Place tang of
lockwasher in keyway of shaft.
:p”z,
4. Thread locknut (136) onto shaft (122). Tighten
locknut until snug. Bend any tang of lockwasher
(382) into a slot of locknut.
56
NOTE: Rghten locknut if necessary
to
align the
closest tab of lockwasher with slot on locknut.
Fig. 84
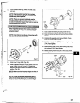
5. Coat outside of outboard bearing (112A) and bore of
bearing housing (134) with oil.
6. Install bearing housing (134) onto shaft/bearing
assembly (Fig. 85).
NOTE: Do not force assembly together.
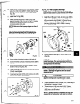
7. Install gasket (36OC), end cover (lOgA), bolts
(371 C). Refer to Table 9 for bolt toroue values.
Check shaft for free turning.
Fig. 86
.