
Technical data

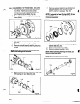

5. Disconnect Coupling.
/r”-.
6. Remove coupling guard pump endplate.
7. if oil lubricated, drain oil from bearing frame by
removing bearing frame drain plug (408A).
Replace plug after oil is drained. Remove oil
reservoir, if equipped (Fig. 21).
NOTE: Oil ana/ysis should be part of a
preventive maintenance program, and is helpful
to determine cause of a failure. Save oil in a
clean container for inspection.
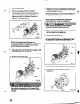
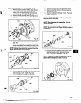
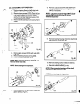
8. Place sling from hoist through frame adapter (108)
or frame (228A) for STX (Fig. 22).
9. Remove bearing frame foot hold down bolts (37OF).
10. Remove casing bolts (370).
Fig. 22
Never apply heat to remove parts. Use of heat
may cause an explosion due to trapped fluid,
resulting in severe physical injury and property
damage.
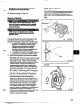
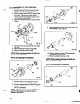
11. Remove back pull-out assembly from casing (100).
Tighten jack screws (418) evenly to remove back
pull-out assembly (Fig. 23).
NOTE: Penetrating oil can be used if adapter to
casing joint is excessively corroded.
NOTE: Remove and then mark shims ftom
under frame foot. Save for reassembly.
Never remove the back pull-out assembly
unassisted, physical iqwy can occur.
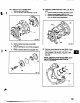
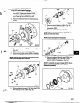
12. Remove casing gasket (351) and discard. (Replace
with new gasket during reassembly.)
13. Remove jack screws (418).
NOTE: Casing gasket (357) may partially adhere
to casing due to binders and adhesives in the
gasket material. Clean all gasket surfaces.
14. Move back pull-out assembly to clean work bench.
15. Support frame adapter (108) securely to
workbench.
Fig. 24
36
_’
..,_ ._ -. -.__.. -r_.