
Technical data
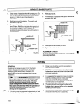

GROUT BASEPLATE
Allow grout to set.
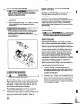
1. Clean areas of baseplate that will contact grout. Do
not use oil-based cleaners because grout will not
bond to it. Refer to grout manufacturer’s
instructions.
4.
5.
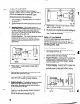
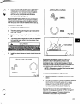
Fill remainder of baseplate with grout. Remove air
as before (Fig. 9B).
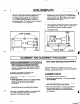
2. Build dam around foundation. Thoroughly wet
foundation (Fig. 9A).
3.
Pour grout through grout hole in baseplate, up to
level of dam. Remove air bubbles from grout as it
is poured by puddling, using a vibrator, or
pumping the grout into place. Non-shrink grout is
recommended.
/.
BASEPLATE
.
4
Fig. 9A
6.
Allow grout to set at least 48 hours.
,
7. Tighten foundation bolts.
ALIGNMENT CHECK
Recheck alignment before continuing, using methods
previously described.
PIPCNG
GENERAL
2.
Guidelines for piping are given in the “Hydraulic
Institute Standards” available from: Hydraulic
Institute, 30200 Detroit Road, Cleveland, OH
44145-l 967 and must be reviewed prior to pump
installation.
3.
4.
Never draw piping into place by forcing at the
flanged connections of the pump. This may
impose dangerous strains on the unit and
cause misalignment between pump and driver-
eipe strain will adversely effect the operation of
the
pump resulting
in physical injury and
damage to the equipment.
n 1. All piping must be supported independently of, and
line up naturally with, the pump flanges.
5.
6.
Piping runs should be as short as possible to
minimize friction losses.
DO NOT connect piping to pump until grout has
hardened and pump and driver hold-down bolts
have been tightened.
It is suggested that expansion loops or joints be
properly installed in suction and/or discharge
lines when handling liquids at elevated
temperatures, so linear expansion of piping will
not draw pump out of alignment.
The piping should be arranged to allow pump
flushing prior to removal of the unit on services
handling corrosive liquids.
Carefully clean all pipe parts, valves and fittings.
and pump branches prior to assembly.
18