
Technical data

,
Id li..
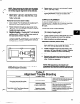
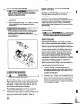
Final Alignment (Hot Alignment)
:f@-
l
After First Run - To obtain correct alignment when
both pump and driver are at operating temperature.
Thereafter, alignment should be checked
periodically in accordance with plant operating
procedures.
NOTE: Alignment check must be made if
process temperature changes, piping changes
and or pump service is performed.
ALIGNMENT CRITERIA
Good alignment is achieved when the dial indicator
readings as specified in the alignment procedure are
.002 in. (.05 mm) Total Indicated Reading (T.I.R.)
or
less when the pump and driver are at operating
temperature (Final Alignment).
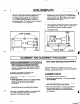
During the installation phase, however, it is necessary
to set the parallel alignment in the vertical direction to
a different criteria due to differences in expansion
rates of the pump and driver. Table 1 shows
recommended preliminary (cold) settings for electric
motor driven pumps based on different pumpage
temperatures. Driver manufacturers should be
consulted for recommended cold settings for other
types of drivers (steam turbines, engines, etc.)
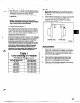
Table 1
Cold Setting of Parallel
Vertical Alignment
PUMPAGE
TEMPERATURE
SI’F (1 O’C)
1 SF (WC)
25o.F (12O’C)
35o.F (175’C)
45O.F (218.C)
5WF (228%)
SET DRIVER SHAFT
.C02in. (.05mm) LOW
.OOlin. (.03mm) HIGH
.OO5in. (.12mm) HIGH
.009in. (.23mm) HIGH
.013in. (.33mm) HIGH
.017in. (&mm) HIGH
SET
UP
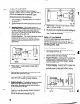
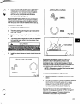
1.
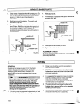
Mount two dial indicators on one of the coupling
halves (X) so they contact the other coupling half
(Y) (Fig. 6).
2. Check setting of indicators bv rotatina couoling half
X to ensure indicators stay
in
contaci;hcith ’
coupling half Y but do not bottom out.. Adjust
indicators accordingly.
P
Fig. 6
MEASUREMENT
1.
To ensure accuracy of indicator readings, always
rotate both coupling halves together so indicators
contact the same point on coupling half Y. This
will eliminate any measurement problems due to
runout on coupling half Y.
2. Take indicator measurements with driver feet
hold-down bolts tightened. Loosen holld down
bolts prior to making alignment corrections.
3. Take care not to damage indicators when moving
driver during alignment corrections.