
Instruction manual


2-24 1. Operation of ZM-300 Main Menu
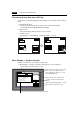
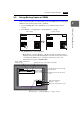
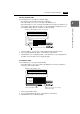
4. Ethernet
The “Ethernet” screen is displayed by pressing the [IP Address (English)] switch on the
initial screen when transferring screen data via Ethernet for the first time, or by pressing the
[Ethernet] switch on the Main Menu screen when transferring screen data to the ZM-300
series. This screen is used for setting the IP address (a number that identifies the ZM-300
series on the network) that is indispensable for Ethernet communications.
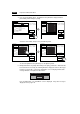
Depending on whether the LAN (10BASE-T) connector at ZM-300(high-performance) or
the network module ZM-80NU/80NU2 for ZM-300 is used, the “Ethernet” screen contents
and the required settings vary as described below.
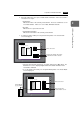
Connection with LAN (10BASE-T) Connector at
ZM-300(high-performance)
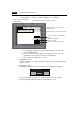
*1 Network Table
Register IP addresses and other information for the ZM-300 series, PLCs or computers that
should be included for Ethernet communications on the ZM-71SE editor. ([System Setting]
→
[Network Table Setting] → [Ethernet] → Edit Network Table) The registered network table can
be used or not used depending on the [Not Use Network Table/Use Network Table] switch.
Return
<-
Ethernet
Not Use Network Table
It is not used when the gate way or the sub-mask is zero.
IP Address:
Gate Way:
Sub-mask:
Port No.
Connect
->
Setting
Finished
00 0
0
0
000
10000
000
0
Cursor switches
[Increment/Decrement] switch for the value
in the cursor position
Determines the setting such as IP address,
and moves back to the Main Menu screen.
Used for checking the 10BASE-T interface.
Normal: Connect
Error: Disconnect
Moves back to the Main Menu screen or
the initial screen.
Selects [Not Use Network Table] or [Use Network Table].
*1
Network table
number