
Instruction manual


Rotary Microtome HM 340 E
Microm International GmbH
part of Thermo Fisher Scientific
Otto-Hahn-Str. 1A
69190 Walldorf / Germany
387831 - English
18
3-2 INITIAL TURN-ON
Note:
The kind of the used examination
materials and all special conditions for
their processing, pre-treatment and, if
necessary, storage as well as instrument controls
for correct and safe operation is in the
responsibility of the operator.
The operator is also responsible for special
equipment and materials and/or reagents for the
operation of the instrument.
Warning:
Before turning on the instrument for the
first time, please check if the power
requirements indicated on the type
plate correspond to the power supply voltage
being used.
The operating panel, which is separately packed,
can be attached to the instrument or used
freestanding. First connect the operating panel
with the instrument:
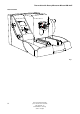
• A control cable (fig. 3.1) is fixed on the back of
the instrument.
• Connect this cable with the connector at the
back of the operating panel.
• Should the operating panel be attached to the
instrument, push the connector through the
corresponding hole (fig. 3.2) on the back of
the microtome.
• Turn the connector 90° and push it through
the hole on the front of the instrument.
• Plug the connector into the operating panel.
Fasten the cable on the panel with the two
screws.
• To clear away the cable, insert it into the
corresponding holders (fig. 3.3) on the back of
the microtome.
• Connect the power cord to the power socket
(fig. 3.4) on the back of the instrument.
• Turn on the power switch (fig. 3.5).
• Then, the specimen holder moves to the back
end position.
• This movement is always carried out when the
instrument is turned on.
• This way, the instrument is calibrated.
• Afterwards, FEED and TRIM are shown on the
display.
• The insert for the two fuses is placed beside
the power switch.
Fig. 3