® M I C R O W AV E O V E N OPERAT I ON M AN U AL ® M ODEL R- 3 3 0 E followed by letter indicating color K=black, W=white CON T EN T S • Precautions to Avoid Possible Exposure to Excessive Microwave Energy ................................ Inside Front Cover • For Customer Assistance ... Inside Front Cover • Consumer Limited Warranty ................... 1 • Product Information Card ........................ 1 • Important Safety Instructions .................. 2 • Unpacking and Installation Instructions..
FOR CUS T OM ER A S S I S TA N CE To aid in reporting this microwave oven in case of loss or theft, please record below the model number and serial number located on the unit. We also suggest you record all the information listed and retain for future reference. Please provide the following information when you write or call: model number, serial number, date of purchase, your complete mailing address (including zip code), your daytime telephone number (including area code) and description of the problem.
CON S UM ER L I M I T ED WA RRA N T Y SHARP ELECTRONICS CORPORATION warrants to the first consumer purchaser that this Sharp brand product (the “Product”), when shipped in its original container, will be free from defective workmanship and materials, and agrees that it will, at its option, either repair the defect or replace the defective Product or part thereof with a new or remanufactured equivalent at no charge to the purchaser for parts or labor for the period(s) set forth below.
I M P ORTA N T S A FET Y I N S T RUCT I ON S When using electrical appliances basic safety precautions should be followed, including the following: WARN I N G - To reduce the risk of burns, electric shock, fire, injury to persons or exposure to excessive microwave energy: 1. Read all instructions before using the appliance. 12. Do not store or use this appliance outdoors. Do not use this product near water—for example, near a kitchen sink, in a wet basement or near a swimming pool, and the like. 2.
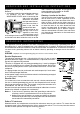
UN PA CK I N G A N D I N S TA L L AT I ON I N S T RUCT I ON S Unpacking and Examining Your Oven Remove: 1. all packing materials from inside the oven cavity; however, DO NOT REMOVE THE WAVEGUIDE COVER, which is located on the right cavity wall. Read enclosures and SAVE the Operation Manual. 2. the feature sticker, if there is one, from the outside of the door.
I N FORM AT I ON Y OU N EED T O K N OW ABOU T Y OU R OV EN may hear the magnetron cycling on and off. It is normal for the exterior of the oven to be warm to the touch when cooking or reheating. This Operation Manual is valuable: read it carefully and always save it for reference. A good microwave cookbook is a valuable asset. Check it for microwave cooking principles, techniques, hints and recipes. See pages 25 and 26 for ordering the Ultimate Accessory, the SHARP CAROUSEL MICROWAVE COOKBOOK.
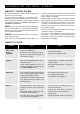
I N F O R M A T I O N Y O U N E E D T O K N O W ABOU T U T EN SI LS AN D COV ERI N GS The following coverings are ideal: It is not necessary to buy all new cookware. Many pieces already in your kitchen can be used successfully in your new microwave oven. Make sure the utensil does not touch the interior walls during cooking. • Paper towels are good for covering foods for reheating and absorbing fat while cooking bacon. • Wax paper can be used for cooking and reheating.
I N F O R M A T I O N Y O U N E E D T O K N O W ABOU T M I CROWAV E COOK I N G • Arrange food carefully. Place thickest areas towards outside of dish. • Rearrange foods such as meatballs halfway through cooking both from top to bottom and from the center of the dish to the outside. • Watch cooking time. Cook for the shortest amount of time indicated and add more as needed. Food severely overcooked can smoke or ignite. • Add standing time. Remove food from oven and stir, if possible.
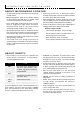
PA RT N A M ES M I CROWAV E OV EN PART S 5 10 9 13 8 6 4 1 12 7 3 2 11 3 1 Door handle Pull to open door. 8 Removable turntable Place the turntable on the turntable support securely. The turntable will rotate clockwise or counterclockwise. Only remove for cleaning. 2 Oven door with see-through window 3 Safety door latches The oven will not operate unless the door is securely closed.
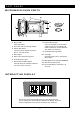
P A R T N A M E S R-3 3 0 E 2 3 -2 4 1 0 -1 4 1 7 -1 8 1 7 -1 8 1 8 -2 1 1 5 -1 6 16 1 8 -2 1 9 ,2 3 22 21 9 ,2 3 9 9 ,2 2 Number next to the control panel illustration indicates page on which there are a feature description and usage information.
B EFORE OP ERAT I N G M A N UA L OP ERAT I ON • Before operating your new microwave oven make sure you read and understand this operation manual completely. • Before the oven can be used, follow these procedures: T I M E COOK I N G Your oven can be programmed for 99 minutes 99 seconds (99.99). Always enter the seconds after the minutes, even if they are both zeros. • Suppose you want to cook for 5 minutes at 100%. 1. Plug in the oven. Close the door.
S EN S OR COOK I N G Covering Foods: Sharp's Sensor is a semi-conductor device that detects the vapor (moisture and humidity) emitted from the food as it heats. The sensor adjusts the cooking times and power level for various foods and quantities. Some foods work best when covered. Use the cover recommended in the chart for these foods. 1. Casserole lid. Using Sensor Settings: 2. Plastic wrap: Use plastic wrap recommended for microwave cooking.
S E N S O R C O O K I N G SEN SOR COOK I N G CH ART FOOD P ROCEDURE A M OUN T 1 package Popcorn Use only popcorn packaged for microwave oven use. Try several brands to decide which you like the best. Do not try to pop unpopped kernels. Touch Popcorn pad and number 1 pad for Regular size. Press Start pad. Touch Popcorn pad and number 2 pad for Snack size. Press Start pad. 2.85 - 3.5 oz (Regular/Regular light) 1.5 - 1.
S E N S O R C O O K I N G SEN SOR COOK I N G CH ART (continued) FOOD A M OUN T Poultry: Boneless .5 - 1.5 lb Use boneless breast of chicken or turkey. Cover with vented plastic wrap. Touch Poultry, number 1 and Start pads. When oven stops, rearrange. Re-cover and touch Start pad. After cooking, let stand, covered, 3-5 minutes. Poultry should be 160°F. .5 - 3.0 lb Arrange pieces with meatiest portions toward outside of glass dish or microwave safe rack. Cover with vented plastic wrap.
S E N S O R C O O K I N G SEN SOR COOK I N G RECI PES (continued) Shrim p Pa st a Sa uc e 1 2 1 1/2 1/2 Makes 4 servings 1 1 pound of shrimp, peeled and deveined cups canned tomato puree tablespoon tomato paste cup thinly sliced fresh basil leaves teaspoon oregano cup thinly sliced scallions (about 2 bunches) clove of garlic, minced salt and pepper to taste Parmesan cheese 1 Place shrimp in 2-quart, covered casserole. 2 Microwave using Fish/seafood. Drain and set aside.
S E N S O R C O O K I N G SEN SOR COOK I N G RECI PES (continued) M e x ic a n Se a sone d Pot a t oe s 4 1/4 1 1/2 Makes 6 to 8 servings medium baking potatoes (8 ounces each) cup olive oil tablespoon instant minced onion teaspoon chili powder 1/2 teaspoon oregano leaves 1/4 teaspoon ground cumin 1/2 teaspoon salt 1 Cut each potato lengthwise into 4 equal wedges. Place potato wedges into 10-inch square casserole. Toss potatoes with oil to coat well. 2 In small bowl, combine remaining ingredients.
L ET ’ S COOK Your oven has 6 convenience pads to assist with meal preparation. There are some foods in the Breakfast, Lunch, 15 Minute Recipes and From the Pantry that use the sensor. See the sensor cooking information on page 10. For foods not using the sensor, follow the directions in the Interactive Display to enter quantity. DEFROST CEN T ER The oven will stop so the food can be checked.
L E T ’ S C O O K COM PU DEFROST FOOD (continued) P ROCEDURE A M OUN T 2.0 - 4.0 lb 7. Roast 8. Casserole/Soup Start defrosting with fat side down. After each stage, turn roast over and shield the warm portions with aluminum foil. Let stand, covered, for 30 to 60 minutes. 1 - 6 cups After audible signal, stir if possible. At end, stir well and let stand, covered, for 5 to 10 minutes.
L E T ’ S C O O K BREAK FAST AN D LU N CH Breakfast and Lunch are for cooking and heating popular foods that take a short amount of time. • Suppose you want to use Breakfast to cook 2 servings of hot cereal. N OT E: P ROCEDURE DI S P L AY 1. The rolls/muffins setting has 2 choices. Follow directions in the Interactive Display to choose option. SEE SELECT Breakfast LABEL FOOD 1 2. Breakfast can be programmed with More or Less Time Adjustment. Touch the Power Level pad once Touch Breakfast pad.
L E T ’ S C O O K LU N CH CH ART FOOD 1. Meal in a Cup ★ 2. Hot Dogs in Buns ★ ★ It is not necessary to enter quantity. A M OUN T P ROCEDURE 1 (6 - 8 oz) This setting is ideal for individual portions of canned food packed in a small microwaveable container. Remove inner metal lid and replace outer microwaveable lid. Stir after cooking. Place hot dog in bun. Wrap each with paper towel or napkin. 1-4 3. Soup ★ 1 - 4 cups Place in bowl or casserole. Cover with lid or plastic wrap.
L E T ’ S C O O K 2 . H AWAI I AN PORK 1. Place in 3-quart casserole: 1 tablespoon oil 1 pound boneless pork loin, cut into 1-inch strips, seasoned with salt and pepper Stir well and cover. Touch 15 Minute Recipes, number 2 to select HAWAIIAN PORK and then touch Start. 2. Combine well in a large bowl: 1 cup peach or apricot preserves 1/4 cup barbecue sauce 2 tablespoons soy sauce 2 tablespoons cornstarch 1 cup coarsely chopped onions At pause, add preserves/barbecue sauce mixture and stir together well.
L E T ’ S C O O K FROM T H E PAN T RY (Recipes serve 6) 1 . BEEF WRAPS 1. Place in a 2-quart casserole: 1 pound ground beef Break apart and cover. Touch From the Pantry, number 1 to select BEEF WRAPS and then touch Start. 2. At pause, drain fat and break ground beef into small pieces. Add to casserole: 1 10-ounce package frozen chopped spinach, thawed and drained 1 1/2 cups salsa 1-3 teaspoons chili powder Stir together well. Re-cover. Touch Start. 3.
L E T ’ S C O O K 5 . GARDEN M EDLEY 1. Place in 2 1/2-quart casserole: 1 pound peeled baking potatoes, cut into eighths and thinly sliced 1 14 1/2-ounce can diced tomatoes 2 teaspoons minced garlic 1 teaspoon thyme leaves Cover with a lid. Touch From the Pantry, number 5 to select GARDEN MEDLEY and then touch Start. 2. At pause, stir well and add: 1 16-ounce package frozen stir fry mixed vegetables 2 cups thinly sliced summer squash Re-cover. Touch Start. 3.
O T H E R C O N V E N I E N T F E A T U R E S M AN U AL DEFROST M I N U T E PLU S If the food that you wish to defrost is not listed on the DEFROST CENTER CHART or is above or below the limits in the “Amount” column on the DEFROST CENTER CHART, you need to defrost manually. You can defrost any frozen food, either raw or previously cooked, by using 30% Power Level. See page 9. Estimate defrosting time and press Power Level pad 8 times when you select the power level.
O T H E R C O N V E N I E N T F E A T U R E S T I M ER CU ST OM H ELP • Suppose you want to time a 3-minute long distance phone call. Custom Help provides 4 features which make using your oven easy because specific instructions are provided in the interactive display. P ROCEDURE 1 Touch Timer pad and number pad 1 . Timer Clock 2 Enter time. 3 3 Touch Timer pad. The Timer will count down. 0 1. CHILD LOCK 1 The Child Lock prevents unwanted oven operation such as by small children.
O T H E R C O N V E N I E N T F E A T U R E S • Touch number 4 pad for language and standard of weight. N OT E: 1. Auto Start can be used for manual cooking if clock is set. 2. If the oven door is opened after programming Auto Start, it is necessary to touch the Start pad for Auto Start time to appear in the readout so that the oven will automatically begin programmed cooking at the chosen Auto Start time. 3. Be sure to choose foods that can be left in the oven safely until the Auto Start time.
S ERV I CE CA L L CHECK Please check the following before calling for service: Place one cup of water in a glass measuring cup in the oven and close the door securely. Operate the oven for one minute at HIGH 100%. A Does the oven light come on? YES _______ NO _______ B Does the cooling fan work? (Put your hand over the rear ventilating openings.) YES _______ NO _______ C Does the turntable rotate? (It is normal for the turntable to turn in either direction.
S P ECI FI CAT I ON S AC Line Voltage: Single phase 120V, 60Hz, AC only AC Power Required: 1640W 14.2 amps. Output Power: ★ 1200W (IEC Test Procedure) Microwave Frequency: 2450 MHz Outside Dimensions: 201/2"(W) x 117/8"(H) x 171/8"(D) Cavity Dimensions: 143/4"(W) x 8 3/4"(H) x 153/4"(D) Oven Capacity: 1.2 Cu.Ft. Cooking Uniformity: Turntable system Weight: Approx. 35 lb ★ The International Electrotechnical Commission’s standardized method for measuring output wattage.
GUI A A UT O- T OUCH BREAK FAST 1 5 M I N U T E RECI PES (DESAY U N O) (RECET AS RAPI DAS EN 1 5 M I N U T OS) 1 Toque el botón Breakfast. 2 Seleccione la comida deseada. (Ej: toque el botón número 3 para cereales calientes.) 3 Toque el botón número 2 para dos raciones. 4 Toque el botón Start. 3 2 Start Touch On A L I M EN T O CAN TI DAD 1. Huevos revueltos 2. Toino 3. Cereal caliente 4. Calentar pan fresco 5.
GUI A A UT O- T OUCH Si desea leer información más completa y precauciones de seguridad para el manejo del horno, consulte el manual de operaciones. PARA FI J AR LA H ORA OPERACI ON M AN U AL Si en la pantalla se lee SHARP SIMPLY THE BEST PRESS CLEAR AND PRESS CLOCK toque primero Stop/Clear. Cocción de Alta Potencia Timer Clock 1 Toque Clock y el número 2 . 1 Oprima los botones numéricos para determinar el tiempo de cocción. (Ej: 1 min. 30 seg.
A UT O- T OUCH GUI DE 1 5 M I N U T E RECI PES BREAK FAST 1 Touch Breakfast pad. 1 Touch 15 Minute Recipes pad. Breakfast 2 Select desired food. (Ex: touch number 3 pad for hot cereal.) 3 Enter the quantity if necessary. (Ex: touch number 2 pad for 2 servings.) 2 4 Touch Start pad. BREAK FAST CH ART FOOD 2 Select desired recipe. (Ex: touch number 2 pad for Hawaiian pork.) 3 R E C I P E S (All are for 6 servings) A M OUN T 1. Saucy Chicken 2. Hawaiian Pork 1. Scrambled Eggs 1 - 9 eggs 2.
A UT O- T OUCH GUI DE For more complete information and safety precautions, refer to your Operation Manual. SET CLOCK M AN U AL OPERAT I ON High Power Cooking If SHARP SIMPLY THE BEST PRESS CLEAR AND PRESS CLOCK is in the display, first touch Stop/Clear pad. Timer Clock 1 Touch Clock pad and number 2 pad. 2 Enter correct time of the day by touching numbers in sequence. (Ex: 12:30) 1 Enter cooking time by touching number pads. (Ex: 1 min. 30 sec.