
Service manual


___________________________________________________________________________ Section 4
4-7
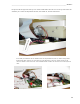
Battery Removal
Once the top cover is removed, the battery can be accessed for replacement if needed. Make sure that the battery
fuse has been removed.
Locate the battery, item number 11, near the front of the unit.
Slide the cable connections off of the battery.
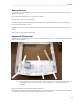
The battery is attached to the unit using double-sided tape, using a flat blade screwdriver gently pry the battery
loose from the bottom plastic chassis.
Install the new battery in the same location using double sided tape, item number 49, and reconnect the battery
cables.
Replace the cover and install the battery fuse.
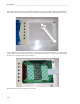
Keyboard/LCD Removal
With the top cover removed flip the cover over to access the inside of the top cover and locate the mounting screws
for the keyboard and LCD.
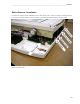
Note: 5 of the mounting screws are item number 13. The remaining screw, at the noted location is item 44
and is shorter than the other screws. This becomes important when reinstalling the keyboard
assembly.
Remove the mounting screws from the underside of the cover.
The keyboard assembly can then be removed from the top cover. The picture below shows the keyboard assembly
removed from the top cover and the Keyboard/LCD cable, item 34, removed.