REPLACEMENT WARRANTY Microwave Oven Congratulations on Your Purchase! This Sharp product is warranted against faults in material and manufacture for the period as stated in the table below. Should you need to make a claim against this warranty please take your product back to the place of purchase.
WARNINGS IMPORTANT SAFETY INSTRUCTIONS: READ CAREFULLY AND KEEEP FOR FUTURE REFERENCE. a. Do not overcook food. b. Remove wire twist ties from paper or plastic bags before placing bag in the oven. c. Do not heat oil or fat for deep frying. The temperature of the oil cannot be controlled. d. Look at the oven from time to time when food is heated in disposable containers made of plastic, paper or other combustible e.
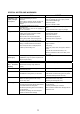
SPECIAL NOTES AND WARNINGS DO Eggs, fruits, vegetables, nuts, seeds, sausages and oysters Popcorn Baby food DON’T * Puncture egg yolks and whites and oysters before cooking to prevent “explosion”. * Pierce skins of potatoes, apples, squash, hot dogs, sausages and oysters so that steam escapes. * Cook eggs in shells. This prevents “explosion”, which may damage the oven or injure yourself. Use specially bagged popcorn for the microwave oven.
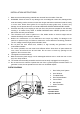
INSTALLATION INSTRUCTIONS 1. 2. Make sure that all the packing materials are removed from the inside of the door. WARNING: Check the oven for any damage, such as misaligned or bent door, damaged door seals and sealing surface, broken or loose door hinges and latches and dents inside the cavity or on the door, broken wave guide. Do not remove the wave guide cover. If there is any damage, do not operate the oven and contact SERVICE CENTRE APPROVED BY SHARP. 3.
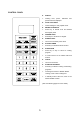
CONTROL PANEL z DISPLAY ¾ Cooking time, power, indicators and present time are displayed. z AUTO COOK PADS ¾ Instant settings to cook popular foods. z REHEAT & DEFROST ¾ Press key to defrost food and Reheat z NUMBER PADS beverage & pizza. ¾ Press keys to set times or weights. z POWER LEVEL ¾ Use to set microwave power level. z KITCHEN TIMER ¾ Press key to set kitchen timer function. z STOP/CLEAR ¾ Press key to stop or cancel a cooking program.
HOW TO SET THE OVEN CONTROLS Each time a button is touched, a beep will sound to acknowledge the touch. SETTING THE CLOCK This is a 12-hour cycle clock. 1. Press CLOCK button once. 2. Press number pads to enter time. 3. Press Clock button to confirm. NOTE: During the cooking, press the CLOCK button, the clock time and “CLOCK” will display 5 seconds. MICROWAVE COOKING For microwave cooking, the longest cooking time is 99 minutes and 99 seconds. You can select power level by pressing the POWER LEVEL button.
HOW TO SET THE OVEN CONTROLS (continued) QUICK START COOKING Use this feature to program the oven to microwave food at 100% power conveniently. Place food into oven, and close the door. Press START/AUTO MINUTE in quick succession to set the cooking time, the oven will start automatically. The longest cooking time you can set is 99 minutes and 59 seconds. AUTO WEIGHT DEFROST Suppose you want to defrost 100g mince. 1.
HOW TO SET THE OVEN CONTROLS (continued) AUTO COOK To Select press desired Menu button. For example, to cook two units of jacket potato. 1. Place food into oven, and close the door. 2. Press the JACKET POTATO pad once. “ENTER” and “1” display. 3. Press JACKET POTATO a number of times to enter the number of servings. 4. Press START/AUTO MINUTE pad to confirm. AUTO COOK MENUS: Food Cooking Procedure FRESH VEGETABLES Wash vegetables & place in a large microwave safe glass bowl.
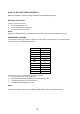
MANUAL COOKING CHARTS Defrost Times for Meat, Poultry, Bread and Pies 1. Remove wrapping and place frozen item on a shallow, Microwave safe plastic defrost rack. If necessary, shield thin areas with aluminum foil to prevent the item from cooking while defrosting 2. Defrost by following the steps in the “Microwave Time” column. 3. Set the microwave to 30% power. 4.
Frozen Vegetable Chart 1. Place vegetables in a medium/large microwave safe bowl and cover with plastic wrap. 2. Halfway through cooking, stir the vegetables to ensure even cooking. 3. Allow to stand for 2 minutes before draining any water and serving.
Fresh Vegetable Chart 1. Cover required dishes with plastic wrap or a lid. 2. Drain any remaining water after standing before serving.
Reheating/Defrosting Convenience Food Chart FOOD WEIGHT Beverage (room temp.) 250mL per cup Canned Food (room temp.) (e.g. Spaghetti, Baked Beans) Canned Soup (room temp) 250mL per cup (thin soup) Meat Pie (refrigerated) Individual 180g each Frozen Rice/Pasta Dinners (e.g.
BEFORE YOU CALL FOR SERVICE If you think the oven is not working properly there are some simple checks you can carry out yourself before calling for service: 1. Check to ensure that the oven is plugged in securely. If it is not, remove the plug from the outlet, wait 10 seconds, and plug it in again securely. 2. Check for a blown circuit fuse or a tripped main circuit breaker. If these seem to be operating properly, test the outlet with another appliance. 3.
UTENSILS GUIDE 1. 2. 3. 4. The ideal material for a microwave utensil is transparent to microwave, it allows energy to pass through the container and heat the food. Microwave cannot penetrate metal, so metal utensils or dishes with metallic trim should not be used. Do not use recycled paper products when microwave cooking, as they may contain small metal fragments which may cause sparks and/or fires. Round /oval dishes rather than square/oblong ones are recommend, as food in corners tends to overcook.
CLEANING AND CARE Disconnect the power supply cord before cleaning or leave the door open to inactivate the oven . CLEAN THE OVEN AT REGULAR INTERVALS - Keep the oven clean and remove any food deposits or it could lead to deterioration of the surface. This could adversely affect the life of the appliance and possibly result in a hazardous situation. Exterior: The outside may be cleaned with mild soap and warm water, wipe clean with a damp cloth. Avoid the use of harsh abrasive cleaners.
SPECIFICATIONS Input Power Consumption: Output Power (MWO): Operation Frequency: Outside Dimensions: Oven Cavity Dimensions: Cooking Uniformity: Net Weight: 230V-240V~50Hz, 1200W(Microwave) 800W* (IEC Test Procedure) 2450MHz (Class B/Group 2)** 262mm(H)×452mm(W)×342mm(D) 173mm(H)×280mm(W)×293mm(D) Turntable System Approx.12 kg * When tested in accordance with AS/NZS 2895.