
Operation Manual


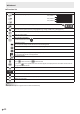
Table Of Contents
- IMPORTANT INFORMATION
- DEAR SHARP CUSTOMER
- SAFETY PRECAUTIONS
- TIPS AND SAFETY INSTRUCTIONS
- MOUNTING PRECAUTIONS
- Supplied Components
- System Requirements
- Part Names
- Connecting Peripheral Equipment
- Connecting the Power Cord
- Binding Cables
- Preparing the Remote Control Unit
- Mounting a web camera
- Attaching the wireless adapter
- Turning Power On/Off
- Touch Pen
- Touch action
- Basic Operation
- Whiteboard
- Bytello Share
- PDF Viewer
- File Explorer
- Web Browser
- Updating the Software (Update)
- Common Settings Menu
- Administrator Settings Menu
- Reset/Functional Restriction Setting (FUNCTION Menu)
- Controlling the Monitor with a computer (RS-232C)
- Troubleshooting
- Specifications
- Intellectual Property Rights and Other Matters
- Mounting Precautions (For SHARP dealers and service engineers)

24
E
Basic Operation
Using the remote control unit
1
2
3
4
5
6
7
8
9
10
11
12
13
14
15
16
17
18
19
20
1. HDMI
Switch the input mode to HDMI1, HDMI2 or HDMI3.
2. Numeric input buttons
These buttons are used for setting such as LAN setting.
3. MUTE
Turns off the volume temporarily.
Press the MUTE button again to turn the sound back to the
previous level.
4. MODE (Color mode selection)
In video input mode (other than “APPLICATION”), the color
mode changes.
The menu is displayed.
Press the
or button to select the color mode.
• High Illuminance is a display with colors suited to bright
locations.
5. VOLUME +/- (Volume adjustment)
Press + or - to adjust the volume.
6. INFORMATION
Displays monitor information.
X.X.X
XXXXXXXX
XXXX-XXXXXX-XX-XXXX
XXXXXXXX
XXX.XXX.XXX.XXX
XXX.XXX.XXX.XXX
XXX.XXX.XXX.XXX
XX:XX:XX:XX:XX:XX
XX:XX:XX:XX:XX:XX
The display changes from “Information1” → “Information2” →
clear display, and so on every time you press this button.
When displaying “Information”, the display changes from
“Information1” → “Information2” → “Information1”, and so on
every time you press the
button.
Pressing the RETURN button disappears the display.
• The display disappears automatically after about 15
seconds.
7. FUNCTION
Use this to display the FUNCTION menu. (See page 50.)
8. ENTER
Confirms the setting.
9. FREEZE
Freezes the video shown on the monitor. (See page 28.)
In some cases a residual image may occur. Do not freeze the
video for a long time.