
Operation Manual


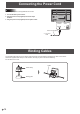


Table Of Contents
- IMPORTANT INFORMATION
- DEAR SHARP CUSTOMER
- SAFETY PRECAUTIONS
- TIPS AND SAFETY INSTRUCTIONS
- MOUNTING PRECAUTIONS
- Supplied Components
- System Requirements
- Part Names
- Connecting Peripheral Equipment
- Connecting the Power Cord
- Binding Cables
- Preparing the Remote Control Unit
- Mounting a web camera
- Attaching the wireless adapter
- Turning Power On/Off
- Touch Pen
- Touch action
- Basic Operation
- Whiteboard
- Bytello Share
- PDF Viewer
- File Explorer
- Web Browser
- Updating the Software (Update)
- Common Settings Menu
- Administrator Settings Menu
- Reset/Functional Restriction Setting (FUNCTION Menu)
- Controlling the Monitor with a computer (RS-232C)
- Troubleshooting
- Specifications
- Intellectual Property Rights and Other Matters
- Mounting Precautions (For SHARP dealers and service engineers)

20
E
Touch Pen
Pen tip (thin)
Pen tip (thick)
The following software recognizes the side of the touch pen that is touching the screen, enabling the two sides to be used as
different pens.
• Whiteboard
For details on how to use the touch pen in Whiteboard, refer to “Whiteboard” (see page 29).
TIPS
• In the case of an Overlay board (See page 27.), multiple touch pens can be used simultaneously. In other cases, multiple
touch pens cannot be used simultaneously.
• When multiple touch pens are used on an Overlay board (See page 27.), lines may break.
- When touched simultaneously.
- When touch pens are moved near each other.
• If the pen tip becomes worn or damaged, replace the touch pen. To purchase a new touch pen, consult your dealer.
The supplied touch pen is attached to this monitor.
TIPS
• Do not attach anything other than the supplied touch pen.
• Magnet is used to attach the supplied touch pen. Do not move close watch or magnetic card to it.