
Operation Manual


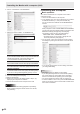


Table Of Contents
- IMPORTANT INFORMATION
- DEAR SHARP CUSTOMER
- SAFETY PRECAUTIONS
- TIPS AND SAFETY INSTRUCTIONS
- MOUNTING PRECAUTIONS
- Supplied Components
- System Requirements
- Part Names
- Connecting Peripheral Equipment
- Connecting the Power Cord
- Binding Cables
- Preparing the Remote Control Unit
- Removing the Handles
- Mounting a web camera
- Turning Power On/Off
- Touch Panel / Touch Pen Preparations
- Touch action
- Basic Operation
- Menu Items
- Initialization (Reset)/Functional Restriction Setting (FUNCTION)
- Controlling the Monitor with a computer (RS-232C)
- Controlling the Monitor with a computer (LAN)
- Troubleshooting
- Specifications
- Mounting Precautions (For SHARP dealers and service engineers)

51
E
Controlling the Monitor with a computer (RS-232C)
Function
Command Direction
Parameter Reply Control/Response contents *
AUDIO
OPTION
SPEAKER SELECT
SPSL WR 0-1 0-1
0: Internal speaker, 1: External speaker
○
AUDIO OUTPUT
AOUT WR 0-2 0-2
0: VARIABLE1, 1: FIXED, 2: VARIABLE2
AUDIO INPUT LEVEL
AIVP WR 0-1 0-1
0: 1.0Vrms, 1: 0.5Vrms
MONAURAL AUDIO
MONO WR 0-1 0-1
0: OFF, 1: ON
TOUCH INPUT
SELECT
BOTTOM USB
(Long side)
USCB WR
0-6, 8 0-6, 8
0: INVALID, 1: BOTTOM INPUT TERM. (Long side), 2: DisplayPort1, 3: HDMI1,
4: HDMI2, 5: HDMI3, 6: D-SUB, 8:DisplayPort2
SIDE USB (Short side) USCS WR
0-6, 8 0-6, 8
0: INVALID, 1: SIDE INPUT TERM. (Short side), 2: DisplayPort1, 3: HDMI1,
4: HDMI2, 5: HDMI3, 6: D-SUB, 8:DisplayPort2
START INPUT MODE SUIM
WR 1-5, 7, 10-11 1-5, 7, 10-11
1: LAST INPUT MODE, 2: DisplayPort1, 3: HDMI1, 4: HDMI2, 5: HDMI3,
7: D-SUB, 10:OPTION (valid when you have used the expansion slot to expand
the functions), 11:DisplayPort2
COMMUNICATION
SETTING
RS-232C/LAN
SELECT
CTLS WR
0-1 0-1
0: RS-232C, 1: LAN
●
BAUD RATE BAUD WR
0-2 0-2
0: 9600bps, 1: 19200bps, 2: 38400bps
○
Crestron Connected CRCN WR
0-1 0-1
0: OFF, 1: ON
REMOTE No. RCNO WR 0-9 0-9 Sets the number of the remote control unit.
MONITOR menu
Function
Command Direction
Parameter Reply Control/Response contents *
PORTRAIT/LANDSCAPE INSTALL STDR WR 0-1 0-1 0: LANDSCAPE, 1: PORTRAIT
○
HORIZONTAL INSTALLATION MLAY WR 0-1 0-1 0: OFF, 1: FACE UP*
OSD H-POSITION OSDH WR 0-100 0-100
OSD V-POSITION OSDV WR 0-100 0-100
OPERATION MODE FNCM WR 0-1 0-1 0: MODE1, 1: MODE2
POWER SAVE MODE STBM WR 0-1 0-1 0: OFF, 1: ON
OFF IF NO OPERATION ATOF WR 0-1 0-1 0: OFF, 1: ON
TIME AOFT WR 1-12 1-12 1-12: 1-12 hours
POWER ON DELAY PODS WR 0-1 0-1 0: OFF, 1: ON
INTERVAL PWOD WR 1-60 1-60 1-60: 1-60 seconds
SELF ADJUST AADJ WR 0-1 0-1 0: OFF, 1: ON
START TIMING AADD WR 10-200 10-200 10: 1 second through 200: 20 seconds
TOUCH OUTPUT
INVALID DISP.
TOUCH OUTPUT
INVALID ICON
TOPI WR 0-1 0-1 0: OFF, 1: ON
CHANGE DISPLAY
POSITION
TOIP WR 0-3 0-3 0: UPPER RIGHT, 1: UPPER LEFT, 2: LOWER RIGHT, 3: LOWER LEFT
TOUCH OPERATION MODE TOMD WR 0-1, 3 0-1, 3 0: AUTO, 1: MULTI-TOUCH MODE, 3: SINGLE-TOUCH MODE
“ERR” when the touch panel is not connected.
-
TOUCH PANEL MODE GMDP WR 0-1 0-1 0: OFF, 1: ON (When the input mode is HDMI, D-SUB[RGB], DisplayPort,
OPTION)
○
PALM CANCEL MODE PARE WR 0-1 0-1 0: OFF, 1: ON
* This monitor should not be mounted flat or used as a touch table type installation. Please consult an authorized SHARP dealer before considering any type of flat installation (when the monitor
is tilted more than 20 degrees upward from the perpendicular in relation to a level surface), and find out about the mandatory flat mounting instructions.