
Operation Manual


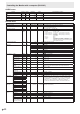
Table Of Contents
- IMPORTANT INFORMATION
- DEAR SHARP CUSTOMER
- SAFETY PRECAUTIONS
- TIPS AND SAFETY INSTRUCTIONS
- MOUNTING PRECAUTIONS
- Supplied Components
- System Requirements
- Part Names
- Connecting Peripheral Equipment
- Connecting the Power Cord
- Binding Cables
- Preparing the Remote Control Unit
- Removing the Handles
- Mounting a web camera
- Turning Power On/Off
- Touch Panel / Touch Pen Preparations
- Touch action
- Basic Operation
- Menu Items
- Initialization (Reset)/Functional Restriction Setting (FUNCTION)
- Controlling the Monitor with a computer (RS-232C)
- Controlling the Monitor with a computer (LAN)
- Troubleshooting
- Specifications
- Mounting Precautions (For SHARP dealers and service engineers)

50
E
Controlling the Monitor with a computer (RS-232C)
AUDIO menu
Function
Command Direction
Parameter Reply Control/Response contents *
TREBLE AUTR WR -5-5 -5-5
○
BASS AUBS WR -5-5 -5-5
BALANCE AUBL WR -10-10 -10-10
RESET ARST W 3 -
SETUP menu
Function
Command Direction
Parameter Reply Control/Response contents *
DATE/TIME SETTING DATE WR AABBCCDDEE AABBCCDDEE AA: Year, BB: Month, CC: Day, DD: Hour, EE: Minute
○
DATE DISPLAY FORMAT DTFT WR
0-2 0-2
0: YYYY/MM/DD, 1: MM/DD/YYYY, 2: DD/MM/YYYY
YYYY: Year, MM: Month, DD: Day
TIME DISPLAY FORMAT TMFT WR
0-1 0-1
0: 24-HOUR TIME, 1: 12-HOUR TIME
SCHEDULE SC01-
SC08
WR ABCDEFFGGH ABCDEFFGGH Schedule of a specied number
A: Schedule 0= Not effective, 1 = Effective
B: Power 0 = OFF, 1 = ON
C: Day of the week 1 0 = Only once, 1 = Every week, 2 = Every day
D: Day of the week 2 0 = Sunday, 1 = Monday through 6 = Saturday,
9 = Not exist
E: Day of the week 3 0 = Sunday, 1 = Monday through 6 = Saturday,
9 = Not exist
F: Hour 00-23
G: Minute 00-59
H: Input 0 = Not specied, 1 = HDMI1, 2 = HDMI2, 3 = HDMI3,
4 = D-SUB, 6 = DisplayPort1, 7=DisplayPort2,
8=OPTION (valid when you have used the expansion
slot to expand the functions)
SCHEDULE BRIGHTNESS SB01-
SB08
WR 0-31 0-31 Screen brightness to change
99 99 Disable brightness setting
LANGUAGE LANG WR 14 14 ENGLISH
1 1 DEUTSCH
2 2 FRANÇAIS
3 3 ITALIANO
4 4 ESPAÑOL
5 5 РУССКИЙ
6 6
INPUT SELECT D-SUB SLDS WR 0-1 0-1 0:RGB, 1:COMPONENT
HDMI CEC LINK
CELK WR 0-1 0-1 0: OFF, 1: AUTO
AUTO POWER ON
ATPO WR 0-1 0-1 0: OFF, 1: ON
HDMI AUTO VIEW
(HDMI1)
HDAW WR 0-1 0-1 0: OFF, 1: ON
HDMI AUTO VIEW
(HDMI2)
H2AW WR 0-1 0-1 0: OFF, 1: ON
HDMI AUTO VIEW
(HDMI3)
H3AW WR 0-1 0-1 0: OFF, 1: ON
HDMI AUTO VIEW
(
OPTION
)
OPAW WR 0-1 0-1 0: OFF, 1: ON
(valid when you have used the expansion slot to expand the functions)
DisplayPort STREAM
(DisplayPort1)
DPST WR 0, 2 0, 2 0: SST1, 2: SST2
-
DisplayPort STREAM
(DisplayPort2)
DPS2 WR 0-2 0-2 0: SST1, 1: MST, 2: SST2
HDMI MODES
(HDMI1)
HD1M WR 0-1 0-1 0: MODE1, 1: MODE2
HDMI MODES
(HDMI2)
HD2M WR 0-1 0-1 0: MODE1, 1: MODE2
HDMI MODES
(HDMI3)
HD3M WR 0-1 0-1 0: MODE1, 1: MODE2
INPUT MODE
NAME
DisplayPort1
INDP WR 0-30 0-30 0: NO SETTING, 1: PC1, 2:PC2, 3: PC3, 4: TV, 5: VIDEO, 6: DVD, 7: HDD,
8: DVR, 9: BD, 10: CAMERA, 11: DOCUMENT CAMERA, 12: VIDEO CAMERA,
13: VIDEO CONFERENCE, 14: WIRELESS, 15: STB, 16: CONTROLLER,
17: COMPOSITE, 18: COMPONENT, 19: RGB, 20: INPUT1, 21: INPUT2,
22: INPUT3, 23: INPUT4, 24: INPUT5, 25: INPUT6, 26: SATELLITE,
27: CABLE, 28: CAMCORDER, 29: TABLET, 30: SURVEILLANCE CAM.
○
DisplayPort2
INP2
HDMI1 INH1
HDMI2 INH2
HDMI3 INH3
D-SUB IND1
Edit the input
mode name
INPUT1 IN1E WR “xxxxxxxxx
xxxxxxxxx”
xxxxxxxxx
xxxxxxxxx
Input mode name (Half-width alphanumeric characters and symbols only,
maximum of 18 characters)
INPUT2 IN2E
INPUT3 IN3E
INPUT4 IN4E
INPUT5 IN5E
INPUT6 IN6E
AUDIO
SELECT
DisplayPort1
ASDI WR 1, 3 1, 3
1: AUDIO, 3: DisplayPort
DisplayPort2
ASD2 WR 1, 3 1, 3
1: AUDIO, 3: DisplayPort
HDMI1
ASHP WR 0-1 0-1
0: HDMI, 1: AUDIO
HDMI2
AH2P WR 0-1 0-1
0: HDMI, 1: AUDIO
HDMI3
AH3P WR 0-1 0-1
0: HDMI, 1: AUDIO
OPTION
(valid when you have
used the expansion slot
to expand the functions)
ASOP WR 0-1 0-1
0: OPTION, 1: AUDIO