
Operation Manual


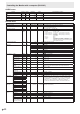
Table Of Contents
- IMPORTANT INFORMATION
- DEAR SHARP CUSTOMER
- SAFETY PRECAUTIONS
- TIPS AND SAFETY INSTRUCTIONS
- MOUNTING PRECAUTIONS
- Supplied Components
- System Requirements
- Part Names
- Connecting Peripheral Equipment
- Connecting the Power Cord
- Binding Cables
- Preparing the Remote Control Unit
- Removing the Handles
- Mounting a web camera
- Turning Power On/Off
- Touch Panel / Touch Pen Preparations
- Touch action
- Basic Operation
- Menu Items
- Initialization (Reset)/Functional Restriction Setting (FUNCTION)
- Controlling the Monitor with a computer (RS-232C)
- Controlling the Monitor with a computer (LAN)
- Troubleshooting
- Specifications
- Mounting Precautions (For SHARP dealers and service engineers)

41
E
Menu Items
(6) BRIGHT
Sets the brightness when changing the screen brightness at
a specied time.
Caution
• Do not switch off the main power after setting the
SCHEDULE.
• Specify the correct date and time. (See page 34.)
SCHEDULE does not function unless the date and time are
specied.
• Check regularly that the set date and time are correct.
• When a temperature abnormality occurs and the backlight
brightness is reduced, the brightness is not changed even
if a schedule set to BRIGHT is executed.
TIPS
• Up to 8 SCHEDULE items can be registered.
• Setting the SCHEDULE ashes the power LED in orange
in standby mode.
• A SCHEDULE that has a large number has precedence
over that of a small number when schedules overlap.
n
About remote control numbers
If there is another monitor nearby, you can change the remote
control number to prevent the other monitor from being
operated by the remote control unit.
Set the same number in the monitor and in the remote control
unit.
TIPS
• You can set remote control numbers to values from 0 to 9.
• When the remote control unit batteries become exhausted
and when you replace the batteries, the number on the
remote control unit may be reset to 0.
Changing the remote control number on the monitor
Use REMOTE No. on the SETUP menu to set the number.
(See page 35.)
1. Use the
or button to select the remote control
number.
2. Select ON and press the ENTER button.
The remote control number is set on the monitor.
Changing the remote control number on the remote
control unit
1. While holding down the ID SET button, hold down the
number that corresponds to the remote control number
set on the monitor for 5 seconds or more, and then
release these buttons.
The remote control number is set on the remote control unit.
Checking the remote controller number
* Perform these steps on the remote control unit.
1.
Press the INFORMATION button to display INFORMATION1.
2. Check that REMOTE No. is the remote control number
that you have set in the above procedure.
3. Press the RETURN button to close the monitor
INFORMATION screen.
TIPS
• If the remote control numbers on the monitor and remote
control unit are different, they will both be displayed on
INFORMATION1. On this screen, you can press the
ENTER button to match the number on the monitor with the
number on the remote control unit.
• Even if the remote control numbers are different, you can
use the remote control unit to display the INFORMATION
screen.