
Operation Manual


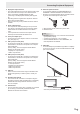


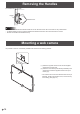


Table Of Contents
- IMPORTANT INFORMATION
- DEAR SHARP CUSTOMER
- SAFETY PRECAUTIONS
- TIPS AND SAFETY INSTRUCTIONS
- MOUNTING PRECAUTIONS
- Supplied Components
- System Requirements
- Part Names
- Connecting Peripheral Equipment
- Connecting the Power Cord
- Binding Cables
- Preparing the Remote Control Unit
- Removing the Handles
- Mounting a web camera
- Turning Power On/Off
- Touch Panel / Touch Pen Preparations
- Touch action
- Basic Operation
- Menu Items
- Initialization (Reset)/Functional Restriction Setting (FUNCTION)
- Controlling the Monitor with a computer (RS-232C)
- Controlling the Monitor with a computer (LAN)
- Troubleshooting
- Specifications
- Mounting Precautions (For SHARP dealers and service engineers)

16
E
Removing the Handles
Mounting a web camera
The handles can be removed.
Handle
Handle screws
Caution
• The removable handles and handle screws are for use with this monitor. Do not use them for any other devices.
• To attach handles, be sure to use the handles and handle screws which were removed from this monitor.
• Be sure the handles are attached securely.
(2)
(1)
*
It is possible to mount a commercially available web camera in the following positions:
(1) Attach the supplied camera mount with the supplied
camera mount screws (x2).
(2) Attach the web camera (commercially available) to the
camera mount with the supplied camera screw (inch
thread) (x1).
* The camera mount cannot be attached when the tray is
attached. To attach the camera mount, remove the tray
mount tting. (See page 72.)