
Operation Manual


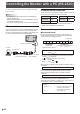
Table Of Contents
- IMPORTANT INFORMATION
- DEAR SHARP CUSTOMER
- SAFETY PRECAUTIONS
- TIPS AND SAFETY INSTRUCTIONS
- MOUNTING PRECAUTIONS
- Supplied Components
- System Requirements
- Part Names
- Connecting Peripheral Equipment
- Connecting the Power Cord
- Binding Cables
- Preparing the Remote Control Unit
- Removing the Handles
- Mounting a web camera
- Turning Power On/Off
- Touch Panel / Touch Pen Preparations
- Touch action
- Basic Operation
- Menu Items
- Initialization (Reset)/Functional Restriction Setting (FUNCTION)
- Controlling the Monitor with a PC (RS-232C)
- Controlling the Monitor with a PC (LAN)
- Troubleshooting
- Specifications
- Mounting Precautions (For SHARP dealers and service engineers)

37
E
n
SCHEDULE
You can set the time to switch the monitor on and off.
Set this function with “SCHEDULE” in the SETUP menu. (See
page 31.)
-
:
– – – – – –
– – – –
–
– – – –
SCHEDULE
No.
POWER DAY OF THE WEEK
TIME
INPUT BRIGHT
– –
/
– –
/
– – – – – – –
– –
:
– –
:
– –
(1)
–
-
:
– – – – – –
– – – –
–
– – – ––
-
:
– – – – – –
– – – –
–
– – – ––
-
:
– – – – – –
– – – –
–
– – – ––
-
:
– – – – – –
– – – –
–
– – – ––
-
:
– – – – – –
– – – –
–
– – – ––
-
:
– – – – – –
– – – –
–
– – – ––
-
:
– – – – – –
– – – –
–
– – – ––
(5)
(2) (3) (4)
(6)
OK···[ENTER] CANCEL···[RETURN]
1920x1080
V: 60 Hz H: 67.5 kHz
D-SUB1[RGB]
1. Press or to select the SCHEDULE number, and
press
.
2. Set the SCHEDULE. (See the description below.)
Press
or to select items, and press or to
change the setting.
3. Press
ENTER
.
SCHEDULE becomes effective.
(1)
●:SCHEDULEeffective
-
:SCHEDULEnoteffective
(2) POWER
ON :Switchesthemonitoronatthespeciedtime.
OFF:Switchesthemonitoroffatthespeciedtimeandputs
the monitor in standby mode.
(3) DAY OF THE WEEK
SpeciesthedayoftheweektoexecutetheSCHEDULE.
0:ONLY ONCE
ExecutestheSCHEDULEonceonthespeciedday.
SpecifythedayoftheweektoexecutetheSCHEDULE.
1:EVERY WEEK
ExecutestheSCHEDULEonthespecieddayoftheweek
everyweek.Specifythedayoftheweektoexecutethe
SCHEDULE.
Periodic setting such as “Monday through Friday” is also
possible.
2:EVERY DAY
ExecutestheSCHEDULEeverydayregardlessoftheday
oftheweek.
(4) TIME
SpeciesthetimetoexecutetheSCHEDULE.
Set the time on a 24-hour basis. (Factory default)
Can be entered as 12-hour time using the TIME setting in
DATE/TIME FORMAT.
(5) INPUT
Speciestheinputmodeatpower-on.Ifnotspecied,the
START INPUT MODE setting will apply. By factory default,
the input that was active when the power was last turned
off will appear. Input modes displayed on HDMI1, HDMI2,
HDMI3 and D-SUB1 will depend upon the INPUT SELECT
settings.
(6) BRIGHT
Sets the brightness when changing the screen brightness at
aspeciedtime.
Menu Items
Caution
• Donotswitchoffthemainpoweraftersettingthe
SCHEDULE.
• Specifythecorrectdateandtime.(Seepage31.)
SCHEDULE does not function unless the date and time are
specied.
• Checkregularlythatthesetdateandtimearecorrect.
• When STANDBY MODE is LOW POWER, SCHEDULE
cannot be set.
• Whenatemperatureabnormalityoccursandthebacklight
brightness is reduced, the brightness is not changed even
ifaschedulesettoBRIGHTisexecuted.
TIPS
• Upto8SCHEDULEitemscanberegistered.
• SettingtheSCHEDULEashesthepowerLEDalternately
in red and orange in standby mode.
• ASCHEDULEthathasalargenumberhasprecedence
over that of a small number when schedules overlap.