
Operation Manual


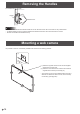

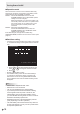

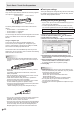
Table Of Contents
- IMPORTANT INFORMATION
- DEAR SHARP CUSTOMER
- SAFETY PRECAUTIONS
- TIPS AND SAFETY INSTRUCTIONS
- MOUNTING PRECAUTIONS
- Supplied Components
- System Requirements
- Part Names
- Connecting Peripheral Equipment
- Connecting the Power Cord
- Binding Cables
- Preparing the Remote Control Unit
- Removing the Handles
- Mounting a web camera
- Turning Power On/Off
- Touch Panel / Touch Pen Preparations
- Touch action
- Basic Operation
- Menu Items
- Initialization (Reset)/Functional Restriction Setting (FUNCTION)
- Controlling the Monitor with a PC (RS-232C)
- Controlling the Monitor with a PC (LAN)
- Troubleshooting
- Specifications
- Mounting Precautions (For SHARP dealers and service engineers)

20
E
Touch pen actions
Only use touch pens that are used with this monitor (supplied
touch pens or optional PN-ZL03).
CAPACITIVE
Function button 2
Function button 3
Pen tip
Battery indicator
Function button 1
The factory default settings for the function buttons are as
follows.
• Function button 1 : Pen Software Link
• Function button 2 : PageDown
• Function button 3 : PageUP
You can change the functions that are assigned to the function
buttons. For details, see the Touch Pen Utility Operation
Manual.
Using as a digitizer pen
A touch pen can be used as a Windows digitizer pen.
To use a touch pen as a digitizer pen, change the “Input
mode” to “Pen Digitizer” in the Touch Pen Utility. For details,
see the Touch Pen Utility Operation Manual.
The function buttons are used differently when the pen is a
digitizer pen. To use a function, touch the screen while holding
down the button of that function.
TIPS
• Hold the touch pen at the part indicated below. Incorrect
operation may result if your nger is too close to the tip of
the pen.
CAPACITIVE
• When the function button is pressed, the battery indicator
illuminates.
If the battery indicator does not illuminate, check if the
battery is depleted.
• Use function buttons near the front of the screen. If too far
away, operation will not be possible.
• Press function buttons slowly and rmly. If pressed too
quickly, the action may not be recognized.
• The line may break if the touch pen battery is low or there
is other wireless equipment in operation nearby.
• If the pen tip becomes damaged and the touch panel does
not respond, replace the pen tip.
* When inserting the pen tip, insert rmly all the way in.
• The pen tip is made soft to protect the screen and improve
writability. For this reason, the pen tip may become
deformed, however, this is not a failure.
• The touch pens cannot be used as touch pens and digitizer
pens at the same time. When the setting is changed in the
Touch Pen Utility, all touch pens become digitizer pens.
Multiple digitizer pens cannot be used at the same time.
n
Touch pen settings
Touch pen settings are congured using the Touch Pen Utility.
For details on the settings and how to use the utility, see the
Touch Pen Utility Operation Manual.
Adding touch pens (pairing)
• Up to 4 touch pens can be used simultaneously. (Up to 10
touch pens can be registered.)
• To use an optional touch pen with the monitor, the touch
pen must be registered in the touch pen adapter. (pairing)
Item Model Remarks
Touch pen PN-ZL03 For capacitive touch panel
Perform touch pen pairing for one pen at a time.
1. Click the Touch Pen Utility icon (
) on the taskbar.
2. Click [Touch pen settings].
3. Select a line in the touch pen settings screen that does
not have a pen registered, and touch [Registration].
4. Simultaneously hold down function button 1 and
function button 3 of the touch pen being paired for at
least 5 seconds.
5. When the battery indicator blinks twice or more,
release function button 1 and function button 3.
A message appears after completion of pairing.
6. Touch [OK].
TIPS
• When multiple touch pens are used, touch positions and
touch pen information (color, thickness, etc.) may become
interchanged, and lines may break.
- When touched simultaneously
- When touch pens are moved near each other
- When batteries are low
- When other wireless equipment is operating nearby
• Do not press the pen tip on other than the screen.
This may cause malfunctioning.
• One touch pen cannot be registered in multiple touch pen
adapters.
Touch Panel / Touch Pen Preparations