
Operation Manual


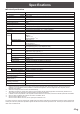


Table Of Contents
- IMPORTANT INFORMATION
- DEAR SHARP CUSTOMER
- SAFETY PRECAUTIONS
- TIPS AND SAFETY INSTRUCTIONS
- MOUNTING PRECAUTIONS
- Supplied Components
- System Requirements
- Part Names
- Connecting Peripheral Equipment
- Connecting the Power Cord
- Binding Cables
- Preparing the Remote Control Unit
- Turning Power On/Off
- Touch action
- Basic Operation
- Drawing
- LocalMM
- File Explorer
- Wireless Display
- Menu Items
- Functional Restriction Setting (Function)
- Controlling the Monitor with a computer (RS-232C)
- Troubleshooting
- Specifications
- Intellectual Property Rights and Other Matters
- Mounting Precautions (For SHARP dealers and service engineers)

49
E
• Wheninstalling,removingormovingthemonitor,ensurethatthisiscarriedoutbyatleast3people.
• Besuretouseawall-mountbracketdesignedordesignatedformountingthemonitor.
• Thismonitorisdesignedtobeinstalledonaconcretewallorpillar.Reinforcedworkmightbenecessaryforsomematerials
such as plaster / thin plastic board / wood before starting installation.
• Thismonitorandbracketmustbeinstalledonawallwhichcanendureatleast4timesormoretheweightofthemonitor.
Install by the most suitable method for the material and the structure.
• ToattachaVESA-compliantmountingbracket,useM6screwsthatare5/16inch(8mm)to3/8inch(10mm)longerthanthe
thickness of the mounting bracket.
Screws (M6)
Mounting bracket
Monitor mounting
5/16 - 3/8 inch (8-10 mm)
• Donotuseanimpactdriver.
• Whenmovingthemonitor,besuretoholdthepartsmarkedby
below. Do not grasp the screen or tray. This may cause
product damage, failure, or injury.
• Ifyouneedtotemporarilyplacethemonitoronatableorothersurfaceduringinstallation,spreadathicksoftclothonthe
table to prevent damage to the screen and table.
• Priortorepackingorremoval,removethetray.
• Aftermounting,pleasecarefullyensurethemonitorissecure,andnotabletocomeloosefromthewallormount.
• Donotuseanyscrewholesotherthanthoseformountingbrackets,locatedontherearofthemonitor,forinstallation.
Mounting Precautions
(For SHARP dealers and service engineers)