
Operation Manual, MX-M266N-M316N ,GB
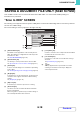
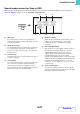
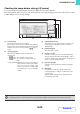
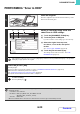
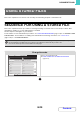
Table Of Contents

6-23
DOCUMENT FILING
Contents
PERFORMING "Scan to HDD"
1
Place the original.
Place the original face up in the document feeder tray, or face
down on the document glass.
2
Switch to document filing mode and
select Scan to HDD settings.
(1) Touch the [DOCUMENT FILING] key.
(2) Touch the [Scan to HDD] tab.
If you do not wish to select settings, go to the next step.
(3) Select the original size, exposure,
resolution, colour mode, and special
modes.
See ""Scan to HDD" SCREEN" (page 6-18).
(4) Touch the [File Information] key.
The settings are the same as for "File". See "FILE
INFORMATION" (page 6-15).
If the original is 2-sided, be sure to touch the [Original] key and then touch the [2-Sided Booklet] key or the [2-Sided
Tablet] key as appropriate for the original.
3
Press the [START] key.
Scanning begins.
For the procedure for placing the original, see step 4 of "SAVING A FILE WITH "Quick File"" (page 6-11).
When Preview is enabled, the preview screen appears.
☞ Checking the image before storing it (Preview) (page 6-22)
A beep will sound to indicate that Scan to HDD is completed.
To cancel scanning...
Press the [STOP] key ( ).
When Scan to HDD is performed without appending file information, the following user name and file name are automatically
assigned to the file.
User Name: User Unknown
File Name: Mode_Day-Month-Year_Hour-Minute-Second
(Example: HDD_04042020_112030)
Stored to: Main Folder
When user authentication is used, the user name that was used for login is automatically selected.
1
File Retrieve Scan to HDD HDD Status
Ex Data Access
File
Information
Original
Exposure
Resolution
Colour Mode
Special Modes
Scan:
600X600dpi
Auto
Store:
Auto
Auto
Mono2
A4
Ready to scan to HDD.
Press [Start] to scan original.
IMAGE SEND
DOCUMENT
FILING
COPY
Preview
(3)(1)(2)(4)