
Operation Manual, Software setup guide
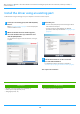
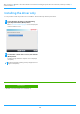
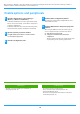
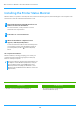
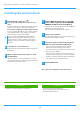
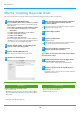
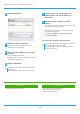
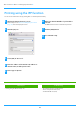
Table Of Contents

19
11
Click the [Default] icon.
12
Click the machine's model name.
The model name is normally displayed as below:
<Model name> (<Serial number>)
13
Make sure that the PPD file of your model is
selected.
Select the PPD file of the machine.
Depending on the OS version, the PPD file of the machine
may be automatically selected.
14
Click the [Add] button.
15
Click the printer icon, click the [Options &
Supplies] button and click the [Option] (or
[Driver]) tab.
16
Match the product configuration of this
machine.
If the condition of this machine was automatically detected,
check whether the settings are correct.
If the settings are incorrect, or it is necessary to manually
setup, follow the steps below:
(1) Select the peripherals connected to the machine
(2) Click the [OK] button
This completes the configuration of the printer driver.
• The PPD file is installed in the following folders on the
startup disk.
[Library] - [Printers] - [PPDs] - [Contents] - [Resources]
• You can check the options that are installed on the machine
by printing out the "Machine Status List".
To print the [Machine Status List]: [Settings] → [Status] →
[List for User] → [Print]
Related topics
• Printing using the IPP function (P. 20)
Troubleshooting
• The software cannot be installed (P. 22)
• How to setup this machine (P. 22)
• Trouble with Mac OS (P. 24)
Table of contents
Mac OS / Installing the printer driver