
MX-M182/D/M202D/M232D Operation-Manual GB

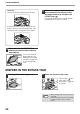
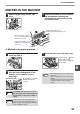

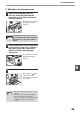
Table Of Contents
- CONTENTS
- INTRODUCTION
- USING THE MANUAL
- DIFFERENCES BETWEEN MODELS
- SETUP
- BEFORE USING THE MACHINE
- COPY FUNCTIONS
- PRINTER FUNCTIONS
- BASIC PRINTING
- PRINTER DRIVER SETTING SCREEN
- PRINTING MULTIPLE PAGES ON ONE PAGE
- FITTING THE PRINTED IMAGE TO THE PAPER (Fit To Paper Size)
- ROTATING THE PRINT IMAGE 180 DEGREES (Rotate 180 degrees)
- ENLARGING/REDUCING THE PRINT IMAGE (Zoom)
- PRINTING FAINT TEXT AND LINES IN BLACK (Text To Black/Vector To Black)
- ADJUSTING THE BRIGHTNESS AND CONTRAST OF THE IMAGE (Image Adjustment)
- PRINTING A WATERMARK
- TWO-SIDED PRINTING
- SAVING FREQUENTLY USED PRINT SETTINGS
- OUTLINE OF THE PRINT STATUS WINDOW
- SCANNER FUNCTIONS
- TROUBLESHOOTING
- ROUTINE MAINTENANCE
- APPENDIX
- SYSTEM SETTINGS GUIDE

96
TROUBLESHOOTING
6
C. Misfeed in the transport area
1
Open the fusing paper guide by
pressing down the green-labeled
projection on the guide and remove
the misfed paper.
Be careful not to tear the
misfed paper during
removal.
2
If the misfed paper cannot be removed
by the previous step but is visible in
the paper output area, remove the
paper by pulling it into the paper
output area.
Be careful not to tear the
misfed paper during
removal.
3
Close the side cover.
The message " Clear
paper path." will be
cleared and copying will
be possible.
The fusing unit is hot. Do not touch
the fusing unit when removing misfed
paper. Doing so may cause a burn or
injury.
• When closing the side cover, press on the
handle.
• If the paper was torn, make sure that no
torn pieces remain in the machine.
• If the message does not clear, check again
to make sure that no pieces of paper
remain.
Warning
Note