
MX-M182/D/M202D/M232D Operation-Manual GB
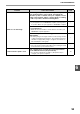
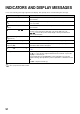

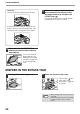
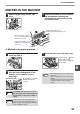

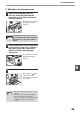
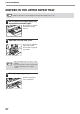
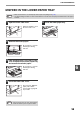
Table Of Contents
- CONTENTS
- INTRODUCTION
- USING THE MANUAL
- DIFFERENCES BETWEEN MODELS
- SETUP
- BEFORE USING THE MACHINE
- COPY FUNCTIONS
- PRINTER FUNCTIONS
- BASIC PRINTING
- PRINTER DRIVER SETTING SCREEN
- PRINTING MULTIPLE PAGES ON ONE PAGE
- FITTING THE PRINTED IMAGE TO THE PAPER (Fit To Paper Size)
- ROTATING THE PRINT IMAGE 180 DEGREES (Rotate 180 degrees)
- ENLARGING/REDUCING THE PRINT IMAGE (Zoom)
- PRINTING FAINT TEXT AND LINES IN BLACK (Text To Black/Vector To Black)
- ADJUSTING THE BRIGHTNESS AND CONTRAST OF THE IMAGE (Image Adjustment)
- PRINTING A WATERMARK
- TWO-SIDED PRINTING
- SAVING FREQUENTLY USED PRINT SETTINGS
- OUTLINE OF THE PRINT STATUS WINDOW
- SCANNER FUNCTIONS
- TROUBLESHOOTING
- ROUTINE MAINTENANCE
- APPENDIX
- SYSTEM SETTINGS GUIDE

95
TROUBLESHOOTING
B. Misfeed in the fusing area
1
Push gently on both ends of the front
cover and open it.
2
Turn the roller rotating knob in the
direction of the arrow.
3
Carefully remove the misfed paper.
Lower the fusing unit release levers to
allow easier removal.
Be careful not to tear the
misfed paper during
removal.
4
Lift the fusing unit release levers, to
return them to their operating
positions.
5
Close the front cover and side cover.
The message " Clear
paper path." will be
cleared and copying will
be possible.
The fusing unit is hot. Do not touch
the fusing unit when removing misfed
paper. Doing so may cause a burn or
injury.
• Do not touch the photoconductive drum
(green portion) when removing the misfed
paper. Doing so may damage the drum and
cause smudges on copies.
• Be careful about unfixed toner on the
misfed paper not to soil your hands or
clothes.
Roller rotating knob
Fusing unit
release lever
Warning
Caution
• When closing the front cover, gently hold
both ends.
• When closing the side cover, press on the
handle.
• If the message does not clear, check again
to make sure that no pieces of paper
remain.
Note