
MX-M182/D/M202D/M232D Operation-Manual GB

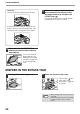
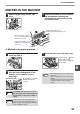

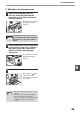
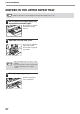
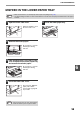
Table Of Contents
- CONTENTS
- INTRODUCTION
- USING THE MANUAL
- DIFFERENCES BETWEEN MODELS
- SETUP
- BEFORE USING THE MACHINE
- COPY FUNCTIONS
- PRINTER FUNCTIONS
- BASIC PRINTING
- PRINTER DRIVER SETTING SCREEN
- PRINTING MULTIPLE PAGES ON ONE PAGE
- FITTING THE PRINTED IMAGE TO THE PAPER (Fit To Paper Size)
- ROTATING THE PRINT IMAGE 180 DEGREES (Rotate 180 degrees)
- ENLARGING/REDUCING THE PRINT IMAGE (Zoom)
- PRINTING FAINT TEXT AND LINES IN BLACK (Text To Black/Vector To Black)
- ADJUSTING THE BRIGHTNESS AND CONTRAST OF THE IMAGE (Image Adjustment)
- PRINTING A WATERMARK
- TWO-SIDED PRINTING
- SAVING FREQUENTLY USED PRINT SETTINGS
- OUTLINE OF THE PRINT STATUS WINDOW
- SCANNER FUNCTIONS
- TROUBLESHOOTING
- ROUTINE MAINTENANCE
- APPENDIX
- SYSTEM SETTINGS GUIDE

93
TROUBLESHOOTING
Section C
Remove the misfed original from the exit area.
If the misfed original cannot be easily removed
from the exit area, open the moveable part of the
document feeder tray and remove the original.
2
Open and close the SPF/RSPF to
make the misfeed location indicator
stop blinking.
You can also make the
misfeed indicator stop
blinking by opening and
closing the feeding roller
cover or the right side
cover.
3
Return the originals indicated by the
minus number in the display to the
document feeder tray and press the
[START] key ( ).
Copying will resume from the originals that still
remained when the misfeed occurred.
MISFEED IN THE BYPASS TRAY
1
Gently pull the misfed paper out.
2
Open and close the side cover.
The message " Clear
paper path." will be
cleared and copying will
be possible.
• When closing the side cover, press down on
the handle.
• If the message does not clear, check again
to make sure that no pieces of paper
remain.
Note