
MX-M182/D/M202D/M232D Operation-Manual GB
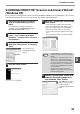
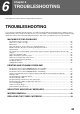
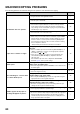
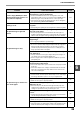
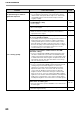
Table Of Contents
- CONTENTS
- INTRODUCTION
- USING THE MANUAL
- DIFFERENCES BETWEEN MODELS
- SETUP
- BEFORE USING THE MACHINE
- COPY FUNCTIONS
- PRINTER FUNCTIONS
- BASIC PRINTING
- PRINTER DRIVER SETTING SCREEN
- PRINTING MULTIPLE PAGES ON ONE PAGE
- FITTING THE PRINTED IMAGE TO THE PAPER (Fit To Paper Size)
- ROTATING THE PRINT IMAGE 180 DEGREES (Rotate 180 degrees)
- ENLARGING/REDUCING THE PRINT IMAGE (Zoom)
- PRINTING FAINT TEXT AND LINES IN BLACK (Text To Black/Vector To Black)
- ADJUSTING THE BRIGHTNESS AND CONTRAST OF THE IMAGE (Image Adjustment)
- PRINTING A WATERMARK
- TWO-SIDED PRINTING
- SAVING FREQUENTLY USED PRINT SETTINGS
- OUTLINE OF THE PRINT STATUS WINDOW
- SCANNER FUNCTIONS
- TROUBLESHOOTING
- ROUTINE MAINTENANCE
- APPENDIX
- SYSTEM SETTINGS GUIDE

81
SCANNER FUNCTIONS
7
When scanning ends, the following
screen will appear. Select the next
task that you wish to perform, and
then click the "Next" button.
If you are ready to end
the session, click
"Nothing. I’m finished
working with these
pictures".
8
Click the "Finish" button.
The "Scanner and
Camera Wizard" closes
and the scanned image is
saved in the specified
folder.