
MX-M182/D/M202D/M232D Operation-Manual GB
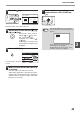
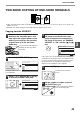
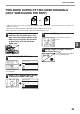
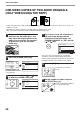
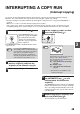
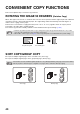
Table Of Contents
- CONTENTS
- INTRODUCTION
- USING THE MANUAL
- DIFFERENCES BETWEEN MODELS
- SETUP
- BEFORE USING THE MACHINE
- COPY FUNCTIONS
- PRINTER FUNCTIONS
- BASIC PRINTING
- PRINTER DRIVER SETTING SCREEN
- PRINTING MULTIPLE PAGES ON ONE PAGE
- FITTING THE PRINTED IMAGE TO THE PAPER (Fit To Paper Size)
- ROTATING THE PRINT IMAGE 180 DEGREES (Rotate 180 degrees)
- ENLARGING/REDUCING THE PRINT IMAGE (Zoom)
- PRINTING FAINT TEXT AND LINES IN BLACK (Text To Black/Vector To Black)
- ADJUSTING THE BRIGHTNESS AND CONTRAST OF THE IMAGE (Image Adjustment)
- PRINTING A WATERMARK
- TWO-SIDED PRINTING
- SAVING FREQUENTLY USED PRINT SETTINGS
- OUTLINE OF THE PRINT STATUS WINDOW
- SCANNER FUNCTIONS
- TROUBLESHOOTING
- ROUTINE MAINTENANCE
- APPENDIX
- SYSTEM SETTINGS GUIDE

40
COPY FUNCTIONS
3
7
Press the key.
The vertical ratio can now be selected.
8
Set the vertical ratio with the [ ], [ ],
[ ], or [ ] keys.
A preset ratio can be selected
with the [ ] or [ ] keys. The
ratio can be adjusted in
increments of 1% with the [ ]
or [ ] keys.
To change the copy ratio in the
horizontal direction again, press
the key.
9
Press the [OK] key.
You will return to the base
screen.
10
Make sure that the desired paper tray
is selected.
If the auto paper select function has been
enabled, the appropriate copy paper size will be
automatically selected based on the original size
and the selected copy ratios. Image rotation will
take place if necessary.
11
Select any other copy settings as
needed and press the [START] key
().
@
READ
ACC. #-C
X:
Y:
YX
[ ]:
115%
100%
86%
115%
100%
XY ZOOM
ZOOM
OK
A4R
B4
X115% Y 99%
Ready to copy.
AUTO
AUTO
If the [COPY RATIO] key is pressed when
XY zoom ratios are set, the following screen
appears.
To cancel the XY zoom ratio settings, select
"OFF" and press the [OK] key.
To adjust the XY zoom copy ratios, select
"ADJUST" and press the [OK] key.
MNO
WXYZ
@.-
_
AD-END
Note
XY ZOOM
ADJUST
OFF