
MX-M182/D/M202D/M232D Operation-Manual GB

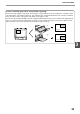
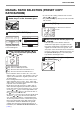
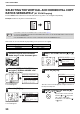
Table Of Contents
- CONTENTS
- INTRODUCTION
- USING THE MANUAL
- DIFFERENCES BETWEEN MODELS
- SETUP
- BEFORE USING THE MACHINE
- COPY FUNCTIONS
- PRINTER FUNCTIONS
- BASIC PRINTING
- PRINTER DRIVER SETTING SCREEN
- PRINTING MULTIPLE PAGES ON ONE PAGE
- FITTING THE PRINTED IMAGE TO THE PAPER (Fit To Paper Size)
- ROTATING THE PRINT IMAGE 180 DEGREES (Rotate 180 degrees)
- ENLARGING/REDUCING THE PRINT IMAGE (Zoom)
- PRINTING FAINT TEXT AND LINES IN BLACK (Text To Black/Vector To Black)
- ADJUSTING THE BRIGHTNESS AND CONTRAST OF THE IMAGE (Image Adjustment)
- PRINTING A WATERMARK
- TWO-SIDED PRINTING
- SAVING FREQUENTLY USED PRINT SETTINGS
- OUTLINE OF THE PRINT STATUS WINDOW
- SCANNER FUNCTIONS
- TROUBLESHOOTING
- ROUTINE MAINTENANCE
- APPENDIX
- SYSTEM SETTINGS GUIDE

32
COPY FUNCTIONS
3
Points concerning the position of the printed copy image
Even if the same original is copied onto the same type of paper, differences in the original size, scanning location
(document glass or document feeder tray), selected paper tray, enlargement/reduction ratio, and other conditions
may cause the position of the printed copy image on the paper to vary.
As shown in the following example, when an original smaller than the paper size (for example, A5 original and A3
paper) is copied from the document glass, the position of the printed copy image on the paper is different when
paper from tray 1 is used (1) and paper from the bypass tray is used (2).
A5
A3 paper
A3 paper
A5
copy image
A5
copy image
(1)
(2)
A3
A3