
MX-M182/D/M202D/M232D Operation-Manual GB

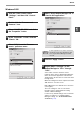


Table Of Contents
- CONTENTS
- INTRODUCTION
- USING THE MANUAL
- DIFFERENCES BETWEEN MODELS
- SETUP
- BEFORE USING THE MACHINE
- COPY FUNCTIONS
- PRINTER FUNCTIONS
- BASIC PRINTING
- PRINTER DRIVER SETTING SCREEN
- PRINTING MULTIPLE PAGES ON ONE PAGE
- FITTING THE PRINTED IMAGE TO THE PAPER (Fit To Paper Size)
- ROTATING THE PRINT IMAGE 180 DEGREES (Rotate 180 degrees)
- ENLARGING/REDUCING THE PRINT IMAGE (Zoom)
- PRINTING FAINT TEXT AND LINES IN BLACK (Text To Black/Vector To Black)
- ADJUSTING THE BRIGHTNESS AND CONTRAST OF THE IMAGE (Image Adjustment)
- PRINTING A WATERMARK
- TWO-SIDED PRINTING
- SAVING FREQUENTLY USED PRINT SETTINGS
- OUTLINE OF THE PRINT STATUS WINDOW
- SCANNER FUNCTIONS
- TROUBLESHOOTING
- ROUTINE MAINTENANCE
- APPENDIX
- SYSTEM SETTINGS GUIDE

12
1
CONFIGURING THE PRINTER
DRIVER
After installing the printer driver, you must configure the printer driver settings appropriately for the number of paper
trays on the machine and the size of paper loaded in each.
1
Click the "Start" button, click "Control
Panel", and then click "Printer".
• In Windows 7, click the "Start" button and then
click "Devices and Printers".
• In Windows XP, click the "start" button and click
"Printers and Faxes".
• In Windows 2000, click the "Start" button, select
"Settings", and then click "Printers".
2
Click the "SHARP MX-XXXX" printer
driver icon and select "Properties"
from the "Organize" menu.
• In Windows 7, right-click the "SHARP
MX-XXXX" printer driver icon, and then click
"Printer properties".
• In Windows XP/2000, select "Properties" from
the "File" menu.
3
Click the "Configuration" tab and set
the printer configuration based on the
options that have been installed.
Set the printer configuration properly. If not,
printing may not take place correctly.
4
Click the "Set Tray Status" button and
select the size of paper that is loaded
in each tray.
Select a tray in the "Paper Source" menu, and
select the size of paper loaded in that tray from
the "Set Paper Size" menu. Repeat for each tray.
5
Click the "OK" button in the "Set Tray
Status" window.
6
Click the "OK" button in the printer
properties window.
In Windows XP, if "Printers and Faxes" does
not appear in the "start" menu, select "Control
Panel", select "Printers and Other Hardware",
and then select "Printers and Faxes".
To automatically configure the settings based
on the detected machine status, click the
"Auto Configuration" button.
Note
Note