
Operation Manual, Setup Guide for the Administrator


6
Machine Adjustment
1 Image Quality Adjustment
Select [Image Quality Adjustment] in the Machine
Adjustment screen.
1.1 Laser Adjustment
Select [Laser Adjustment] in the Image Quality Adjustment
screen.
1.1.1 Density Smoothing Adjustment (Auto
Adjustment)
This performs density smoothing adjustment for printing in
front / rear (main scan) direction automatically.
1) Select [Density Smoothing Adjustment (Auto
Adjustment)] in the Laser Adjustment screen.
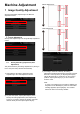
2) To print a test patch, tap the [Execute] key in the
Density Smoothing Adjustment (Auto Adjustment)
screen. If you need to change the density, select the
desired density and then tap the [Execute] key.
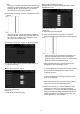
[Before Adjustment]
[After Adjustment]
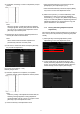
3) A message “Value set at Density Smoothing
Adjustment (Densitometer/Visual) is cleared if executed.
Execute?” comes up when you tap the [Execute] key.
Tap the [Execute] key to continue if you do not see a
problem. Tap the [Cancel] key if you do not want to
clear the value.
Note:
To return your preferences to the factory defaults, tap
the [Return to the Defaults] key. When a confirmation
message appears, tap the [OK] key. The machine
reboots to return to the factory defaults.