
MX-FX13 Operation-Manual GB


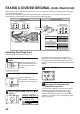
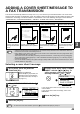

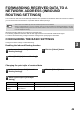
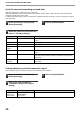
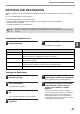
Table Of Contents
- INTRODUCTION
- CONNECTING AN EXTENSION PHONE
- CONTENTS
- TO USE THIS PRODUCT CORRECTLY ASA FACSIMILE
- 1. BEFORE USING THE FAXFUNCTION
- 2. BASIC OPERATIONS
- 3. ADVANCED TRANSMISSIONMETHODS
- SENDING THE SAME DOCUMENT TO MULTIPLE DESTINATIONS IN A SINGLE OPERATION (BROADCAST TRANSMISSION)
- AUTOMATIC TRANSMISSION AT A SPECIFIED TIME (TIMER TRANSMISSION)
- TRANSMISSION AND RECEPTION USING THE POLLING FUNCTION
- INCLUDING SENDER INFORMATION ON FAXES
- FAXING A DIVIDED ORIGINAL (DUAL PAGE SCAN)
- ADDING A COVER SHEET/MESSAGE TO A FAX TRANSMISSION
- USING SETTINGS STORED AS A PROGRAM
- FORWARDING RECEIVED DATA TO A NETWORK ADDRESS (INBOUND ROUTING SETTINGS)
- FORWARDING RECEIVED FAXES TO ANOTHER MACHINE WHEN PRINTING IS NOT POSSIBLE (FORWARDING FUNCTION)
- SENDING A FAX DIRECTLY FROM A COMPUTER (PC-Fax)
- 4. TRANSMISSION USINGF-CODES
- 5. CONVENIENT METHODS OFUSE
- 6. PROGRAMMING
- 7. TROUBLESHOOTING
- 8. SYSTEM SETTINGS
- 9. APPENDIX

47
ADVANCED TRANSMISSION METHODS
3
SETTINGS THE DESTINATION
Specify a sending source of received data and forwarding destination e-mail addresses to configure a forwarding
table.
Up to 10 forwarding tables can be configured.
For each forwarding table, set the following items:
•
Forward Condition (enabling/disabling forwarding, and the conditions to determine forwarding)
•
Sender number (fax number)
•
Forwarding destinations (e-mail addresses)
Viewing the destination list
1
In the menu frame, click [Inbound
Routing Settings].
2
Click [Destination].
The destination list appears.
Settings the destination
1
In the menu frame, click [Inbound
Routing Settings].
2
Click [Destination].
The destination list appears.
3
Click the destination number to be
set.
The "Forwarding Destination" screen appears.
4
Select [Enable] in "Forward
Condition".
5
In "Forward Condition", select the
determining condition for forwarding.
Select [Forward (All)] or [Forward (Sender)].
6
If you wish to forward received data
from a specific sender, enter the
sender's fax number in "Sender
Number".
Enter the fax number using up to 20 digits.
To enter the fax number from the fax addresses
stored in the machine, click the [Select from
Address Book] button. The "Fax Destination"
screen appears, and you can select the sender's
number from the fax address list.
• The names of the destination number (Forward destination 1 to 10) cannot be changed.
• Only the e-mail address can be specified for a forwarding destination. FTP, Desktop, and fax number cannot be
specified.
Note
Item Description
Inbound Routing Displays whether Inbound Routing function is enabled.
Number Displays the forwarding destination number (Forward Destination 1 to 10).
Each of setup menu is displayed by clicking each number.
Forward Condition Displays the forward condition of the destination (enabling/disabling and determining
the destination setting).
[Delete] button To delete the forwarding condition stored in a destination number, select the "Number"
checkbox of the destination number and click the [Delete] button.
[Clear Checked] button Clicking this clears all "Number" checkboxes.