MODEL MX-FX13 FACSIMILE EXPANSION KIT OPERATION GUIDE Page •BEFORE USING THE FAX FUNCTION.............................. 6 •BASIC OPERATIONS .......... 16 •ADVANCED TRANSMISSION METHODS ............................ 31 •TRANSMISSION USING F-CODES .............................. 52 •CONVENIENT METHODS OF USE ....................................... 64 •PROGRAMMING .................. 66 •TROUBLESHOOTING.......... 90 •SYSTEM SETTINGS............. 96 •APPENDIX ..........................
Telecommunication Line Cable: Use only the line cable that was provided with the machine. Notice for Users in Europe Hereby, SHARP Electronics (Europe) GmbH declares that this Facsimile Expansion Kit MX-FX13 is in compliance with the essential requirements and other relevant provisions of Directive 1999/5/EC.
INTRODUCTION Thank you for purchasing this product. This manual only explains the facsimile functions of the product. For safety precautions and general information on using the machine such as loading paper, clearing misfeeds, and handling peripheral units, see the Operation Guide for the machine. For other functions, see the following manuals as appropriate: Copier function/Printer function: See the Operation Guide.
CONTENTS INTRODUCTION ........................................................................................................................................ 1 CONNECTING AN EXTENSION PHONE.................................................................................................. 1 TO USE THIS PRODUCT CORRECTLY AS A FACSIMILE..................................................................... 4 1 BEFORE USING THE FAX FUNCTION POINTS TO CHECK AND PROGRAM AFTER INSTALLATION .......................
CONTENTS F-CODE POLLING MEMORY.......................... 54 ● HOW F-CODE POLLING MEMORY WORKS .......54 ● USING F-CODE POLLING MEMORY ............55 ● PROCEDURE FOR F-CODE POLLING .........57 F-CODE CONFIDENTIAL TRANSMISSION ... 59 ● F-CODE TRANSMISSION (F-CODE CONFIDENTIAL TRANSMISSION) ................59 ● PRINTING A DOCUMENT RECEIVED TO AN F-CODE CONFIDENTIAL MEMORY BOX .....61 F-CODE RELAY BROADCAST TRANSMISSION ..............................................
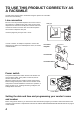
TO USE THIS PRODUCT CORRECTLY AS A FACSIMILE Several points must be kept in mind when using this product as a facsimile. Please note the following. Line connection Be sure to use the provided telephone line cord to connect the machine to a telephone line jack. Insert one end of the telephone line cord into the LINE jack on the left side of the machine as shown. Insert the other end of the telephone line cord into a telephone line jack. LINE jack Insert the plug firmly until you hear a "click".
TO USE THIS PRODUCT CORRECTLY AS A FACSIMILE Lithium battery A lithium battery in the machine is used to retain settings and programmed information such as auto-dial numbers (page 66). • When the battery dies, settings and programmed information will be lost, so please keep a record of this information. (See "PRINTING LISTS OF PROGRAMMED INFORMATION, SETTINGS, AND COMMUNICATION ACTIVITY" on page 85.) • The life of the battery is approximately 5 years when the power switch is kept continuously off.
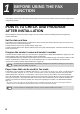
1 BEFORE USING THE FAX FUNCTION This chapter contains basic information about using the fax function of the machine. Please read this chapter before using the fax function. POINTS TO CHECK AND PROGRAM AFTER INSTALLATION After installing the machine and before using it as a fax machine, check the following points and program the required information. Set the date and time The machine has an internal clock.
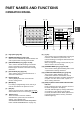
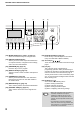
PART NAMES AND FUNCTIONS OPERATION PANEL (1) (2) (3) 01 02 03 04 (4) 1 SPEAKER 05 FAX STATUS COPY SHIFT 06 07 08 09 10 11 12 13 14 ON LINE DATA PRINT REDIAL/PAUSE 15 SPECIAL FUNCTION SCAN SPEED 16 17 18 19 20 21 22 23 24 LINE DATA FAX SYMBOL COMM.
BEFORE USING THE FAX FUNCTION (5) (6) (7) BACK OK (8) ABC DEF GHI JKL MNO PQRS TUV WXYZ ACC. #-C (17) (18) (19) (20) INTERRUPT @.-_ PAPER SELECT COPY RATIO AUTO IMAGE OUTPUT 2-SIDED COPY RESOLUTION ADDRESS FORMAT ORIGINAL SIZE DUPLEX SCAN RESOLUTION ADDRESS BROADCAST ORIGINAL SIZE DUPLEX SCAN (16) (9) (21) (13) [MODE SELECT] keys (step 1 on page 17) These are used these keys to change modes.
BEFORE USING THE FAX FUNCTION FAX MODE (BASE SCREEN) The base screen of fax mode is displayed by pressing the [FAX] key when the print mode, copy mode, or scan mode screen appears. The base screen of fax mode (1) (2) (3) (4) (5) Stand-by. 96% 10 MAY MON 10:25 AM MEMORY AUTO CONT AUTO A4R STANDARD (1) Message display Messages appear here to indicate the current status of the machine. An icon ( ) appears to the right side when a confidential fax has been received.
BEFORE USING THE FAX FUNCTION AUDITING MODE Accounts that can transmit faxes (up to 50) can be established and transmission time and other information can be tracked for each account. The Acc. Usage List (page 99) can be printed out which shows the time used for transmission and pages transmitted by each account. • This function is enabled using "ACCOUNT CONTROL" and "ACCOUNT # SET" in the system settings.
ORIGINALS ORIGINALS THAT CAN BE FAXED Original sizes Minimum original size Using the SPF/RSPF Using the document glass Note Maximum original size 297 mm (width) x 800 mm* (length) (11" (width) x 31-1/2"* (length)) * Long documents can be transmitted A5: 210 mm (width) x 148 mm (length) (8-1/2" (width) x 5-1/2" (length)) A5R: 148 mm (width) x 210 mm (length) (5-1/2" (width) x 8-1/2" (length)) 297 mm (width) x 432 mm (length) (11" (width) x 17" (length)) • Originals that are not a standard size (A5, A4,
PLACING THE ORIGINAL An original can be placed in the SPF/RSPF or on the document glass. Use the SPF/RSPF when faxing a large number of sheet originals. Use the document glass to fax originals that cannot be scanned using the SPF/RSPF such as thick or thin sheet originals, or books or other bound originals. USING THE SPF/RSPF 1 2 Open the SPF/RSPF, make sure that an original has not been left on the document glass, and then gently close the SPF/RSPF.
CHECKING THE SIZE OF A PLACED ORIGINAL When a standard-size* original is placed, the original size is automatically detected (automatic original detection function) and displayed in the original display. Make sure that the size has been detected correctly. (1) When an original is placed, an icon appears to indicate the original scanning mode. : One-sided scanning in the SPF. : Scanning on the document glass : Two-sided scanning in the RSPF. (2) Displays the original size.
SELECTING RESOLUTION AND EXPOSURE SETTINGS The resolution and exposure can be adjusted to match the size and darkness of text on the original, or for an original such as a photograph. To change the settings, follow the steps below after selecting fax mode and placing the original. (Page 12) 1 3 Press the [RESOLUTION] key.
CONVENIENT DIALLING METHODS (AUTO-DIALLING) The fax function includes a convenient auto dial feature (Rapid dialling, speed dialling and group dialling). By programming frequently dialled numbers, you can call and send faxes to these locations by means of a simple dialling operation (page 19). There are three types of auto-dialling: Rapid dialling, speed dialling, and group dialling. To program auto-dial numbers, see page 66.
2 BASIC OPERATIONS This chapter explains the basic procedures for sending and receiving faxes. There are three basic methods for fax transmission: memory transmission, direct transmission, and manual transmission. When memory transmission is used, the document is temporarily stored in memory before being transmitted.
SENDING A FAX BASIC PROCEDURE FOR SENDING FAXES 1 Make sure that the machine is in fax mode. The FAX indicator is lit when the machine is in fax mode. If the LINE C indicator is not lit, press the FAX DATA S G F [FAX] key. If auditing mode has been enabled for the fax function in the system settings, a message will appear prompting you to enter your account number when you switch to fax mode. Enter your account number (5 digits) with the numeric keys. (See "ACCOUNT CONTROL" on page 103.
BASIC OPERATIONS Using the SPF/RSPF 6 Press the [START] key ( Using the document glass 6 ). MNO Press the [START] key ( ). MNO READING No.001 MEMORY CONT AUTO STANDARD WXYZ @.-_ AD-END XX% P-XXX AUTO A4R READING No.001 MEMORY CONT AUTO STANDARD WXYZ @.-_ AD-END XX% P-XXX AUTO A4R • Scanning begins. • If the line is free, the machine will dial the receiving machine and begin transmission as soon as the first page is scanned.
BASIC OPERATIONS TRANSMISSION BY AUTO-DIALLING (RAPID DIALLING AND GROUP DIALLING) Fax numbers can be dialled by automatic dialling (Rapid dialling and group dialling) instead of pressing the numeric keys. Follow the steps below to send a fax using an auto dial number. To use an auto dial number, the name and fax number of the destination must first be stored. See page 15 for information on auto-dialling and page 66 for information on programming auto-dial destinations.
BASIC OPERATIONS SEARCHING FOR A PROGRAMMED DESTINATION (USING THE [ADDRESS] KEY) At the time of dialling, you can enter letters to search for a destination stored in a Rapid key, Speed Dial number, or Group key. 1 2 Perform steps 1 to 4 of "BASIC PROCEDURE FOR SENDING FAXES" (page 17). Press the [ADDRESS] key.
BASIC OPERATIONS FAXING A TWO-SIDED ORIGINAL (MX-M182D/MX-M202D/MX-M232D) Follow the steps below to automatically transmit both sides of a two-sided original. (This is only possible on models that have an RSPF installed.) Note 1 Do not use an original that is not a standard size (A3, B4, A4, A4R, A5, 8-1/2" x 11", 8-1/2" x 11"R (11" x 17", 8-1/2" x 14", 8-1/2" x 11", 8-1/2" x 11"R, A4, A4R if the machine uses inch-based paper sizes)). Otherwise a scanning error or cut-off image may result.
BASIC OPERATIONS Transmission settings (memory transmission mode and direct transmission mode) Transmission modes include memory transmission, where the original is temporarily scanned into memory before transmission, and direct transmission, where the original is transmitted directly without being scanned into memory.
BASIC OPERATIONS 8 Press the [START] key. Note When using the document glass, multiple original pages cannot be transmitted in a single transmission. MNO WXYZ @.-_ AD-END • To change from "Direct Transmission" back to "Memory Transmission", select "MEMORY TX" in step 5. • To cancel a direct transmission, press the [C] key. Faxing by manual transmission (using the [SPEAKER] key) 1 Perform steps 1 to 4 of "BASIC PROCEDURE FOR SENDING FAXES" (page 17).
BASIC OPERATIONS Quick On-line When you use the SPF/RSPF to send a multi-page document and there are no previously stored jobs waiting or in progress (and the line is not being used), the machine dials the destination after the first page is scanned and begins transmitting scanned pages while the remaining pages are being scanned. This transmission method is called Quick On-line. When a quick online transmission is being performed, the message display shows "READING" "DIALLING" - "COMM.
BASIC OPERATIONS CANCELLING A FAX TRANSMISSION To cancel a transmission that is in progress or a stored transmission job, follow the steps below. A transmission in progress or a stored transmission job is cancelled from the fax status screen. (Printing of a received fax cannot be cancelled.
BASIC OPERATIONS Cancelling a stored transmission job If you do not wish to cancel a stored transmission job and only wish to check its status, press the [BACK] key instead of the [C] key in step 4 to exit. 1 Press the [FAX STATUS] key. Select "YES" with the [ ] or [ ] key. FAX STATUS TX/RX JOBS TX/RX RESERVE TX/RX COMPLETED FAX STATUS ON LINE DATA 5 SPECIAL FUNCTION Job cancelled. YES NO The fax job status screen is displayed.
RECEIVING FAXES When another fax machine sends a fax to your machine, your machine will ring*, automatically receive the fax, and begin printing. (This is called automatic reception.) If you do not wish to have received faxes printed immediately, use the print hold function to hold received faxes in memory for printing at your convenience (all received faxes will be printed at once). To enable this function and print received faxes, see "FAX PRINT HOLD FUNCTION" on page 29.
BASIC OPERATIONS F-code confidential fax reception When a fax has been received by F-code confidential fax reception, an icon ( ) will appear in the base screen of fax mode (message display (1) on page 9). The icon also appears in front of the box in the F-code confidential box name screen in the display. (Step 6 on page 61) Print the received fax as explained in "PRINTING A DOCUMENT RECEIVED TO AN F-CODE CONFIDENTIAL MEMORY BOX" (page 61).
BASIC OPERATIONS FAX PRINT HOLD FUNCTION Faxes are normally printed as soon as they are received. This function is used to hold received faxes in memory rather than printing them as they are received. Faxes held in memory are printed manually all at once. Settings required for fax print hold If a fax is received when auto power shut-off mode has activated ("POWER ON AND OFF" in the Operation Guide for the machine), the machine returns to normal operation in order to print the fax.
BASIC OPERATIONS 6 Select "ON" with the [ ] or [ ] key. 7 Press the [OK] key. OK FAX PRINT HOLD ON OFF To disable fax print hold, select "OFF". Printing received faxes held in memory To print received faxes that are held in memory when fax print hold is enabled, follow the steps below. 1 In Fax mode, press the [SPECIAL FUNCTION] key. 4 Select "PRINT HOLD DATA" with the [ ] or [ ] key. Begin the following procedure from the base screen of Fax mode.
3 ADVANCED TRANSMISSION METHODS This chapter explains advanced features that are designed for specific purposes and circumstances. Please read those sections that are of interest to you. SENDING THE SAME DOCUMENT TO MULTIPLE DESTINATIONS IN A SINGLE OPERATION (BROADCAST TRANSMISSION) This feature is used to send a fax to multiple destinations in a single operation. The original to be transmitted is scanned into memory and then successively transmitted to the selected destinations.
ADVANCED TRANSMISSION METHODS USING BROADCAST TRANSMISSION 1 Perform steps 1 to 4 of "BASIC PROCEDURE FOR SENDING FAXES" (page 17). 2 Press the [BROADCAST] key. R SELECT COPY RATIO AUTO IMAGE OUTPUT 2-SIDED OLUTION ADDRESS FORMAT ORIGINAL SIZE DUPLEX OLUTION ADDRESS BROADCAST ORIGINAL SIZE DUPLEX ENTER RX STATION : 4 After entering a full number with the numeric keys, press the BACK OK [OK] key to complete the entry.
AUTOMATIC TRANSMISSION AT A SPECIFIED TIME (TIMER TRANSMISSION) This feature enables you to set up a transmission or polling operation to be performed automatically at a specified time up to a week in advance. This is convenient when you will be out of the office or for transmission at off-peak nighttime rates. A combined total of 50 timer transmission and memory transmission jobs can be stored. Note • After a timer transmission is performed, the information (image, destination, etc.
ADVANCED TRANSMISSION METHODS 7 Press the [OK] key. OK Note 34 The selected day is set. 8 Perform the desired fax operation. The steps that follow will depend on the type of operation.
TRANSMISSION AND RECEPTION USING THE POLLING FUNCTION The polling function allows your machine to call a fax machine that has a document ready for transmission and initiate reception of the document. You can also perform the reverse operation: scan a document into the memory of your machine so that another machine can call your machine and initiate reception of the document. Calling the sending machine and asking the sending machine to fax a document is called "polling".
ADVANCED TRANSMISSION METHODS USING THE POLLING FUNCTION When used in conjunction with the timer transmission function (page 33), only one polling job can be stored. Note 1 In Fax mode, press the [SPECIAL FUNCTION] key.
ADVANCED TRANSMISSION METHODS Serial polling When performing serial polling, an auto-dial key that includes a sub-address or passcode (page 52) cannot be selected. 1 Perform steps 1 to 3 of the polling procedure (page 36). 2 Select "SERIAL POLLING" with the [ ] or [ ] key. PQ DED COPY LEX SCAN LEX SCAN ACC SENDING OPTIONS POLLING SERIAL POLLING SUB ADDRESS TX About the steps that follow See steps 5 to 8 of the polling procedure (page 36).
ADVANCED TRANSMISSION METHODS USING POLLING MEMORY This function sends a document previously scanned into memory to a receiving machine when the receiving machine calls and polls your machine. (If desired, you can restrict polling to fax machines whose fax number you have programmed in your machine. See "Restricting polling access (polling security)" on page 40.
ADVANCED TRANSMISSION METHODS 7 Select "1 TIME" or "REPEAT" with the [ ] or [ ] key. SELECT SENDING 1 TIME REPEAT 9 Press the [START] key ( MNO • Scanning begins. • If you are scanning from the document glass and have another page to scan, change pages and press the [START] key ( ). Repeat until all pages have been scanned and then press the key. WXYZ @.-_ AD-END If you select "1 TIME", the document data is automatically cleared from memory after your machine is polled once.
ADVANCED TRANSMISSION METHODS Deleting documents from the Public Box This procedure is used to delete documents from the Public Box when they are no longer needed. 1 2 Follow steps 2 to 6 of "Scanning a document into polling memory (the Public Box)" (page 38) and then follow the steps below. 4 Select "YES" with the [ ] or [ ] key. DELETE YES NO Select "DELETE" with the [ ] or [ ] key. PQ DED COPY LEX SCAN LEX SCAN ACC ORIGINAL ADD CHANGE DELETE PRINT To cancel the deletion, select "NO".
INCLUDING SENDER INFORMATION ON FAXES This function prints the date, time, your programmed name, your programmed fax number, and the transmitted page number at the top centre of each page that you fax. All pages that you fax include this information. Example of fax page printed out by the receiving machine OCT-22-2011-SAT 03:00 PM (1) SHARP PLANNING DIV. (2) FAX No. 0666211221 (3) P. 001/001 (4) (1) Date and time Date and time: programmed in the system settings (see "DATE & TIME SET" on page 104).
FAXING A DIVIDED ORIGINAL (DUAL PAGE SCAN) When faxing a book or other bound document, you can use this function to divide the two open pages of the book into two separate fax pages. This function can only be used when the original is A3, B4, or A4R size (11" x 17" or 8-1/2" x 11"R size if the machine uses inch-based paper sizes) is scanned using the document glass.
ADDING A COVER SHEET/MESSAGE TO A FAX TRANSMISSION This function automatically attaches an A4 (8-1/2" x 11") cover sheet to your fax transmissions. The cover sheet shows the date and time, the destination name, the sender's name and fax number, and the number of pages in the transmission. A message can also be added to a transmission. One of the following messages can be selected: "CONFIDENTIAL", "PLEASE DISTRIBUTE", "URGENT", "PLEASE CALL BACK", "IMPORTANT".
USING SETTINGS STORED AS A PROGRAM This function allows you to store the steps of an operation, including the destination and scanning settings, into a program. This function is convenient when you frequently send documents, such as a daily report, to the same destination. Up to nine programs can be stored. When storing a program, a name (maximum 36 letters) can be assigned to the program. For information on storing, editing, and deleting programs, see "STORING, EDITING AND DELETING PROGRAMS" on page 76.
FORWARDING RECEIVED DATA TO A NETWORK ADDRESS (INBOUND ROUTING SETTINGS) The received fax data can be automatically forwarded to a specified e-mail address. When this function is enabled, you can forward the received data to a specified address without printing it. Note • This function is available only when the network expansion kit is installed. • When a mobile telephone is set as a recipient, data may not be forwarded successfully depending on the type of mobile telephone being used.
ADVANCED TRANSMISSION METHODS Set a file name for forwarding received data Select the checkboxes of items used for the file name. Items Serial Number, Sender Name, Date & Time, Session Page Counter, Unique Identifier, and Characters are assigned to the file name in this order. To add a desired text string, select the "Characters" checkbox and enter the string in "Preset of Character" using up to 64 characters. 1 In the menu frame, click [Inbound Routing Settings].
ADVANCED TRANSMISSION METHODS SETTINGS THE DESTINATION Specify a sending source of received data and forwarding destination e-mail addresses to configure a forwarding table. Up to 10 forwarding tables can be configured.
ADVANCED TRANSMISSION METHODS 7 Enter the destination e-mail address in "Forward Destination (Max.5)". Up to five e-mail addresses can be specified as the destination. Three types of methods are available for entering the destination. The set e-mail addresses are displayed in "Forwarding Destination Settings". • Entering an e-mail address directly Click the [Direct Entry] button. When the "Forwarding Destination Settings (Direct Entry)" appears, enter an e-mail address and click the [Submit] button.
FORWARDING RECEIVED FAXES TO ANOTHER MACHINE WHEN PRINTING IS NOT POSSIBLE (FORWARDING FUNCTION) When printing is not possible because of a paper, toner, or other problem, you can forward received faxes to another fax machine if that machine has been appropriately programmed in your machine. This function can be conveniently used in an office or other workplace where there is another fax machine connected to a different phone line.
ADVANCED TRANSMISSION METHODS 3 Select "RX DATA TRANSFER" with the [ ] or [ ] key. PQ DED COPY LEX SCAN LEX SCAN ACC SPECIAL FUNCTION PRINT ENTRY RX DATA TRANSFER 6 Press the [OK] key. The machine automatically dials the forwarding number programmed in the system settings and begins forwarding the fax or faxes. OK Note 4 Press the [OK] key. BACK OK GHI PQRS 5 Select "TRANSFER" with the [ ] or [ ] key.
ADVANCED TRANSMISSION METHODS INSTALLING THE PC-FAX DRIVER (THAT ACCOMPANIES THE MACHINE) Note 1 2 • The PC-Fax driver uses the printer driver port. Before installing the PC-Fax driver, be sure to install the MFP driver (printer/scanner). • To install this software, you must have administrator's rights. Insert the "Software CD-ROM" that accompanies the machine into your computer's CD-ROM drive. 6 Click the [Custom] button.
4 TRANSMISSION USING F-CODES This chapter explains F-code transmission, which gives you a convenient means of performing advanced operations such as relay broadcast transmission and confidential transmission. Please read those sections that are of interest to you. COMMUNICATION BETWEEN MACHINES SUPPORTING F-CODES This machine supports the "F-code" standard as established by the ITU-T*.
TRANSMISSION USING F-CODES When communication occurs involving a box, the communication will only take place if the sub-address and passcode that the other machine sends match the sub-address and passcode programmed in your machine for that box. Therefore, to allow communication, you must inform the other party of the sub-address and passcode of the box.
F-CODE POLLING MEMORY F-code polling memory allows one fax machine to call another fax machine and initiate reception of a document that has been scanned into the other machine's F-code polling memory box. Calling another machine and initiating reception is called F-code polling, and scanning a document into a memory box for another machine to retrieve by polling is called F-code polling memory.
TRANSMISSION USING F-CODES USING F-CODE POLLING MEMORY In order for another machine to retrieve a document from your machine, you must first scan the document into the F-code polling memory box. You can check the document in the memory polling box by printing it out. (See "Checking and clearing document data in a box" on page 56.) Note When using F-code polling memory, do not set the reception mode to manual reception.
TRANSMISSION USING F-CODES Checking and clearing document data in a box The procedures for checking document data in an F-code polling memory box by printing the data and for clearing the data are generally the same as in "Printing documents in the Public Box" (page 39) and "Deleting documents from the Public Box" (page 40). 1 2 Perform steps 2 through 4 of "Scanning a document into polling memory (the Public Box)" on page 38. Select "PRINT" or "DELETE" with the [ ] or [ ] key.
TRANSMISSION USING F-CODES PROCEDURE FOR F-CODE POLLING Make sure that a document has not been placed in the document feeder tray or on the document glass, and then follow the steps below. Note 1 • You must know the sub-address (SEP) and passcode (PWD) of the other machine's F-code polling memory box. • Serial polling (selecting multiple fax machines to be polled using a group key, Rapid keys, and Speed Dial numbers) is not possible when using F-code polling.
TRANSMISSION USING F-CODES 10 Enter a passcode (maximum 20 digits) with the numeric keys. 11 WXYZ • Characters that can be entered are numbers, "#", and spaces. However, the initial character cannot be a space. • If you make a mistake, press the [C] key and re-enter the correct digit(s). • If the other machine has not programmed a passcode, omit the passcode and go to the next step. • If you specified a Rapid key or Speed Dial number in step 6 that has a passcode programmed, the passcode will appear.
F-CODE CONFIDENTIAL TRANSMISSION F-Code confidential transmission provides a secure means of faxing confidential documents. The sub-address and passcode programmed in the box restrict the recipients of the fax, and once received in the box, the fax can only be printed by someone who knows the print passcode. This function is convenient when sending important documents that you only want a specific person to see, or when multiple departments share a single fax machine.
TRANSMISSION USING F-CODES F-code confidential transmission 1 2 Follow steps 1 to 4 of "BASIC PROCEDURE FOR SENDING FAXES" (page 17) and then follow the steps below. 3 Press the [OK] key. 9 Enter the sub-address (maximum 20 digits) with the numeric keys. WXYZ Press the [SPECIAL FUNCTION] key. ON LINE DATA LINE DATA 8 When the [SPECIAL FUNCTION] key is pressed, the special function selection screen appears.
TRANSMISSION USING F-CODES PRINTING A DOCUMENT RECEIVED TO AN F-CODE CONFIDENTIAL MEMORY BOX Faxes received in an F-code confidential memory box are printed out by entering the 4-digit print passcode (0000 to 9999) that was programmed when the box was created. Note 1 In fax mode, press the [SPECIAL FUNCTION] key. ON LINE DATA LINE DATA 2 • Make sure that a Transaction Report is set to print out in the system settings so that you will be informed when a confidential document is received.
F-CODE RELAY BROADCAST TRANSMISSION The F-Code relay broadcast function allows the machine to act as a relay machine for a broadcast transmission. The end receiving machines are stored in the machine's F-Code relay memory box, and when the machine receives a relay request from another F-Code machine, it will relay the fax to all of the stored end receiving machines.
TRANSMISSION USING F-CODES USING THE F-CODE RELAY BROADCAST FUNCTION (your machine is the relay machine) When a document is received from a relay request machine, the F-code relay broadcast function transmits the document to the end receiving machines using a memory box only if the sub-address and passcode sent by the relay request machine are correct. To create, edit, or delete an F-code relay group (box), see pages 78, 80 and 83.
5 CONVENIENT METHODS OF USE This chapter explains convenient functions that can be used when sending a fax, connecting an extension phone, and other features that expand the scope of use of the fax machine. Please read those sections that are of interest to you. CONNECTING AN EXTENSION PHONE You can connect a telephone to the machine and use it as an extension phone to make and receive calls like any normal phone. Fax reception can also be activated from an extension phone connected to the machine.
CONVENIENT METHODS OF USE SETTING THE RECEPTION MODE The machine normally receives faxes automatically after ringing; however, when an extension phone is connected, you can set the reception mode to MANUAL. This will allow you to talk to the other party first and then receive a fax. This is convenient when you only have one telephone line and receive more voice calls than faxes. You must answer all calls on the extension phone, and activate fax reception after you verify that a call is a fax transmission.
6 PROGRAMMING This chapter explains the procedures for programming auto dial keys (Rapid keys, Speed Dial numbers, and group keys), programs, and F-code operations, and how to print out lists of programmed information. PROGRAMMING Auto dial numbers (Rapid keys, Speed Dial numbers, and group keys), programs, and F-code operations are stored and edited at the operation panel of the machine. This chapter explains how to use the operation panel for these procedures.
PROGRAMMING 3 Press the [OK] key. BACK OK To store a Rapid key or Speed Dial number, follow steps 1 through 6 on pages 66 to 67 and then follow the steps below. GHI 7 PQRS 4 [Storing Rapid keys and Speed Dial numbers] Select "DIAL" with the [ ] or [ ] key. Press a Rapid key ([01] to [50]) or press the [SPEED] key. • If you are storing a Rapid key, press the Rapid key that you wish to use ([01] to [50]). If you press a Rapid key that has already been programmed, a warning message will appear.
PROGRAMMING 11 13 Press the [OK] key. OK 12 26 27 28 F 37 P 38 39 R 48 V 40 O 45 S 49 W J N 44 Q KEY WORDS ABCDE E 35 I M 43 47 U 30 D 34 H L 42 46 C 33 G K 41 29 B 32 36 • If you pressed the [START] key ( ), you will return to step 7. If you wish to store another Rapid key or Speed Dial number, repeat steps 7 to 13. If you have finished storing auto-dial numbers, press the [BACK] key.
PROGRAMMING 3 OK Enter a sub-address (maximum 20 digits) with the numeric keys. ABC DEF GHI JKL MNO PQRS TUV WXYZ SUB ADDRESS [Chain Dialling] To set an auto-dial number as a Chain Dial number, complete steps 1 through 13 on pages 66 to 68 and then follow the steps below. Note :123 @.-_ ACC. #-C READ-END Characters that can be entered are numbers, " ", "#", and spaces. If you make a mistake, press [C] key and then re-enter the correct number.
PROGRAMMING [Transmission speed setting] [International transmission mode setting] To set the transmission speed, complete steps 1 through 13 on pages 66 to 68 and then follow the steps below. To set the international transmission mode, complete steps 1 through 13 on pages 66 to 68 and then follow the steps below. Note 1 Set the transmission speed only when you know what speed is most suitable, such as when you are sending a fax to a foreign country and telephone line conditions are bad.
PROGRAMMING [Storing a group key] 5 To store a group key, follow steps 1 through 6 on pages 66 to 67 and then follow the steps below. 1 • To store a Rapid key, press the Rapid key that you wish to use ([01] to [50]). Press a Rapid key ([01] to [50]). 26 Press the Rapid key ([01] to [50]) that you wish to program as a group key. If you press a Rapid key that has already been programmed, a warning message will appear.
PROGRAMMING [Editing and deleting auto-dial numbers] To edit or delete an auto-dial number, follow steps 1 through 6 on pages 66 and 67 and then follow the steps below. • To edit a Speed Dial number, press the [SPEED] key and then enter the Speed Dial number (000 to 299) that you wish to edit with the numeric keys.
PROGRAMMING 11 To finish the storing procedure, press the [START] key ( ). If you wish to program an option such as F-code, chain dialling, transmission speed, or international transmission mode, press the [OK] key. • If you pressed the [START] key ( ), go to step 5. If you wish to program another Rapid key or Speed Dial number, repeat steps 5 to 11. To exit, press the [BACK] key. Editing to that point will be completed.
PROGRAMMING 3 Select "CHANGE" with the [ ] or [ ] key. 9 Edit the stored information. • To add a Rapid key or Speed Dial number, enter the Rapid key ([01] to [50]) or Speed Dial number that you wish to add. A key or number that is already in the group cannot be added. GROUP CHANGE DELETE 26 27 A 31 F 36 G K 46 L Press the [OK] key.
PROGRAMMING ● Deleting a group key 1 In step 3 on page 74, select "DELETE" with the [ ] or [ ] key. PQ DED COPY LEX SCAN LEX SCAN GROUP CHANGE DELETE ACC 2 Press the [OK] key. BACK GHI OK PQRS 3 26 Press the group key (one of Rapid keys [01] to [50]) that you wish to edit. 27 A 31 28 32 F 36 42 43 4 V I 44 O 45 S 49 W J 40 N R 48 E 35 39 M Q 47 U H 38 L 30 D 34 G P 46 C 33 37 K 41 29 B T 50 XYZ SP Select "DELETE" with the [ ] or [ ] key. SBC CO.
PROGRAMMING STORING, EDITING AND DELETING PROGRAMS You can store a transmission method*, cover sheet/message, transmission settings, dual pages, and/or resolution/exposure settings in a program. This will allow you to use the settings for a transmission by means of a simple operation (see "USING A PROGRAM" on page 44).
PROGRAMMING 10 Select the program that you wish to store with the [ ] or [ ] key. PROGRAM TX TYPE SENDING MENU [ ]:CANCEL [START]:ENTER • A transmission method, cover sheet/message, resolution/exposure settings, dual pages, sender's name, and transmission settings can be stored. A transmission method must be stored. The storing procedure cannot be completed unless a transmission method is stored. • For the procedures for selecting each of the settings, refer to the explanations of the settings.
PROGRAMMING, EDITING, AND DELETING F-CODE MEMORY BOXES The procedure for programming a box for F-code transmission is explained here. There are three types of F-code boxes: F-code public boxes (page 81), F-code confidential boxes (page 79), and F-code relay group boxes (page 80). F-code boxes are programmed, edited, and deleted as explained below. PROGRAMMING AN F-CODE MEMORY BOX A box name, sub-address, passcode, and the appropriate functions are programmed in an F-code box.
PROGRAMMING [PROGRAMMING AN F-CODE CONFIDENTIAL BOX] Follow the steps below to program an F-code confidential reception box. An F-code (sub-address and passcode) for F-code confidential reception and a print passcode to print out received faxes are programmed in each box. Up to 10 boxes can be programmed. To check the contents of a programmed box, print the following list: "PRINT - REPORT - SUB ADD SET LIST".
PROGRAMMING [PROGRAMMING AN F-CODE RELAY GROUP] This procedure is used to program an F-code relay group box for relay broadcast of a received fax upon receipt of an F-code relay request. Up to 10 boxes can be programmed. An F-code (sub-address and passcode) for reception of an F-code relay request and the destinations to which the fax is to be relayed are programmed in each box. To check the contents of a programmed box, print the following list: "PRINT REPORT - SUB ADD SET LIST" (page 85).
PROGRAMMING [PROGRAMMING F-CODE PUBLIC (POLLING MEMORY) BOXES] This setting is used to program a box to store document data for remote transmission when polled by a machine that supports F-Code communication. Up to 10 boxes can be programmed. To check the contents of a programmed box, print the following list: "PRINT - REPORT - SUB ADD SET LIST" (page 85). To program an F-code public box, follow steps 1 through 6 on page 78 and then follow the steps below.
PROGRAMMING ● Editing an F-code confidential box 11 Select the name of the F-code confidential box that you wish to edit with the [ ] or [ ] key. PQ DED COPY LEX SCAN LEX SCAN ACC S.A. CONF. BOX SBC CO. — — — — — — — — — — — — [#]:LIST DETAIL If not all letters of the box name appear, press the key to display all letters. Press the key once again to return to the original screen. 12 18 Edit the passcode (maximum 20 digits) with the numeric keys. • See steps 5 and 6 on page 69.
PROGRAMMING [EDITING AND DELETING F-CODE RELAY GROUPS] 9 14 OK Select "CHANGE" or "DELETE" with the [ ] or [ ] key. PQ DED COPY LEX SCAN LEX SCAN S.A. RELAY GRP CHANGE DELETE 15 ACC 10 Press the [OK] key. • See steps 3 to 6 on page 69. • If you do not need to edit the sub-address and passcode, press the [OK] key and go to the next step. Press the [OK] key. 16 BACK OK Edit the sub-address and passcode (maximum 20 digits) with the numeric keys. Edit the relay destinations.
PROGRAMMING [EDITING/DELETING F-CODE PUBLIC BOXES] 9 14 Select "CHANGE" or "DELETE" with the [ ] or [ ] key. PQ DED COPY LEX SCAN LEX SCAN S.A. MEM POLLING CHANGE DELETE OK 15 ACC 10 Press the [OK] key. • See steps 3 to 6 on page 69. • If you do not need to edit the sub-address and passcode, press the [OK] key and go to the next step. Press the [OK] key. BACK OK 16 GHI Edit the sub-address and passcode (maximum 20 digits) with the numeric keys.
PRINTING LISTS OF PROGRAMMED INFORMATION, SETTINGS, AND COMMUNICATION ACTIVITY You can print lists showing programmed information, settings, and communication activity. The following lists can be printed. • ACTIVITY REPORT: This report shows information on your most recent transmissions and receptions, including communication time and the other party. • TIMER LIST: This list shows timer transmissions and recall mode jobs. • MEM.
ENTERING CHARACTERS This section explains how to enter and edit characters for names of rapid dial numbers, Speed Dial numbers, and group keys, as well as account names, program names, and search characters for the address list. CHARACTERS THAT CAN BE ENTERED Characters that can be entered for names The following characters can be entered: • Up to 36 characters can be entered for a name. However, up to 18 characters can be entered for a account name or sender's name.
PROGRAMMING CHARACTER ENTRY KEYS To enter characters, use the character entry keys on the operation panel. The characters entered by each key and key functions are as follows. Character entry key A B C D E F G H I J K L M N O P Q R S T U V W XYZ Note Characters and function A B C D E F G H I J K L M N O P Q R S T U V W XYZ Character entry key Characters and function [SP] [SHIFT] Use to enter special characters. Use to toggle between upper case and lower case letters. [SYMBOL] Use to enter symbols.
PROGRAMMING INITIAL PROCEDURE FOR ENTERING CHARACTERS Entering alphabetical characters (example: TPS) 1 Entering symbols 1 Open the Rapid key overlay. Press the [SYMBOL] key. REDIAL/PAUSE ENTER NAME PRINT SCAN SPEED FAX SYMBOL COMM. SETTING SPACE/– ABC To switch between upper case letters and lower case letters, press the [SHIFT] key. 2 Select the symbol that you wish to enter with the [ ][ ][ ][ ] keys. PQ 2 26 Enter "T", "P" and "S" with the letter keys.
PROGRAMMING Entering special characters Special characters are entered with the Rapid key overlay opened. 1 Press the [SP] key. M N 44 O SPEE 45 SYMBO R S 49 W T COMM. SET 50 XYZ SPEC. CHARACTER SP SPACE 1/ 2 2 Select the special character that you wish to enter with the [ ][ ][ ][ ] keys. PQ SPEC. CHARACTER ED COPY LEX SCAN LEX SCAN ACC 1/ 2 To move to the next page, move the cursor to the bottom line and press the [ ] key.
7 TROUBLESHOOTING This chapter contains information to help you make efficient use of the fax features of the machine, including solutions to common problems. WHEN A TRANSACTION REPORT IS PRINTED The machine has been set to automatically print a transaction report to notify you of the result when a transmission is not successful or when the Broadcast transmission function is used.
TROUBLESHOOTING Sending result Explanation XX-XX OK When group dialling, broadcast transmission, or F-code relay request transmission was performed, xxx- : Indicates total number of transmissions. xxx OK : Indicates completed transmissions. NO S ADD FUNC When an F-code transmission was attempted, (1) The other machine did not have the F-code function. (2) An F-code was not programmed in the other machine. S ADD TX FAIL When an F-code transmission was attempted, (1) The sub-addresses did not match.
VIEWING THE COMMUNICATION ACTIVITY REPORT AT REGULAR INTERVALS (Communication activity report) Your machine keeps a record of the most recent 50 transactions (both transmissions and receptions) that were performed. The record includes the date of the transaction, the other party's name, the duration, and result. You can have the report automatically printed when the number of transactions exceeds 50, or at a specified time. This allows you to check the machine's activity at regular intervals.
TROUBLESHOOTING Message (alarm sounds) Toner is low. Add toner. Can not copy or print. Meaning of message Solution Toner is low. Replace the toner cartridge. "REPLACING THE TONER CARTRIDGE" in the Operation Guide for the machine There is no toner. Replace the toner cartridge. "REPLACING THE TONER CARTRIDGE" in the Operation Guide for the machine The detected original size is smaller than the actual original size, or a smaller size has been selected.
PROBLEMS AND SOLUTIONS If you experience a problem with the fax function, first check the following table. This section describes problems related to the fax function. For problems related to general operation of the machine, see "TROUBLESHOOTING" in the Operation Guide for the machine. Problem The machine does not operate. Dialling is not possible. Cannot send a fax. Check Solution Page Is the machine power switch turned on? Turn the power switch ON.
TROUBLESHOOTING Problem The transmitted image is distorted. Check Solution Page Were line conditions poor due to thunder or another reason? Try the transmission again. Were the resolution and exposure settings suitable? Check the resolution and exposure settings. "SELECTING RESOLUTION AND EXPOSURE SETTINGS" on page 14 White or black lines appear in the transmitted image.
8 SYSTEM SETTINGS The system settings are used by the administrator (administrator of the machine) to customize certain features of the machine to better meet the needs of users. This section explains system settings for the fax features of the machine. For system settings that are for the copy function, print function, and network scanner function, see the respective manuals for those functions.
SYSTEM SETTINGS ADMINISTRATOR SETTINGS MENU The system settings are accessed via the following menu structure. Refer to this menu when enabling or disabling the settings that are explained beginning on page 99. Some settings contain an additional level of settings (a settings screen).
PROCEDURE FOR USING THE SYSTEM SETTINGS The system settings can be accessed from any mode (copy, fax, print, and scan mode). When the setting is completed, you will return to the previous mode. • Faxes cannot be sent or received while a system setting is being used. • A system setting cannot be used while a fax is being sent or received, while a voice call is being made, or while a received fax is being printed. INITIAL PROCEDURE 1 Press the [SPECIAL FUNCTION] key.
SYSTEM SETTINGS FOR THE FAX FUNCTION LIST PRINT/SET This setting is used to print lists showing current system settings and other programmed information. 1 Follow steps 1 through 6 of "INITIAL PROCEDURE" (page 98). 2 Select "LIST PRINT/SET" with the [ ] or [ ] key and then press the [OK] key. LIST PRINT 1 Follow steps 1 through 6 of "INITIAL PROCEDURE" (page 98). 3 Select "LIST SETTING" with the [ ] or [ key and then press the [OK] key.
SYSTEM SETTINGS 2 Select "LIST PRINT/SET" with the [ ] or [ ] key and then press the [OK] key. 3 Select "LIST SETTING" with the [ ] or [ key and then press the [OK] key. 4 Select "AUTO LISTING" with the [ ] or [ ] key and then press the [OK] key. 5 Select "AUTO PRINT REPT AT LIMIT (50)" with the [ ] or [ ] key and then press the [OK] key. INITIAL SETTING ] • The setting is enabled and a checkmark appears in the checkbox.
SYSTEM SETTINGS OWN PASSCODE SET Use this setting to program the fax number of the machine and the name of the user. The programmed name and number are printed at the top of each fax page you send. The number is also used as a passcode when performing polling reception "USING THE POLLING FUNCTION" (page 36). You can check your programmed name and number by printing out the "SYSTEM SET LIST". (Page 99) • A maximum of 20 digits can be stored for the fax number.
SYSTEM SETTINGS EXTENSION TEL Enable this setting when an extension telephone is connected to the machine. An extension telephone connected to the machine cannot be used until this setting is enabled. The initial setting is enabled. 1 Follow steps 1 through 6 of "INITIAL PROCEDURE" (page 98). 2 Select "INITIAL SETTING" with the [ ] or [ ] key and then press the [OK] key. 3 Select "EXTENSION TEL" with the [ ] or [ ] key and then press the [OK] key.
SYSTEM SETTINGS 6 ACCOUNT CONTROL This setting is used to enable (or disable) auditing mode. Auditing mode is initially disabled. When this setting is enabled, the operator must enter a valid 5-digit account number in order to use the fax function of the machine. This function also tracks fax communication time and fax pages for each account. To enable auditing mode, program an account number as explained in "ACCOUNT # SET". Enter an account name (up to 18 characters) and then press the [OK] key.
SYSTEM SETTINGS 3 Enter an account name (up to 18 characters long) and press the [OK] key. • See "ENTERING CHARACTERS" (page 86) for the procedure for entering letters. • If you do not wish to change the account name, press the [OK] key. • Press the [OK] key. You will return to the screen of step 2. To change another number, repeat steps 2 and 3. To exit, press the [BACK] key in step 2. DATE & TIME SET This setting is used to set the machine's internal clock to the current date and time.
SYSTEM SETTINGS SENDING FUNCTION ROTATE TX This setting is used to adjust the exposure level when scanning an original to be faxed. The initial setting is standard resolution and auto exposure mode. This setting is used to select whether or not an A4, A5R or 8-1/2" x 11" size original that is oriented vertically will be rotated to a horizontal orientation before transmission. Rotation is normally enabled, and vertically oriented originals are rotated counterclockwise.
SYSTEM SETTINGS SEND MODE 1 This setting is used to select whether the default mode for sending faxes is memory transmission or direct transmission. The initial setting is "MEMORY TX". Follow steps 1 through 6 of "INITIAL PROCEDURE" (page 98). 2 Select "SENDING FUNCTION" with the [ ] or [ ] key and then press the [OK] key. 3 Select "PRINT STATION # IN RCVD DATA" with the [ ] or [ ] key and then press the [OK] key.
SYSTEM SETTINGS 5 Enter the recall interval (01 to 15)* with the numeric keys and then press the [OK] key. 7 • The recall interval can be set from 1 to 15* minutes. • After finishing step 5, if you do not wish to change the number of recall attempts, press the [BACK] key to exit. • If you do not wish to have recalling take place, set the number of attempts to "0". • If the recall interval is set to "0", the machine will immediately call again after the connection is broken due to the line error.
SYSTEM SETTINGS AUTO COVER SHEET #OF RINGS MAN.RX When this setting is enabled, a cover page is automatically generated and added to each fax transmission. The cover page shows the date, time, destination name, sender's name, sender's fax number, number of pages, and a message if the message function is selected.
SYSTEM SETTINGS RECEIVED DATA PRINT CONDITION This setting determines the selection condition for paper when printing received documents. Select one of the three conditions below. "REDUCTION" is normally selected. • "REDUCTION" Each received image is printed at actual size when possible. When not possible, the image is automatically reduced before printing. • "DIVISION" Each received image is printed at actual size. If necessary, the image is split onto multiple sheets of paper.
SYSTEM SETTINGS 7 FW. RX DATA This setting is used to select whether or not received faxes are forwarded to a fax machine programmed as explained in "RECEIVED DATA FW. STATION SET" (page 110) in the event that the machine cannot print the faxes. The setting is initially disabled. 1 Follow steps 1 through 6 of "INITIAL PROCEDURE" (page 98). 2 Select "RCV. FUNCTION" with the [ ] or [ ] key and then press the [OK] key. 3 Select "FW. RX DATA" with the [ ] or [ key and then press the [OK] key.
SYSTEM SETTINGS ENTER JUNK FAX # 1 This setting is used to program fax numbers from which you wish to block reception. Up to 50 fax numbers can be stored (maximum of 20 digits each). To block reception from the programmed fax numbers, the "ANTI JUNK FAX" setting must be enabled. Follow steps 1 through 6 of "INITIAL PROCEDURE" (page 98). 2 Select "POLLING SECURITY" with the [ ] or [ ] key and then press the [OK] key. 3 Select "POLLING SECURITY" with the [ ] or [ ] key and then press the [OK] key.
9 APPENDIX This chapter contains the specifications of the fax function and the index. SPECIFICATIONS For information on power requirements, power consumption, dimensions, weight, and other specifications that are common to all features of the machine, see "SPECIFICATIONS" in the "Start Guide".
INDEX Symbols / Numbers E #of rings at. RX .......................................................108 8 1/2x11 RX reduce ................................................109 Earlier output ..................................................... 27,110 ECM ......................................................................... 24 Editing/deleting - F-code confidential boxes .................................. 81 - F-code public (polling memory) boxes ............... 84 - F-code relay groups ................
M R Memory transmission ................................................23 Rapid dialling............................................................ 15 Rcv. function .......................................................... 108 Read-end ................................................................. 18 Recall set (err)........................................................ 107 Recall setting (busy)............................................... 106 Received data print condition .....................
INDEX BY PURPOSE Advanced transmission methods Programming/settings Broadcast transmission.............................................31 Cover sheet/message function..................................43 Dual page scan .........................................................42 Forwarding function...................................................49 Own number sending ................................................41 Polling function - Polling .............................................................
WARNING: This is a Class A product. In a domestic environment this product may cause radio interference in which case the user may be required to take adequate measures.
MX-FX13 SHAR~ SHARP CORPORATION