PORTABLE MINIDISC RECORDER LECTEUR-ENREGISTREUR MINIDISC PORTABLE MODEL MODÈLE MD-MT99C OPERATION MANUAL MODE D’EMPLOI for SECL TINSK0119AWZZ ENGLISH ······ Please refer to pages E-1 to E-48. FRANÇAIS ······ Se reporter aux pages F-1 à F-48.
ENGLISH Introduction Contents -Introduction/Contents- Important Introduction Thank you for purchasing this SHARP product. For the best performance, read this manual carefully. It will guide you in operating your SHARP product. „ Important Introduction „ Advanced Features Special Notes . . . . . . . . . . . . . . . . . . . . . . . . . . . . . . . . 2 Accessories . . . . . . . . . . . . . . . . . . . . . . . . . . . . . . . . . 2 Names of Controls and Indicators . . . . . . . . . . . . .
Special Notes z The letters in brackets contained in the model number indicate the colour of the product only. Operation and specifications are unaffected. z Audio-visual material may consist of copyrighted works which must not be recorded without the authority of the owner of the copyright. Please refer to the relevant laws in your country.
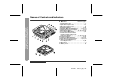
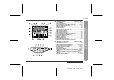
Names of Controls and Indicators E-3 Reference page 1. 5V DC Input Socket . . . . . . . . . . . . . . . . . . . . . . . 7 2. Optical/Line Input Socket . . . . . . . . . . . . . . . . 7, 8 3. Microphone Input Socket . . . . . . . . . . . . . . . . . . 23 4. Bass/Delete Button . . . . . . . . . . . . . . . . . . . 14, 34 5. Edit/Auto Mark/Time Mark Button . . . . . 21, 26, 33 6. Display/Character Select Button . . . . . . . . . 27, 33 7. Mode/Charge Button . . . . . . . . . . 10, 16, 17, 29, 32 8.
MD-MT99C „ Remote control unit Reference page 1. Headphones Socket . . . . . . . . . . . . . . . . . . . . . . . 13 2. Bass/Delete/Track Mark Button. . . . . . . . 14, 21, 34 3. Volume Down/Cursor Button. . . . . . . . . . . . . 14, 34 4. Volume Up/Cursor Button . . . . . . . . . . . . . . . 14, 34 5. Hold Switch. . . . . . . . . . . . . . . . . . . . . . . . . . . . . . 31 6. Play/Pause Button . . . . . . . . . . . . . . . . . . . . . 10, 14 7. Fast Reverse/Recording Level Down/Name Select Button . . . .
-Precautions- Important Introduction Precautions E-5 „ Important „ Storing the unit z Do not wear your headphones when you are crossing streets or near traffic. z Do not use your headphones whilst driving a motor vehicle. It may create a traffic hazard and may be illegal. Remember to obey all of the safety rules in your area. Avoid using or leaving the unit in the following places. z Do not play the unit at a high volume. Hearing experts advise against extended listening at high volume levels.
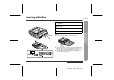
Inserting a MiniDisc MD-MT99C Lift it up. Insert a MiniDisc as shown. Close the compartment door. Notes: z Do not place the MiniDisc under the holder. Preparation 2 3 4 Slide the OPEN lever to release the compartment door. -Inserting a MiniDisc- 1 z If any resistance is felt, do not force the MiniDisc into the unit, as it may cause damage to the unit. If resistance is felt, remove the MiniDisc and reload it. z The lid cannot be opened if "TOC" is displayed; refer to the instruction on page 11.
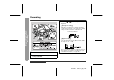
Connections -Connections- Preparation You can record your favourite CDs or tapes to MD. E-7 ENGLISH 01/4/26 99secl_E_2.
ENGLISH 01/4/26 99secl_E_2.
Recording 3 Press the ing level. or button to adjust the record- Analogue recording Level meter indicator -Recording- Basic Operation Adjust the recording level so that the maximum sound volume from the source makes the reading swing somewhere between -4 dB and 0 dB. Digital recording You can adjust the level in 1dB increments within the range of +12 - -12dB. 1 2 E-9 Once you adjust the digital recording level, the setting remains even after the recording stops.
MD-MT99C To interrupt recording Here you can search for the track to record. 5 6 7 Press the MODE/CHRG button repeatedly to select the recording mode (page 17). Press the PLAY/PAUSE button to start the MiniDisc unit recording. Begin playback on the stereo system, the output will be recorded. Press the PLAY/PAUSE button. z To resume recording, press the PLAY/PAUSE button again. z The track number will be increased by one each time the recording is interrupted.
Recording (continued) To update the recorded contents of the MiniDisc Press the /:OFF button whilst in the stop mode. The power turns off after recorded contents have been updated on the MiniDisc. -Recording- Basic Operation About the TOC E-11 After any recording or editing function, "TOC" (Table Of Contents) is displayed. To finalise the recording or editing function, press the /:OFF button. During this process "TOC" will flash and "TOC EDIT!" will be displayed.
MD-MT99C This portable MD incorporates a sampling rate converter meaning it can record from digital radios or DAT tape recorders. „ Note for digital recording You cannot copy a MiniDisc that you recorded from digital inputs to another MiniDisc or DAT. It is prevented by the SCMS (Serial Copy Management System). Recording from analogue inputs is not affected.
-Playback- Basic Operation Playback E-13 ENGLISH 01/4/26 99secl_E_3.
MD-MT99C 3 4 „ Volume control Press the VOL+ button to increase the volume and the VOL- button to decrease the volume. Volume (0-30) Plug the remote control into the REMOTE socket on the unit. Insert a MiniDisc (page 6). Press the PLAY/PAUSE button. Playback starts automatically with a playback only MiniDisc or a MiniDisc which is protected against accidental erasure (Auto-play function). To interrupt playback Press the PLAY/PAUSE button. To resume playback, press the PLAY/PAUSE button again.
Advanced Playback „ To locate the beginning of a track To move to the beginning of the next track: Press the button during playback. To restart the track being played: -Advanced Playback- Useful Features Press the button during playback. To locate the next track: Press the „ To locate the desired portion To locate the previous track: Press the For audible fast forward: Press and hold down the button during playback. For audible fast reverse: Press and hold down the button during playback.
MD-MT99C „ Random play or repeat play During playback, press the MODE/CHRG button repeatedly to select the playback mode. RANDOM RANDOM Random play Repeat play of tracks in random order Press the ENTER/SYNC button whilst a MiniDisc recorded in the monaural mode is being played. z If a track recorded in the stereo mode is reached during fast playback, the fast playback mode will be cancelled. z Depending on the contents recorded on a MiniDisc, it may be difficult to hear them.
Advanced Recording „ Long-play recording 2 times and 4 times long recording Double or quadruple time of stereo recording is possible. 1 Each time the button is pressed, the display will change as follows. -Advanced Recording- Useful Features Monaural recording In monaural, you can record twice as long as the stereo recording. A track recorded in monaural can be played back in double speed, see page 16. When a recording is paused, press the MODE/ CHRG button repeatedly to select the recording mode.
MD-MT99C Notes: z Tracks can be recorded in stereo recording mode, 2 times long recording mode, and 4 times long recording mode on one MiniDisc. z In monaural recording, the sound on the right and left channels is mixed even if the input source is in stereo. Although you can hear the stereo sound from the headphones, the recorded sound is monaural. z Tracks recorded in 2 times long recording and 4 times long recording modes cannot be played with the unit that does not support these modes.
Advanced Recording (continued) „ Playback sound-actuated recording Recording automatically starts or pauses by detecting sound from the stereo system (Synchronised recording). 4 Press the PAUSE button on the stereo system to enter the playback pause mode. Select the starting point for your recording and press the PAUSE button. Useful Features -Advanced Recording- 5 6 Press the ENTER/SYNC button. z "SYNC" will be displayed. z To cancel the operation, press the /:OFF button.
MD-MT99C 1 2 During playback, press the PLAY/PAUSE button at the point where you want to begin recording. Press the REC button. To cancel the operation, press the /:OFF button. 3 Press the ENTER/SYNC button. All of the tracks and track names will be erased, following the point where the playback is paused. 4 5 Press the MODE/CHRG button repeatedly to select the recording mode (page 17). Press the PLAY/PAUSE button. Useful Features You can erase a portion of a track and make a new recording.
Useful Features -Advanced Recording- Advanced Recording (continued) E-21 „ To create your own track numbers „ Recording tracks as a single track You can create your own track numbers at any point. You can record several pieces of music as a single track by disabling the auto marker function. Whilst recording, press the REC button at the point where you want to create track numbers. The track number will be increased by one. z One track number will be added every time the REC button is pressed.
MD-MT99C z When recording, if a programmed playback is performed by the source or playback is performed by selecting tracks manually, the MiniDisc track numbers may not be the same as on the source. z Track numbers may not be created properly, depending on the connected stereo system. Useful Features 1. Track numbers are created automatically during recording via the analogue connection when a silence of 1 second or more is detected (Auto marker function).
Recording from a Microphone Useful Features -Recording from a Microphone- „ To record from a microphone E-23 ENGLISH 01/4/26 99secl_E_4.
MD-MT99C Insert a recordable MiniDisc (page 6). Press the PLAY/PAUSE button whilst recording. z To resume recording, press the PLAY/PAUSE button again. The track number will be increased by one each time you interrupt recording. To stop recording Press the REC button. Press the ing level. or button to adjust the record- Press the /:OFF button. To write recorded contents on the MiniDisc Press the /:OFF button whilst in the stop mode.
Recording from a Microphone (continued) Useful Features -Recording from a Microphone- „ Sound-actuated recording (Mic Synchronised recording) 1 2 Press the level. or button to adjust the recording Level meter indicator 3 4 5 E-25 Press the REC button. Press the MODE/CHRG button repeatedly to select the recording mode (page 17). Press the ENTER/SYNC button to select the recording sensitivity.
MD-MT99C „ Track intervals Example: Set to "5 minutes". When recording from the microphone, track numbers will be created automatically at regular intervals (default setting: approximately every 5 minutes). During a mic synchro recording, the unit pauses when a silence lasts for 3 seconds or more, and creates a track number. During a mic manual recording 1 When a recording is paused or whilst recording, press the EDIT button repeatedly.
-Checking Displays- Useful Features Checking Displays E-27 „ To check the elapsed time and remaining time of the track „ To check the remaining recording time and the total playing time During playback, press the DISP button. Whilst in the stop mode, press the DISP button. Each time the button is pressed, the display will change as follows. Each time the button is pressed, the display will change as follows.
MD-MT99C Whilst in the stop mode, press the or button to display the track number and track name. The remaining amount of battery level is shown by the battery indicator ( ) during operation. Track number Track name 2 Press the DISP button to display the playing time for that track. Playing time Each time the or button is pressed, the playing time of the previous or next track will be displayed. z When the battery is completely discharged, the battery indicator will flash.
Battery Power „ Charging the rechargeable battery When the rechargeable battery is used for the first time or when you want to use it after a long period of disuse, be sure to charge it fully. Insert the rechargeable battery. A rechargeable battery other than the one supplied or the optional one (AD-N70BT) cannot be charged. 2 -Battery Power- Useful Features 1 E-29 3 Plug the AC adaptor into the wall socket, and then insert the plug on the other end into the DC IN 5V socket.
MD-MT99C Notes: z Charge the battery within the range of 5°C - 35°C (41°F - 95°F). z Charging is completed if " " does not blink when you plug in the AC adaptor and press the MODE/ CHRG button. z The unit can be left in the charging state after it is completed. Caution: z Use the specified battery AD-N70BT only. Do not charge a battery (nickel-cadmium, alkaline, etc.) other than that specified. z Do not remove the outer cover of the rechargeable battery. It may cause heat generation, fire, or explosion.
Hold Function -Hold Function- Useful Features The present operation condition can be kept even if other buttons are accidentally pressed in a place such as a crowded train. E-31 If the battery is inserted or the AC adaptor is connected, you can set this function even when the power is turned off. To cancel the hold mode Move the HOLD switch away from the safety position (the opposite direction of the arrow).
Changing Default Settings With a MiniDisc inserted, press the MODE/CHRG button for 2 seconds or more. "SET UP" will appear. When you release the button, "BEEP ON" or "BEEP OFF" will appear. 2 3 4 Press the or button to display the menu. Press the MODE/CHRG button to switch items. Press the /:OFF button. You can eliminate the confirmation sound that beeps when you press a button.
Titling a MiniDisc „ Creating disc and track names Load a MiniDisc to be named. A playback only or recording prevented MiniDisc cannot be edited. Whilst in the stop mode, press the EDIT button to select "DISC NAME". -Titling a MiniDisc- Advanced Features 1 3 Press the DISP button repeatedly to select the type of characters.
MD-MT99C When the name has been completely entered, press the EDIT button. "TOC" will be displayed. To write the updated contents to the MiniDisc, press the /:OFF button. You cannot remove the MiniDisc whilst "TOC" is displayed. "TOC" will not disappear until the recorded contents have been updated. Note: One disc name and up to 255 track names can be created per disc (a maximum of 100 characters for the disc and each track name and a total of 1,700 characters can be entered.
Titling a MiniDisc (continued) „ To add characters 1 Put the unit in the character input mode. 2 -Titling a MiniDisc- Advanced Features (Perform steps 1 - 2 on page 33.) Press the VOL+ or VOL- button to move the cursor to the character before which you want to add a new character.
MD-MT99C Master MiniDisc operation 1 Insert a Master MiniDisc. Operation of the MiniDisc for stamping 6 Load a MiniDisc for stamping. 7 Press the ENTER/SYNC button. 3 Whilst in the stop mode, press the EDIT button to select "NAME STAMP". Press the ENTER/SYNC button. The unit will finish recording the character information and enter the stop mode. To cancel the operation, press the /:OFF button. 4 5 Press the ENTER/SYNC button again.
Editing a Recorded MiniDisc „ To erase tracks one at a time 1 Advanced Features -Editing a Recorded MiniDisc- 2 E-37 Start playing the track to be erased, and press the PLAY/PAUSE button. „ To erase all of the tracks at once 1 Press the EDIT button repeatedly to select "ERASE". 2 3 Whilst in the stop mode, press the EDIT button repeatedly to select "ALL ERASE". Press the ENTER/SYNC button. Press the ENTER/SYNC button. To cancel the operation, press the /:OFF button.
MD-MT99C 2 3 Start playing the track to be divided into two. Press the PLAY/PAUSE button at the point where you want to divide the track. 1 2 Press the EDIT button repeatedly to select "DIVIDE". 3 Start playing the last of the two tracks to be combined, and press the PLAY/PAUSE button. Press the EDIT button repeatedly to select "COMBINE". Press the ENTER/SYNC button. Press the ENTER/SYNC button. To cancel the operation, press the /:OFF button. To cancel the operation, press the /:OFF button.
Editing a Recorded MiniDisc (continued) „ To move a track 1 Advanced Features -Editing a Recorded MiniDisc- 2 3 Play the track to be moved, and press the PLAY/ PAUSE button. Press the EDIT button repeatedly to select "MOVE". Press the ENTER/SYNC button. To cancel the operation, press the /:OFF button. 4 5 Press the tion. or button to select the direc- When a track has a name before dividing: The two new tracks will have the same name.
Listening through Another System „ Listening through a car stereo Notes: z It is recommended that the volume level of the MiniDisc unit be set to maximum when listening through a stereo system. z When recording with stereo system, eliminate the confirmation sound (page 32). Otherwise, it will also be recorded. z The recording will be made in the analogue mode. z Character information will not be recorded. Notes: z Adjust the volume of both this portable MD and a car stereo.
References -Other Features and Caution- Other Features and Caution E-41 „ Resuming auto play „ Rechargeable battery When you stop playback and replay the MiniDisc without removing it, playback starts from the point you stopped it. z A rechargeable nickel-metal hydride battery is the only kind that can be used. Even if the battery is not used, you should charge it at least once every three months because of the special quality of this battery.
MiniDisc System Limitations MD-MT99C The unit may have the following symptoms whilst recording or editing. The unit is not out of order. "DISC FULL" or "TOC FULL" appears even though the MiniDisc still has recording time left. More than 255 tracks (maximum) cannot be recorded regardless of the recording time. If the MiniDisc is recorded or edited repeatedly or if it has scratches (recording skips scratched parts), you may not be able to record the maximum tracks above.
Error Messages ERROR MESSAGES BATT EMPTY z The battery has run down. BLANK MD z Nothing is recorded. References Can't COPY -Error Messages- MEANING ERROR MESSAGES Can'tSTAMP (Check the number of tracks.) Can'tWRITE z You tried to record from a copy prohibited MiniDisc. z Cannot save the TOC information correctly to a MiniDisc. DEFECT z The disc is scratched. (If the recorded sound is not right, retry recording or replace the disc with a recordable one.) (Record using the analogue cable.
MD-MT99C z Poor connection of the digital cable. z No output signal comes out from the connected unit to playback. (Use the AC power for the connected unit.) z The input signal has improper sampling frequency. NOT PLAY z You tried to play back a track that cannot be played with this equipment. PLAY MD z You recorded on a playback-only disc. POWER ? z Improper power is being supplied. PROTECTED z The write protection tab of a MiniDisc is set to the protected position.
Troubleshooting Many potential "problems" can be resolved by the owner without calling a service technician. If something seems to be wrong with this product, check the following before calling your authorised SHARP dealer or service centre. The unit does not turn on. Some sounds are skipped.
Maintenance „ Cleaning When this product is subjected to strong external interference (mechanical shock, excessive static electricity, abnormal supply voltage due to lightning, etc.) or if it is operated incorrectly, it may malfunction. When the unit becomes dirty Clean it with a soft cloth. When the unit is excessively dirty, use a soft cloth dampened in water (external surfaces only). If such a problem occurs, do the following: 1. Unplug the AC adaptor from the wall socket. 2. Remove the battery. 3.
Specifications References -Specifications- As a part of our policy of continuous improvement, SHARP reserves the right to make design and specification changes for product improvement without prior notice. The performance specification figures indicated are nominal values of production units. There may be some deviations from these values in individual units. E-47 Power source: DC 1.2 V: DC 5 V: DC 1.5 V: DC 4.5 V: Power consumption: Output power: 7 W (AC adaptor) RMS: 20 mW (10 mW + 10 mW) (0.
MD-MT99C Battery life: 4 times long Continuous play: Approx. 13 hours Continuous recording: Approx. 10.5 hours Continuous play: Approx. 15.5 hours Continuous recording: Approx. 13.5 hours Continuous play: Approx. 17.5 hours When using a commercially available, high capacity, "AA" size (LR6), alkaline battery Continuous recording: Approx. 3 hours Continuous play: Approx. 15 hours Continuous recording: Approx. 4.5 hours Continuous play: Approx. 17.5 hours Continuous recording: Approx.
FRANÇAIS Nous vous remercions d'avoir porté votre choix sur ce produit SHARP. Avant l'utilisation, veuillez lire ce mode d'emploi très attentivement. -Introduction/Table des matières- Instructions importantes Introduction F-1 Table des matières „ Instructions importantes „ Fonctions avancées Remarques spéciales . . . . . . . . . . . . . . . . . . . . . . . . . 2 Accessoires . . . . . . . . . . . . . . . . . . . . . . . . . . . . . . . . . 2 Commandes et voyants . . . . . . . . . . . . . . . . . . . .
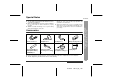
Remarques spéciales Accessoires Télécommande x 1 Casque x 1 Adaptateur CA x 1 Boîtier de batterie x 1 Batterie au nickel-métalhydride (AD-N70BT) x 1 Câble de raccordement (pour enregistrement analogique) x 1 Câble de raccordement (pour enregistrement numérique) x 1 Étui x 1 Instructions importantes z Les lettres mises en parenthèses du numéro de modèle indiquent la couleur du produit concerné. Le fonctionnement et les caractéristiques ne varient pas selon la couleur du modèle.
Commandes et voyants F-3 Page de référence 1. Jack d'entrée 5V CC . . . . . . . . . . . . . . . . . . . . . . . 7 2. Jack d'entrée de ligne/optique . . . . . . . . . . . . . 7, 8 3. Jack d'entrée de microphone . . . . . . . . . . . . . . . 23 4. Touche des graves/annulation . . . . . . . . . . . 14, 34 5. Touche de montage/numérotage automatique/ marque de temps. . . . . . . . . . . . . . . . . . . 21, 26, 33 6. Sélecteur d'affichage/caractères . . . . . . . . . 27, 33 7. Touche de mode/recharge . . . .
MD-MT99C „ Télécommande Page de référence 1. Jack de casque. . . . . . . . . . . . . . . . . . . . . . . . . . . 13 2. Touche de graves/annulation/ numérotage. . . . . . . . . . . . . . . . . . . . . . . . 14, 21, 34 3. Touche de volume bas/curseur. . . . . . . . . . . 14, 34 4. Touche de volume haut/curseur . . . . . . . . . . 14, 34 5. Touche de maintien . . . . . . . . . . . . . . . . . . . . . . . 31 6. Touche de lecture/pause . . . . . . . . . . . . . . . . 10, 14 7.
-Précautions- Instructions importantes Précautions F-5 „ Important „ Conservation de l'appareil z Ne pas utiliser l'appareil en traversant la rue ou en passant près de la voiture. z Ne pas utiliser l'appareil en conduisant une voiture automobile. Ce sera dangereux et illicite. Respecter le code de la route. Mettre l'appareil à l'abri des ennemis suivants pour éviter des problèmes. z Éviter l'écoute à niveau sonore élevé. Les spécialistes déconseillent une écoute prolongée et continue.
Mise en place d'un MD MD-MT99C Ouvrir le compartiment. Mettre un MD en place (voir illustration). Refermer le compartiment. Notes: z Ne pas placer le minidisc sous le support. -Mise en place d'un MD- 2 3 4 Agir sur le levier OPEN pour déverrouiller le compartiment. Avant l'utilisation 1 z Ne pas forcer pour introduire un minidisc dans l'appareil. Si on constate une gêne, retirer le MD et réessayer. z Le compartiment ne s'ouvre pas si l'appareil affiche "TOC".
Raccordement -Raccordement- Avant l'utilisation On peut enregistrer des CD ou cassettes favoris sur un MD. F-7 FRANÇAIS 01/4/26 99secl_CF_2.
FRANÇAIS 01/4/26 99secl_CF_2.
Enregistrement 3 Appuyer sur la touche ou niveau d'enregistrement. pour régler le Le niveau sonore maximal devra alors être situé entre - 4 dB et 0 dB. Voyant de compteur de niveau -Enregistrement- Fonctionnement de base Enregistrement analogique Enregistrement numérique On peut ajuster le niveau par paliers de 1 dB dans une plage comprise entre +12 - -12 dB. Une fois réglé, le niveau d'enregistrement numérique reste en mémoire même après l'arrêt de l'enregistrement.
MD-MT99C Maintenant on peut rechercher un morceau à enregistrer. 5 Agir à plusieurs reprises sur la touche MODE/ CHRG pour sélectionner un mode d'enregistrement (page 17). Appuyer sur la touche PLAY/PAUSE. z Pour reprendre la lecture, réappuyer sun la touche PLAY/PAUSE. z Le numéro de morceau augmente chaque fois que l'enregistrement est interrompu. Pour arrêter l'enregistrement Appuyer sur la touche /:OFF. z À l'arrêt d'enregistrement, "TOC" apparaît.
Enregistrement (suite) Pour écrire l'enregistrement sur MD Du TOC -Enregistrement- Fonctionnement de base Appuyer, en arrêt, sur la touche /:OFF. L'appareil s'éteint après la mise à jour de l'enregistrement sur MD. F-11 Après l'enregistrement ou le montage, l'appareil affiche "TOC". Pour terminer l'opération, appuyer sur la touche /:OFF. L'appareil fait clignoter alors "TOC" et affiche "TOC EDIT!".
MD-MT99C Cet appareil est doté d'un convertisseur de taux d'échantillonnage grâce auquel l'enregistrement à partir d'un tuner numérique ou d'une cassette DAT est possible. „ Note pour l'enregistrement numérique Il est impossible de copier un minidisc qu'on a enregistré numériquement à partir d'un MD ou DAT. Il est interdit selon le système SCMS (Serial Copy Management System). Ce n'est pas le cas pour l'enregistrement analogique.
-Lecture- Fonctionnement de base Lecture F-13 FRANÇAIS 01/4/26 99secl_CF_3.
MD-MT99C „ Commande de volume Appuyer sur la touche VOL+ pour augmenter le niveau sonore et sur la touche VOL- pour le baisser. Brancher la télécommande sur le jack REMOTE de l'appareil. Mettre un minidisc en place (page 6). Appuyer sur la touche PLAY/PAUSE. La lecture se déclenche automatiquement s'il s'agit d'un MD non-enregistrable ou d'un MD protégé contre un effacement accidentel (lecture automatique). Pour interrompre la lecture Appuyer sur la touche PLAY/PAUSE.
Lecture avancée „ Pour localiser un morceau Pour passer au morceau suivant: Appuyer, en cours de lecture, sur la touche . Appuyer, en cours de lecture, sur la touche . Pour localiser un morceau suivant: -Lecture avancée- Fonctions pratiques Pour repasser le morceau en cours: Appuyer, en cours d'arrêt, sur la touche „ Pour localiser un passage souhaité En cours de lecture, presser la touche .
MD-MT99C „ Lecture au hasard et répétition Pendant la lecture, appuyer à plusieurs reprises sur la touche MODE/CHRG pour sélectionner le mode de lecture. Lecture au hasard Répétition de morceaux dans un ordre aléatoire Répétition de tous les morceaux „ Pour reproduire à double vitesse Appuyer sur la touche ENTER/SYNC pendant la lecture d'un minidisc enregistré monophoniquement. z Si, pendant la lecture accélérée, l'appareil atteint un morceau enregistré en stéréo, elle sera annulée.
Enregistrement avancé „ Enregistrement de longue durée -Enregistrement avancé- Fonctions pratiques Enregistrement 2 ou 4 fois plus long Il est possible de doubler ou quadrupler la durée d'enregistrement en stéréo. 1 Enregistrement monaural En monaural, la durée d'enregistrement sera doublée. Un morceau enregistré en monaural peut être reproduit à une vitesse doublée. Se reporter à la page 16. Pour sélectionner un mode d'enregistrement, mettre l'enregistrement en pause et agir sur la touche MODE/CHRG.
MD-MT99C Le système ATRAC (Adaptive TRansform Acoustic Coding) compresse des données sonores à 1/5 en supprimant les sons inaudibles. Grâce au masquage de la psychologie acoustique, la qualité sonore reste assurée. Le système ATRAC3 équipant cet appareil permet de réduire des données à 1/10 ou 1/20 et assure l'enregistrement 2 ou 4 fois plus long en stéréo. On peut sélectionner l'un des modes d'enregistrement: stéréo, 2 fois plus long, 4 fois plus long, monaural.
Enregistrement avancé (suite) „ Enregistrement déclenché par le son reproduit 4 Sélectionner un point de démarrage pour l'enregistrement et puis réappuyer sur la touche PAUSE. 5 -Enregistrement avancé- Fonctions pratiques L'enregistrement se déclenche dès la détection de signaux sonores en provenance d'une chaîne hi-fi (enregistrement synchronisé). 6 Agir à plusieurs reprises sur la touche MODE/ CHRG pour sélectionner un mode d'enregistrement (page 17). Appuyer sur la touche ENTER/SYNC.
MD-MT99C On peut effectuer un nouvel enregistrement sur un morceau en effaçant ce dernier. Cette opération efface tous les morceaux qui suivent un morceau nouvellement enregistré. 2 En cours de lecture, appuyer sur la touche PLAY/PAUSE lorsqu'on atteindra un point par lequel on commencera l'enregistrement. Appuyer sur la touche REC. Pour annuler l'opération, appuyer sur la touche / :OFF. 3 Appuyer sur la touche ENTER/SYNC.
Enregistrement avancé (suite) „ Pour numéroter comme on le souhaitera -Enregistrement avancé- Fonctions pratiques On peut numéroter des points de son choix. F-21 „ Enregistrement des morceaux comme un seul Pendant l'enregistrement, appuyer sur la touche REC dès qu'on arrivera à un point souhaité. Le numéro de morceau augmente d'une unité. z Un numéro est donné chaque fois que la touche REC est pressée. z La touche BASS de la télécommande permet d'ajouter des numéros de morceaux.
MD-MT99C z Les numéros des morceaux sur MD peuvent ne pas correspondre à ceux de la source si on a effectué la lecture en programmant des morceaux sur la source ou en en programmant à la main. z Le numérotage ne peut pas être réalisé correctement selon le type de la chaîne hi-fi. 2. Lorsque l'on enregistre à partir d'un CD (ou MD) en raccordant un élément numériquement, les morceaux sont numérotés de la même manière que ceux enregistrés sur le CD (ou MD) de source (numérotage synchronisé).
Enregistrement à partir d'un microphone Fonctions pratiques -Enregistrement à partir d'un microphone- „ Pour enregistrer par un microphone F-23 FRANÇAIS 01/4/26 99secl_CF_4.
MD-MT99C Mettre un minidisc en place (page 6). Appuyer, en cours d'enregistrement, sur la touche PLAY/ PAUSE. z Pour reprendre l'enregistrement, réappuyer sur la touche PLAY/PAUSE. Le numéro de morceau augmente chaque fois que l'on interrompt l'enregistrement. Pour arrêter l'enregistrement Appuyer sur la touche REC. Appuyer sur la touche /:OFF. Appuyer sur la touche ou niveau d'enregistrement. pour régler le Pour écrire l'enregistrement sur MD Appuyer, en arrêt, sur la touche /:OFF.
Enregistrement à partir d'un microphone (suite) Fonctions pratiques -Enregistrement à partir d'un microphone- „ Enregistrement synchronisé de son (enregistrement synchronisé avec micro) 1 2 Appuyer sur la touche veau d'enregistrement. ou pour régler le ni- Voyant de compteur de niveau L'appareil se met en pause si un silence dure 3 secondes ou plus. (La fonction de pause ne marche pas dans les 10 secondes qui suivent le départ de l'enregistrement.
MD-MT99C „ Intervalles entre morceaux Exemple: numérotage à "5 minutes" Pendant l'enregistrement par microphone, les morceaux sont numérotés automatiquement à un intervalle régulier (réglage par défaut: toutes les 5 minutes environ). Pendant l'enregistrement synchronisé par micro, l'appareil se mettra en arrêt si un silence dure 3 secondes ou plus, et créera un numéro. Pendant l'enregistrement manuel par micro 1 Agir, en cours d'enregistrement ou de pause, sur la touche EDIT.
-Vérification de l'affichage- Fonctions pratiques Vérification de l'affichage F-27 „ Pour vérifier le temps écoulé et le temps restant sur le morceau „ Pour vérifier le temps d'enregistrement restant et le temps de lecture total Pendant la lecture, appuyer sur la touche DISP. En mode d'arrêt, appuyer sur la touche DISP. Chaque fois que la touche est pressée, l'affichage se modifie comme suit. Chaque fois que la touche est pressée, l'affichage se modifie comme suit.
MD-MT99C En mode d'arrêt, appuyer sur la touche ou pour afficher le numéro et le titre du morceau. Numéro de morceau Titre de morceau 2 L'état d'usure de la batterie est indiqué par le voyant de pile ( ). Appuyer sur la touche DISP pour afficher le temps de lecture sur le morceau en cours. Temps de lecture Chaque fois que la touche ou est pressée, l'appareil affiche le temps de lecture sur un morceau précédent ou suivant. z Si la pile se décharge complètement, le voyant se met à clignoter.
Fonctionnement sur les piles „ Mise en place de la batterie rechargeable Penser à charger complètement la batterie s'il s'agit de la première utilisation ou après une longue période de nonemploi. Fonctions pratiques -Fonctionnement sur les piles- 1 F-29 Introduire la batterie rechargeable. Il est possible de recharger seulement la batterie livrée avec l'appareil ou en option (AD-N70BT). 2 3 Brancher l'adaptateur CA sur une prise murale et puis sur le jack DC IN 5V. Appuyer sur la touche MODE/CHRG.
MD-MT99C Notes: z Effectuer la recharge dans une plage de température entre 5°C - 35°C. z La recharge est terminée si le branchement de l'adaptateur CA et la pression sur la touche MODE/CHRG ne permettent pas de faire clignoter " ". z L'appareil peut être laissé en état de recharge même après qu'elle est terminée. Attention: z Utiliser seulement la batterie spécifiée AD-N70BT. Ne jamais recharger d'autres piles (nickel-cadmium, alcaline, etc.). z Ne pas dérober la batterie rechargeable.
Fonction de maintien -Fonction de maintien- Fonctions pratiques L'appareil gardera son fonctionnement en cours même si une touche est pressée accidentellement (dans un train bondé par exemple). Si on a mis une pile en place ou si l'adaptateur CA est raccordé, on peut activer cette fonction que l'appareil soit éteint ou allumé. Pour annuler le mode de maintien En mode de maintien, maintenir la touche HOLD enfoncée pour 2 secondes ou plus. L'appareil affiche "HOLD OFF".
Modification des réglages par défaut „ Bips Lorsque l'on relâche la touche, "BEEP ON" ou "BEEP OFF" apparaît. 2 3 4 Appuyer sur la touche menu. ou pour afficher le Appuyer sur la touche MODE/CHRG pour passer à un paramètre souhaité. Appuyer sur la touche /:OFF. On peut supprimer le bip de confirmation qui est émis à la pression d'une touche.
Titrage d'un minidisc „ Titrage de disques et de morceaux Mettre un MD à titrer. Le montage n'est pas possible avec un MD non-enregistrable ou protégé contre l'enregistrement. -Titrage d'un minidisc- Fonctions avancées 1 En mode d'arrêt, appuyer sur la touche EDIT pour sélectionner "DISC NAME". En mode de pause, appuyer sur la touche EDIT pour sélectionner "TRACK NAME". 3 L'appareil affiche pour 1 seconde les 3 premiers caractères du type choisi.
MD-MT99C 8 La saisie de caractères terminée, on pressera sur la touche EDIT. L'appareil affiche "TOC" pour écrire de nouvelles données sur le MD. On pressera alors sur la touche /:OFF. „ Pour effacer un caractère Appuyer sur la touche VOL+ ou VOL- pour déplacer le curseur sur un caractère à effacer, et puis appuyer sur la touche BASS. „ Pour insérer un espace Appuyer sur la touche VOL+ pour déplacer le curseur vers la droite. Pendant l'affichage de "TOC", on ne peut pas retirer le MD.
Titrage d'un minidisc (suite) „ Pour ajouter des caractères 1 Mettre l'appareil en mode d'entrée de caractère. 2 -Titrage d'un minidisc- Fonctions avancées (Suivre les étapes 1 et 2 à la page 33.) Appuyer sur la touche VOL+ ou VOL- pour déplacer le curseur sur un caractère devant lequel un nouveau caractère vient s'insérer.
MD-MT99C Opération pour côté source 1 Mettre un MD de source en place. Opération pour côté cible 6 Mettre un MD de cible en place. 7 Appuyer sur la touche ENTER/SYNC. 3 En mode d'arrêt, appuyer sur la touche EDIT pour sélectionner "NAME STAMP". Appuyer sur la touche ENTER/SYNC. L'appareil termine la copie des caractères et repasse en mode d'arrêt. Pour annuler l'opération, appuyer sur la touche /:OFF. 4 5 Réappuyer sur la touche ENTER/SYNC.
Montage d'un minidisc enregistré „ Pour effacer des morceaux à la fois Fonctions avancées -Montage d'un minidisc enregistré- 1 F-37 2 Reproduire le morceau à effacer et appuyer sur la touche PLAY/PAUSE. „ Pour effacer tous les morceaux à la fois 1 Agir à plusieurs reprises sur la touche EDIT pour sélectionner "ERASE". 2 3 En mode d'arrêt, agir à plusieurs reprises sur la touche EDIT pour sélectionner "ALL ERASE". Appuyer sur la touche ENTER/SYNC. Appuyer sur la touche ENTER/SYNC.
MD-MT99C 2 3 Reproduire le morceau à diviser en deux. Appuyer sur la touche PLAY/PAUSE lorsque l'on atteindra un point par lequel on divise le morceau. 2 Appuyer sur la touche EDIT pour sélectionner "DIVIDE". 3 Reproduire le deuxième des deux morceaux à fusionner et appuyer sur la touche PLAY/PAUSE. Appuyer sur la touche EDIT pour sélectionner "COMBINE". Appuyer sur la touche ENTER/SYNC. Appuyer sur la touche ENTER/SYNC. Pour annuler l'opération, appuyer sur la touche / :OFF.
Montage d'un minidisc enregistré (suite) „ Pour déplacer un morceau Fonctions avancées -Montage d'un minidisc enregistré- 1 2 3 Reproduire le morceau à déplacer et appuyer sur la touche PLAY/PAUSE. Appuyer sur la touche EDIT pour sélectionner "MOVE". Appuyer sur la touche ENTER/SYNC. Pour annuler l'opération, appuyer sur la touche / :OFF. 4 5 Appuyer sur la touche ner un sens. ou pour sélection- Titre du morceau divisé: Les deux morceaux portent un même titre.
Écoute à travers un autre système „ Avec un autoradio Notes: z Il est conseillé de porter le niveau sonore du MD au maximum pour l'écouter au moyen d'une chaîne hi-fi. z S'il s'agit d'un enregistrement sur une chaîne hi-fi, annuler le bip de confirmation (page 32). Sinon, le bip sera aussi enregistré. z L'enregistrement se fait analogiquement. z Les caractères ne sont pas enregistrés. Notes: z Régler le volume sur l'enregistreur MD et un autoradio.
Références -Autres fonctions et précautions- Autres fonctions et précautions F-41 „ Reprise de la lecture automatique „ Batterie rechargeable Lorsque l'on arrête et recommence la lecture sans retirer le MD, elle part à partir d'un point où on a interrompu. z La seule batterie au nickel-métal-hydride est utilisable. Il faut recharger la batterie rechargeable tous les trois mois même en période de non-utilisation prolongée afin d'assurer la qualité de la batterie.
Limites du minidisc MD-MT99C DESCRIPTION L'appareil peut afficher "DISC FULL" ou "TOC FULL" même si le temps d'enregistrement reste encore. Il est impossible d'enregistrer plus de 255 morceaux (maxi), quelle que soit la durée d'enregistrement. S'il s'agit d'un MD sur lequel on a souvent effectué l'enregistrement ou le montage ou d'un MD rayé (l'enregistrement ne se fait pas sur une partie endommagée), le nombre de morceaux enregistrables est réduit.
Messages affichés MESSAGES D'ERREUR BATT EMPTY z La batterie est épuisée. BLANK MD z Rien n'a été enregistré. Références Can't COPY -Messages affichés- SIGNIFICATION MESSAGES D'ERREUR Can'tSTAMP (Vérifier le nombre des morceaux.) Can'tWRITE z Il s'agit d'un MD protégé par le droit d'auteur. z Les informations TOC ne sont pas correctement enregistrées. DEFECT z Le disque est rayé. (Utiliser un câble analogique.) z Impossible de monter un morceau.
MD-MT99C z Mauvais raccordement du câble numérique. z Aucun signal en provenance d'un élément raccordé. (Faire fonctionner l'élément raccordé sur secteur.) z La fréquence d'échantillonnage des signaux d'entrée n'est pas adéquate. NOT PLAY z On a tenté de reproduire un morceau qui ne peut pas être lu sur cet appareil. PLAY MD z On a tenté l'enregistrement sur un disque non-enregistrable. POWER ? z Alimentation non adaptée. PROTECTED z Le MD est protégé contre l'écriture.
Dépannage L'utilisateur peut résoudre pas mal de problèmes sans faire appel à un dépanneur. Si le cas se présente, vérifier les points ci-dessous avant de prendre contact avec un revendeur ou un centre de réparation agréés par SHARP. L'appareil ne s'allume pas. Perte de son.
Entretien „ Nettoyage Si l'appareil a subi une force extérieure (chocs, électricité statique, surtension due à un foudre, etc.) ou une mauvaise manipulation, il peut mal fonctionner. Si l'appareil est encrassé Essuyer l'appareil avec un chiffon sec. Si la saleté résiste, nettoyer l'appareil avec un chiffon légèrement humecté d'eau (surface seulement). Procéder alors comme suit: 1. Débrancher l'adaptateur CA. 2. Retirer la batterie. 3. Laisser l'appareil hors tension pour 30 secondes environ. 4.
Fiche technique SHARP se réserve le droit d'apporter des modifications à la présentation et aux caractéristiques des appareils à fin d'amélioration. Les valeurs indiquées dans ce document sont les valeurs nominales des appareils de série mais de légères différences peuvent être constatées d'un appareil à l'autre.
MD-MT99C Durée de batterie: 4 fois plus long Lecture ininterrompue: 13 heures environ Enregistrement ininterrompu: 10,5 heures environ Lecture ininterrompue: 15,5 heures environ Enregistrement ininterrompu: 13,5 heures environ Lecture ininterrompue: 17,5 heures environ Avec une pile alcaline de haute capacité au format de "AA" (LR6), en vente dans le commerce Enregistrement ininterrompu: 3 heures environ Lecture ininterrompue: 15 heures environ Enregistrement ininterrompu: 4,5 heures environ Lect
VALID IN CANADA ONLY LIMITED WARRANTY LIMITED WARRANTY / GARANTIE LIMITÉE Consumer Electronics Products Congratulations on your purchase! Sharp Electronics of Canada Ltd.
POUR CANADA SEULEMENT GARANTIE LIMITÉE Bravo! Vous Venez de faire un excellent achat! Sharp Électronique du Canada Ltée (ci-après nommée “Sharp”) donne la garantie expresse suivante à l’acheteur initial du produit ci-dessous mentionné de Sharp, si celui-ci est emballé dans son contenant original et s’il est vendu et distribué au Canada par Sharp ou par un Détaillant autorisé Sharp: Sharp garantit que ledit produit est, s’il est utilisé et entretenu normalement,exempt de défaut de fabrication.
SHARP ELECTRONICS OF CANADA LTD. 335 Britannia Road East, Mississauga,Ontario L4Z 1W9 SHARP CORPORATION 9906 PRINTED IN MALAYSIA IMPRIMÉ EN MALAISIE TINSK0119AWZZ 4 A0105.
MD-MT99C PORTABLE MINIDISC RECORDER