9” Widescreen LCD TV Model LTV-19w3
Table of Contents IMPORTANT PRODUCT SAFETY INSTRUCTIONS ..................................................................................... 2 Antenna Installation Safety .................................................................................................................................. 4 Cleaning the LCD TV .......................................................................................................................................... 4 Safety Guidelines ............................
IMPORTANT PRODUCT SAFETY INSTRUCTIONS Read carefully and follow all warnings and instructions in this User's Manual and those marked on the product before you operate your television. Failure to follow warnings can result in personal injury or damage to product. Keep this User’s Manual in a convenient location for future reference. Proper Positioning of Television Always handle your LCD television with care. Avoid touching the LCD screen. Skin oils are difficult to remove.
To assure proper ventilation, do not block the openings by placing the LCD TV on a bed, sofa, rug or other similar surface. Do not place it in a built-in installation, such as a bookcase or an enclosed rack, unless proper ventilation is provided. Other Notices and Precautions Caution: Never remove the rear cover. There are no user serviceable parts inside. Your LCD TV contains high-voltage parts. You may be seriously injured if you touch them. Do not attempt repairs yourself.
Antenna Installation Safety Outdoor Antenna Grounding If an outside antenna or cable system is connected to the LCD TV, be sure the antenna or cable system is grounded so as to prevent voltage surges and built-up static charges.
Safety Guidelines Warning: This device must be operated with the original power supply, part number: VQ176222:1 CAUTION: The socket-outlet should be installed near the equipment and should be easily accessible. CAUTION: Use a power cable that is properly grounded. Always use the appropriate AC cord that is certified for the individual country. Some examples are listed below: USA...............…UL Switzerland……SEV Canada.............CSA Britain ...........…BASE/BS Germany……….VDE Japan ...............
Installation Congratulations on your purchase of a Westinghouse 19” wide screen LCD TV. Sleek and practical, this lightweight LCD TV delivers a crisp, vibrant picture and doubles as a superb WSXGA+ computer monitor —making it a practical solution for tight spaces in the office, bedroom, or kitchen. Watch television, play video games, e-mail, or surf the Internet.
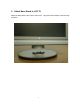
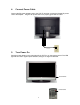
2. Attach Base Stand to LCD TV Attach the base stand to the LCD TV stand neck. into place.
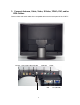
3. Connect Antenna, Cable, Video, S-Video, YPbPr, DVI, and/or VGA Cables Connect video and audio cables from compatible devices to the back panel of the LCD TV.
4. Connect Power Cable Connect the DC power adapter cord to the LCD TV and then connect the female AC power cord to the adapter. Plug the AC power cord into a properly grounded AC outlet. 5. Turn Power On Press the power button on the right side of the LCD TV or on the remote control. The LED light will turn blue if signal input is detected, orange if no signal is detected.
6. Programming TV Channels 1. Select TV as the input using the Source button on the remote. 2. Press the Menu button to display the OSD Display Menu. 3. Use the CHŸ/źarrow keys to highlight the TV Menu. 4. Using the Vol Ź arrow keys select the TV sub-menu. Use the źto highlight the CH Auto Scan function. Press Vol Ź arrow key and Channel Auto Scan will be performed. 5. Once the CH Auto Scan is complete, switch channels by using the CH Ÿ/ź arrow keys on the remote. 6.
Controls & Connections This section describes the side panel controls, and remote control in more detail. Front View of the Product Use the buttons on the right side panel control to display and adjust the On Screen Display (OSD). The OSD controls are explained at the bottom of the page and are defined in the “OSD Functions” section.
Remote Control The Remote Control should be used within 3 meters of the LCD TV. 1. Mute Switch the sound between on & off 2. MTS(Multi-channel TV Sound) Stereo and Mono selection 3. Sleep 1 Use to shut off TV after a period of time 2 4. Power Switch the power between on & off 5 5. Display Display the channel information 6 6. PIP Available in D-Sub/DVI/YPbPr Modes, used 7 to turn PIP picture on & off and select PIP picture size 8 7.
OSD Functions This section describes each on-screen display (OSD) command. There are different OSD menus depending on whether you are in TV, Video (AV/S-Video/YPbPr) or PC (D-Sub/DVI) mode. All the function settings for your LCD TV are controlled either via the remote control or using the control keys located on the right of the front panel of the LCD TV. To display the OSD main menu, press and hold the Menu button on the control keys or the MENU key on the remote control.
Audio Menu In the Audio Menu use the VolŹ to select Audio sub-menu. Use CHŸ/ź to highlight function then use the VolŻ/Ź arrow keys to change the values of the functions that are selected in the OSD menu. Function Name Volume Mute Treble Bass Balance MTS Explanation Volume adjustment Turn Audio Off and On Treble adjustment Bass adjustment Left to Right Audio adjustment Multi-channel Television Sound, select SAP, MONO, or STEREO Color Menu In the Color Menu use the VolŹ to select Color sub-menu.
TV Menu In the TV Menu use the VolŹ to select TV sub-menu. Use CHŸ/ź to highlight function then use the VolŻ/Ź arrow keys to change the values of the functions that are selected in the OSD menu. Function Name Tuner System CH. Auto Scan CH. Fine Tune Blue Screen CH. No CH. Edit C.C. C.C. Background Explanation Select between STD, HRC, IRC, Air Start to scan channel after pressing right or left key, and stop scan if any key is pressed.
Function Name Language OSD Transparency OSD Time-out OSD Position Reset Sleep Power LED Aspect Ratio Explanation English, Chinese, François, Español Set OSD transparency level Set the time to turn off the OSD automatically OSD horizontal/vertical position adjustment Restore factory default settings Set the Sleep timer for 30, 45, 60, 90, or 120 minutes Turn the LED light OFF or ON Set the display to Full, Normal, or Zoom V-Chip and Parental Control Menu To access the PARENTAL CONTROL menu press the V-Chi
Rating Menus Press the V-Chip button on the remote control to access the Parental Control Menu. Enter the PIN code. Use the ź to highlight the Movie (MPAA) or TV (TVPG) menu. Use the Ź to select the sub-menu. Use the Ÿ/ź to highlight the Movie/TV Rating to be blocked or un-blocked. Press the MENU button to set and press EXIT to exit the V-chip menu.
PC OSD Menu Image Menu In the Image Menu use the VolŹ to select image sub-menu. Use CHŸ/ź to highlight function then use the VolŻ/Ź arrow keys to change the values of the functions that are selected in the OSD menu.. Function Name Brightness Contrast Sharpness Clock Phase H-POSITION V-POSITION Auto-Config Explanation Brightness adjustment. Default value is 100. Contrast adjustment. Default value is 50. Adjust picture sharpness from 1 – 5. Default value is 2. Adjust the Clock timing. Default value is 50.
Audio Menu In the Audio Menu use the VolŹ to select Audio sub-menu. Use CHŸ/ź to highlight function then use the VolŻ/Ź arrow keys to change the values of the functions that are selected in the OSD menu.
Miscellaneous Menu In the Misc Menu use the VolŹ to select Misc sub-menu. Use CHŸ/ź to highlight function then use the VolŻ/Ź arrow keys to change the values of the functions that are selected in the OSD menu.
PC DVI OSD Menu PC OSD Menu for DVI Source has the same features as PC D-Sub except, only Brightness, Contrast, and Sharpness can be adjusted in the Image sub-Menu. PIP function Menu Picture In Picture (PIP) is available in D-Sub mode only. When pressing the PIP Menu button on the remote control the following menu appears. Pressing the PIP button again will toggle the PIP function on/off. Use either the Menu key or the Ÿ/ź arrow keys to navigate within the menus.
If in Analog mode and the Display settings are not compatible with or are out of range of the LCD TV/Monitor the following will be displayed: Appendix Specifications Preliminary Product Specification Panel Size/Type 19” wide screen Color TFT LCD. Anti-static and hard coated. Native/Optimum Resolution 1440x900 Aspect Ratio 16:10 Response Time 20ms Contrast Ratio 600:1 Maximum Brightness 350 cd/m² Viewing Angle Horizontal: 170° Vertical: 170° Display Colors 16.
Video Features Progressive scan Motion adaptive 3D de-interlacing 3D noise reduction Inverse 3:2 pull down Aspect Ratio Adjustment (Normal/Full/Zoom) Dynamic Luminance Control (DLC) Function Video Enhancement (Brightness/Contrast/Sharpness/Saturation/Hue) Picture-in-Picture in D-Sub/DVI/YPbPr mode Audio Features Built in audio amplifier and speakers; 3.
• • improper connection The red connector for right audio is easily confused with the red Pr connector in YPbPr component video input. Double check that they are correctly attached.
Santa Fe Springs, CA SE-UM-1904-0501