
Operation Manual


Recording menu
You can set timer programmed recordings with the
integrated HDD Digital Recorder or other connected
recording devices. Further information on HDD
recording is provided in the chapter “HDD Digital
Recorder operation”.
• The internal HDD DIGITAL Recorder cannot record signals
from the following terminals: EXT 3 (COMPONENT input),
EXT 5, 6 (HDMI input), and EXT 7 (PC input).
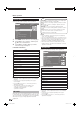
Recording
TV menu
Recording wizard
Timer list
Pre-record time
Post-record time
00 min
05 min
Setup Εxtended functio
n
Connections
✔ Recording menu items
Items
Recording wizard
Via EPG
Via teletext (VPS)
Manual
Timer list
Pre-record time
Post-record time
Recording wizard
To record TV programmes, you can use the data from
EPG, teletext or enter the data manually.
E
Via EPG
Press MENU and the TV menu screen displays.
Press c/d to select “Recording”, and then
press OK.
Press a/b to select “Recording wizard”, and
then press OK.
Press a/b to select “Via EPG”, and then press
OK.
1
2
3
4
Menu operation
Dolby Virtual Speaker
The Dolby Virtual Speaker effect simulates a surround
sound environment with only two speakers. You can
choose between two different settings for the width of
the generated sound characteristics.
Item
off: No effect
Reference Mode: Creates a convincing five-speaker
surround sound listening experience from just two
speakers. In this mode, the apparent width of the
sound across the front image is defined by the distance
between the two speakers.
Wide Mode: Provides a wider, more spacious front audio
image from two speakers placed close together, with
the same realistic five-speaker surround sound as
Reference mode.
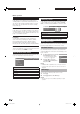
15:57-16:59 arte Charmed - Zauberhafte Hexen
16:00-16:15 MDR FERN... Hier ab vier
16:00-16:10 EinsExtra EinsExtra Aktuell
16:00-17:15 SAT.1 Richter Hold
16:00-16:30 ProSieben M. Asam - Mode
16:00-16:55 ZDFtheater... Waschtag
16:05-17:00 Bayrische... Wir in Bayern
16:05-16:45 KiKa Skippy, der Buschpilot
16:05-17:00 KABEL1 Star Trek - Das nächste Jah...
EPG (Electronic Programme Guide) Mon 31.07./16:05
Date
Time
Stations
Topics
Mon 31.07
Now
all
all
Tue 01.08
Wed 02.08 Thu 03.08 Fri 04.08
• The EPG screen displays.
• You may be routed to the “Time and date” entry
screen if the TV does not recognise the current time.
Press a/b/c/d to select the programme you
want to record, and then press RED.
• Select a programme that has not yet started.
• A message appears if there is a conflict between two
programmes. Follow the screen prompts and choose
the one that has priority.
The timer list screen appears, outlining each
setting used for the upcoming recording.
Confirm with OK. You can make adjustments
as explained in step 3 in the following Manual
section.
Once completed, a red dot will appear in front
of the programme as identification.
• To cancel the recording, select a title from the list
and press RED. If the timer list has already been
transferred to an external recorder, then the timer
must also be deleted there.
E
Via teletext (VPS)
Select “Via teletext (VPS)” instead of “Via EPG”
in step 4 in Via EPG.
• The station selection screen displays.
• You may be routed to the “Time and date” entry
screen if the TV does not recognise the current time.
Press a/b/c/d to select the station you want
to record from, and then press OK.
Press a/b to select the programme you want
to record, and then press OK.
• Select a programme that has not yet started.
• A message appears if there is a conflict between two
programmes. Follow the screen prompts and choose
the one that has priority.
Timer list screen appears, outlining each setting
used for the upcoming recording. Confirm with
OK. You can make adjustments as explained in
step 3 in the following Manual section.
NOTE
• Select the teletext start page according to the station (the
default setting is “301”).
For the selection method, follow these steps:
1 while in the teletext mode, press MENU to display the
Teletext menu
2 select “Setup”
3 press OK on the remote control
4 select “Preview pages”, and then input the selection
value
5
6
7
1
2
3
4
33
LC-52HD1E-gb.indd 33LC-52HD1E-gb.indd 33 2008/03/24 15:01:232008/03/24 15:01:23