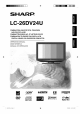
SHARP LC-26DV24U COMBINATION LIQUID CRYSTAL TELEVISION AND DVD/CD PLAYER COMBIN_: T_:L_:VISEUR ACL ET LECTEUR DVD/CD COMBINACION TELEVISOR CON PANTALLA DE CRISTAL LiQUIDO CON DVD/DISCOS COMPACTOS OPERATION MANUAL MODE D'EMPLOI MANUAL DE OPERACION H=-tml ,_ PC input / I']['1iDOLBYI DIGITAL VIDEO DIGITAL 50Q0131A E.
LC-26DV24U COMBINATION LIQUID CRYSTAL TELEVISION AND DVD/CD PLAYER ENGLISH OPERATION IMPORTANT: To aid reporting in case of loss or theft, please record the TV/DVD's model and serial numbers in the space provided. The numbers are located at the rear of the TV/DVD. • Manufactured Laboratories. MANUAL Model No.: Serial No.: under license from Dolby Laboratories. "Dolby" and the double-D symbol are trademarks of Dolby • "HDMt, the HDMI logo and High-Definition Licensing LLC.
IMPORTANT CAUTION: INFORMATION TO PREVENT ELECTRIC SHOCK, MATCH WIDE BLADE OF PLUG TO WIDE SLOT, FULLY INSERT. CAUTION: DO NOT PLACE THIS PRODUCT ON AN UNSTABLE CART, STAND, TRIPOD, BRACKET, OR TABLE. THE PRODUCT MAY FALL CAUSING SERIOUS PERSONAL INJURY AND SERIOUS DAMAGE TO THE PRODUCT. USE ONLYWITH A CART, STAND, TRIPOD, BRACKET, ORTABLE RECOMMENDED BYTHE MANUFACTURER OR SOLD WITH THE PRODUCT.
DEAR SHARP CUSTOMER Thank you for your purchase of the Sharp Combination Liquid Crystal Television and DVD/CD player. To ensure safety and many years of trouble-free operation of your product, please read the Important Safety Instructions carefully before using this product.
IMPORTANT SAFETY INSTRUCTIONS • Water and Moisture -- Do not use this product near water - for example, near a bath tub, wash bowl, kitchen sink, or laundry tub; in a wet basement; or near a swimming pool; and the like. • Stand -- Do not place the product on an unstable cart, stand, tripod or table. Placing the product on an unstable base can cause the product to fall, resulting in serious personal injuries as well as damage to the product.
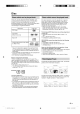
Disc In this unit, use only discs that meet the standard, such as those bearing the below logo marks on the disc label surface, tf you use a non-standard disc, we cannot guarantee playback. Even if such a disc can be played back, we cannot guarantee the image or sound quality. The DVD logo is a registered trademark. Media type The discs listed below cannot be played back in general. Even if one of these can be played back, it may not be played back correctly.
Disc Notes on copyright • This product incorporates copyright protection technology that is protected by U.S. patents and other intellectual property rights. Use of this copyright protection technology must be authorized by Macrovision, and is intended for home and other limited viewing uses only unless otherwise authorized by Macrovision. Reverse engineering or disassembly is prohibited.
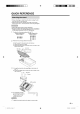
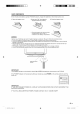
QUICK REFERENCE • Before attaching (or detaching) the stand, unplug the AC cord from the AC input terminal. • Before performing work spread cushioning over the base area to lay the TV on. This will prevent it from being damaged. • Attach the stand in the correct direction. • Be sure to follow the instructions. Incorrect installation of the stand may result in the TV falling over. 1 Confirm the 8 screws supplied with the TV.
QUICK REFERENCE STOP! To safely remove the television from the box • It's best to use 2 people to remove the television for stability. • Lift onto installation location as the diagram illustrates. Ventilation & Cleaning Tips Keep your TV/DVD in a well ventilated area and make sure not to place it by a heat source or use near water. The TV/DVD is designed for AC use only and should be used with supplied AC cord. Clean the screen by spraying a soft lint free cloth with water to lightly moisten.
QUICK REFERENCE If the remote control fails to operate TV/DVD functions, replace the batteries in the remote control unit. 1 Open the battery cover. 2 Insert two "AA" size batteries (supplied with the product). 3 Close the battery cover. • Place the batteries with their terminals corresponding to the (+) and (-) indications in the battery compartment. Improper use of batteries can result in chemical leakage or explosion. Be sure to follow the instructions below.
Contents IMPORTANT INFORMATION ................................... 1 DEAR SHARP CUSTOMER ..................................... 3 IMPORTANT SAFETY INSTRUCTIONS .................. 3 Disc ........................................................................... 5 Discs which can be played back .......................... 5 Discs which cannot be played back ..................... 5 Title/Chapter/Track .............................................. 5 Handling discs ...............................................
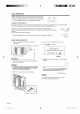
Part names mSTOP I,,PLAY buttOnSTOP button _ SKIP_ ,EJECT I I - _.A EJECT button _] ] I l*d_,l SKIP button Remote control sensor Volume buttons (VOL-/+) Channel buttons (CH v/A) II POWER indicator INPUT • INPUT, CH (v)/(z-.), VOL (-)/(+) and POWER on the main unit have the same functions as the same buttons on the remote control. Fundamentally, this operation manual provides a description based on operation using the remote control.
Part names 14 15 16 1 POWER: Switch the power on or enters standby mode. (See page 15.) 2 0-9: Set the channel. (See page 15.) 3 • (DOT) / SUBTITLE: To select 4-digit channel number. (See page 15.) / Set subtitle. (See page 27.) 4 REV : Review playback. (See page 26.) 5 SKIP 14_/_1:Skip chapter to reverse or forward direction. (See page 26.) 6 STILL/PAUSE: Still picture of DVD / Pause CD sound. (See page 26.
Preparation Use the remote control unit by pointing it towards the remote control sensor on the TV/DVD. Objects between the remote control unit and the remote control sensor may prevent proper operation. • Do not expose the remote control unit to shock. In addition, do not expose the remote control unit to liquids, and do not place in an area with high humidity. • Do not install or place the remote control unit under direct sunlight. The heat may cause deformation of the remote control unit.
Using external equipment You can connect many types of external equipment to your TV/DVD like a DVD player, VCR, Digital TV tuner, HDMI equipment, game console or camcorder. STILUPAUSE POWER CD CD Cg3 CD_ DISPLAY TV/DVD SLEEP VIEWMODE EJECT INPUT PLAY SETUPiTV MENU To view external source images, select the input source from "Source Selection" menu using 0-5 on the remote control. STOP DVD MENU ii ®®®0 ®@® { 1.Input1 2.Input2 3.Input3 4.Input4 5.
Watching TV Method 2 Using remote control buttons 0-9, • (DOT) to select channels for VHF/UHF/CATV/DIGITAL. 1 To selecta I or 2-digit channelnumber(e. g.,Channel 5): Press 5 Insert the batteries into the remote control unit. (See page 9.) 2 Connect the antenna cable to the TV/DVD. (See page 13.) 3 • When selecting a 1-digit channel number, it is not necessary to press 0 before the number. • When you enter 0-9 only, channel selection wi!! be made if there is no operation within a few seconds.
Watching TV You can set channel selection disabled using CH ,,'.Iv. 1 Press TV MENU and the MENU screen displays. 2 Press A/T to select"Channel", 3 Press A/T to select"Add/Delete", ENTER. then press _ or 4 Press A/T to select"Add/Delete", ENTER. then press _ or 5 Press A/T to select the channel that you want to skip. 6 Press ,/_ 7 Press EXIT to return to the normal screen. then press _ or ENTER. to select "Delete" for selected channel.
Watching TV To create channel labels Press VIEW MODE. • The View mode menu displays. • The menu lists the view mode options selectable for the type of video signal currently being received. Press 0-3 to select each view mode directly while the View mode menu is still on the screen. • Each time VIEW MODE is pressed, View Mode item toggles. • You can also select View Mode item by pressing A/T. • You can sequentially select a view mode that has its own aspect ratio. 1 Select a channel you want to label.
Watching TV 1 Tune the TV to the desired program. 2 Press TV MENU and the MENU screen displays. 3 Press A/v to select"Setup", then press • or ENTER. 4 • Closed Caption might not appear according to the condition of the signal from the broadcasting station. Your TV/DVD is equipped with an internal Closed Caption decoder. It allows you to view conversations, narration and sound effects as subtitles on your TV/DVD.
Watching TV This function allows you to adjust the closed caption screen appearance to suit your preference. 1 Press TV MENU and the MENU screen displays. Allows you to use a password to protect certain settings from being accidentally changed. 2 Press ,&/T to select"Setup", then press =,-or ENTER. IMPORTANT: Three conditions Press ,&/T to select "Closed Caption", then press or ENTER. The Closed Caption menu displays. 4 Press A/T to select "Digital CC Preset", then press .,=/_ to select "Custom".
Watching TV V-CHIP might not function according to the condition of the signal from the broadcasting station. V-CHIP is an electronic filtering device built into your TV/DVD. This tool gives parents a great degree of control over broadcasts accessed by their children. It allows parents to select programs judged suitable for child viewing while blocking ones judged not suitable. It does so automatically once you activate the V-CHIP feature in your TV/DVD.
Watching TV • The TV rating systems in Canada are based on the Canadian Radio-Television and Telecommunications Commission (CRTC) policy on violence in television programming. • While violence is the most important content element to be rated, the structure developed takes into consideration other program content like language, nudity, sexuality and mature themes. • When setting the V-CHIP on the Canadian system you can choose either the Canadian English ratings or the Canadian French ratings.
Other convenience functions Use the following buttons operate the menu, on the remote control to example 1 : Select Language Press TV MENU and the MENU screen displays, POWER Audio CD CD (3D C h£nrlel DISPLAY TV/DVD EJEOT SLEEPVIEWMODEINPUT LOCk CDCDD Seep ®®®8 ®®® Press A/T to select "Setup", ENTER. then press _ or Press &/v to select "Language", ®@© Vid£_ SKIP REV FWD Ab_o Reset STILL/PAUSE PLAY L_el >> BackHght SKIP Shb4 16 Off .....
Other convenience functions Picture Picture Setting AV Mode Brightness / Contrast / Sharpness / Color/Tint Co!or Temperature Sports Standard Movie Memory View Mode Film Mode PC Setting* (see page 24) Position Clock Phase DNR Audio On / Off Bass /Treble / Balance MTS Language Audio Stereo / SAP / Mono HDMI Audio HDMI DVI Speakers On Off Channel Add/Delete Adding Channel / Add/ Delete / Clear All Auto Ch Memory Signal Type / Automatic Search Channel Number / Ch Label / Label Clear Ch Lab
Connecting a PC (Personal computer) Use the INPUT5 (PC) terminals to connect a PC. • The PC input terminals are DDC1/2B-compatible. • Refer to "PC compatibility chart" for a list of PC signals compatible with the System. • Make sure to select the same signal values for the output signal of a PC and the input signal of the TV/DVD set before connecting with the PC. (See page 23.) • Depending on the PC being used, images may not be shown without converting the output signals into external output.
Watching the DVD On the screen, "A" changes to "Reading" and then playback will commence. • A menu screen appear on the TV screen, if the disc has a menu feature. In this case, press A/T/,/_ or ENTER to operate a menu feature. Press POWER on the TV/DVD, or POWER on the remote control. • POWER indicator (Green): The TV/DVD is on. ("Please wait" will appear for a few seconds on the screen.) Press STOP to end playback. • The unit memorizes the stopped point, depending on the disc.
Watching the DVD Fast Forward Playback Press FWD during normal playback. Each press of FWD will increasethe speed of the search _ 2), _ (x 4), _ (x 8), _ (x 20). • To resume normal playback, press PLAY. • The above figure shown in parentheses indicates the average speed multiplier. Use the title, chapter and time recorded locate the desired point to play back. (x 1 Press DIRECT SKIP during playback. 2 Press A/v to select the "Title", "Chapter" or "Time".
Watching the DVD The TV/DVD stores the points that you want to watch again up to 3 points. You can resume playback from each scene. Marking You can select the language when you play a multilingual disc. 1 the scenes 1 Press MARKER 2 Select the blank Marker using A/T, then press ENTER at the desired scene. • Up to 3 scenes can be selected. • Repeat this procedure to set the other 2 scenes. 3 Press MARKER Press AUDIO during playback. The current soundtrack language will appear. during playback.
MP3/WMA/JPEG and Audio CD operation This TV/DVD can playback the MP3/WMA/JPEG-data which has been recorded on CD-R or CD-RW. Audio CD also can be played back. To produce the MP3/WMA/JPEG-data, you need a Windows-PC with CD-R/RW drive and a MP3/WMA/JPEG-encoding Software (not supplied). The Apple-HFS-System cannot be played. This TV/DVD requires discs/recordings to meet certain technical standards in order to achieve optimal playback quality. Pre-recorded DVDs are automatically set to these standards.
MP3/WMA/JPEG and Audio CD operation 1 Load a disc on which MP3 or WMA files have been recorded in the disc slot. 2 "Reading" will appear on the TV screen. Reading time wil! depend on the number of files on the disc. 3 A file browser screen will appear on the TV screen. Operat[onstatus F_Eenumber EEapsedfime 2 Press ENTER to add/remove check mark. Checked file type will be displayed in the file browser. 3 Press RETURN to save the setting.
Function setup MP3/WMA/JPEG and Audio CD operation Use the following buttons operate the menu. 1 In the file browser, press A/v/.,i/_ "Repeat" during stop mode. 2 Press ENTER 3 Press PLAY. • The unit automatically starts repeat playback finishing the current track. repeatedly to select to select "Track" or "All". on the remote control to SETUP/TVMENU DVD MENU after To resume normal playback Select Repeat : "Off" in step 2.
Function Setup Language *_ Menu *_ Subtitle *_ Audio .1 Picture TV Screen *2 English / Francais The selected language will be heard or seen, / Espanol Other Other language can be selected list" on page 33). Off (subtitle) Subtitles Original (Audio) The unit will select the first priority 4:3 _ box) (Letter When playing back a wide screen-DVD disc, it displays the wide picture with black bands at the top and bottom of screen.
Function setup Some discs are specified as not suitable for children. Playback of such discs can be restricted with this TV/DVD. 1 Select"Parental", "Enter Password" then press • or ENTER. screen will appear. Press "0000" using Number buttons (0-9). (Please note, this is pre-setting password of this unit). Then press ENTER. The parental level list will appear. • Ifyou input a wrong number, pressCANCEL. Level Off The parental control setting does not function.
Appendix Enter the appropriate Language Name code number Code for the initial settings Language Name Code "Menu", "Subtitle" Language Name and/or "Audio" Code (see page 31 ).
Appendix Problem Possible Solution • No power • Check if you pressed POWER on the remote control unit. (See page 15.) If the indicator on the TV/DVD does not light up, press POWER on the TV/DVD. • Is the AC cord disconnected? (See page 8.) • Has the power been turned on? (See page 15.) • Unit cannot be operated. • External influences such as lightning, static electricity, may cause improper operation.
Appendix Problem Possible Solution • Playback doesn't start. • No disc is inserted. (See page 25.) • The disc may be dirty. Clean up the disc. (See page 6.) • The TV/DVD cannot play CD-ROMs, etc. (See page 5.) • No picture. • TV/DVD selector is not set correctly. (See page 25.) • No sound. • Check the input selector of the amplifier is set properly. • The TV/DVD is in the special playback mode. (See page 26.) • Select the correct Audio Output position on AV amplifier.
Appendix Item Model: LC-26DV24U LCD panel 26" Active Matrix (a-Si TFT LCD) (Diagonal Measurement : 26") Resolution TV Function 1,049,088 pixels (1366 x 768) TV-standard (CCIR) American TV Standard ATSC/NTSC System Receiving VHF/UHF VHF 2-13ch, UHF 14-69ch Channel CATV 1-125ch (non-scrambled channel only.) Digital Terrestrial Broadcast (8VSB) 2-69ch Digital Cable .1 (64/256 QAM) 1-125ch (non-scrambled channel only.
Calling for Service For location of the nearest Sharp Authorized Service, or to obtain product literature, accessories, supplies, or customer assistance, please call 1-800-BE-SHARP.
VALID_IN CANADA ONLY SHARPce_ LiMiTED WARRANTY Consumer E/ectronics Products Congratulations on your purchase! Sharp Sharp Electronics of Canada Ltd.