LCD COLOUR TELEVISION OPERATION MANUAL Printed on 100% post-consumer recycled paper.
ENGLISH LC-13S1M LC-15S1M LC-20S1M LCD COLOUR TELEVISION ENGLISH OPERATION MANUAL CONTENTS Page DEAR SHARP CUSTOMER ................................ 2 IMPORTANT SAFETY PRECAUTIONS ......... 2, 3 SUPPLIED ACCESSORIES ................................ 4 PREPARATION ........................................... 5, 6, 7 Preparing and Using the Remote Control .. 5 Batteries for Remote Control ....................... 5 Removing the Terminal Cover ..................... 6 Bundling Cables with Clamp ................
DEAR SHARP CUSTOMER Thank you for your purchase of the Sharp LCD Colour TV product. To ensure safety and many years of trouble-free operation of your product, please read the IMPORTANT SAFETY PRECAUTIONS carefully before using this product. IMPORTANT SAFETY PRECAUTIONS Electricity is used to perform many useful functions, but it can also cause personal injuries and property damage if improperly handled. This product has been engineered and manufactured with the highest priority on safety.
IMPORTANT SAFETY PRECAUTIONS (Continued) ■ Cleaning—Unplug the power cord from the AC outlet before cleaning the product. Use a damp cloth to clean the product. Do not use liquid cleaners or aerosol cleaners. ■ Water and moisture—Do not use the product near water, such as bathtub, washbasin, kitchen sink and laundry tub, swimming pool and in a wet basement. ■ Stand—Do not place the product on an unstable cart, stand, tripod or table.
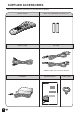
SUPPLIED ACCESSORIES Make sure the following accessories are provided with the product. Remote Control “AAA” size (UM/SUM-4) Dry Battery (×2) Antenna Cable AC Cord *Product shape varies in some countries.
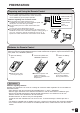
PREPARATION Preparing and Using the Remote Control ■ Use the remote control by pointing it towards the remote sensor window. Objects between the remote control and sensor window may prevent proper operation. POWER OPC HEADPHONE HEADPHONE jack Cautions regarding use of remote control OPC indicator ■ Do not expose the remote control to shock. In addition, do not expose the remote control to liquids, and do not place in an area with high humidity.
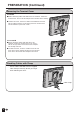
PREPARATION (Continued) Removing the Terminal Cover LC-20S1M ■ Before connecting cables and cords to the rear terminals, remove the terminal cover. Push in the tab and pull out the terminal cover carefully. ■ To mount the cover, insert the 2 hooks on the bottom of the cover into the cabinet and press on the upper part of the terminal cover until the tab locks in place with a click. LC-13/15S1M ■ Before connecting cables and cords to the rear terminals, remove the terminal cover.
PREPARATION (Continued) Power Connection POWER INPUT terminal (DC 12V) Household power outlet Plug into power outlet. AC cord* * Product shape varies in some countries. AC adapter Note: Use a commercially available AC plug adapter, if necessary, depending on the design of the wall outlet. Always turn the main power switch of the LCD TV set to OFF when connecting the AC adapter. Always unplug the AC adapter from the product and power outlet when not using for long periods of time.
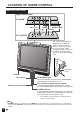
LOCATION OF USERS CONTROL Main unit (front view) Upper control panel LC-20S1M PRESET 1 2 VOL (–)/(+) CH ( MENU MAIN POWER )/( ) TV/VIDEO 2 LC-13/15S1M VOL PRESET 1 CH MENU TV/VIDEO MAIN POWER The screen can be adjusted backwards to an angle between 12 degrees and 35 degrees. The screen cannot be set up straight. When changing the angle, make sure to hold the stand and adjust the screen to the best viewable angle.
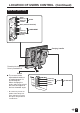
LOCATION OF USERS CONTROL (Continued) Main unit (rear view) VIDEO AUDIO (L) AUDIO (R) S-VIDEO AV-IN1 ANT. (Antenna terminal) Y PB PR COMPONENT AUDIO (L) AUDIO (R) POWER INPUT (DC12V) Carrying handle Round lock for Kensington Security Standard Slot. Stand ● The screen can be adjusted backwards to an angle between 12 and 35 degrees. When changing the angle, make sure to hold the stand and adjust to the best viewable angle.
LOCATION OF USERS CONTROL (Continued) Remote control BRIGHT Selects the brightness of the display. (P.24) SUBPAGE Displays the Teletext Subpage directly. (P.29) HOLD Temporarily holds the current Teletext page. (P.30) TEXT Displays the Teletext mode screen. (P.28) POWER (P.11) BRIGHT WIDE TEXT TEXT OTATE TV/ R VIDEO POWER T MENU Displays the TV menu. (P.15) SUBTITLE Displays the Teletext Subtitle directly. (P.30) END END E MPX SOUND MENU OK MENU MPX Switches Audio mode. (P.
BASIC OPERATION Turning on POWER Control section of main unit MAIN POWER 2 1 Press MAIN POWER, located on the upper part of the main unit to ON. 2 The POWER indicator instantaneously changes from red to green and the main unit is turned on. PRESET 1 ▼ On-Screen Display Note: • Input mode indication disappears after several seconds.
BASIC OPERATION (Continued) Switching TV/VIDEO AV1/AV2/COMPONENT/TV Mode BRIGHT WIDE TEXT TEXT TATE TV/ RO VIDEO POWER T TV/ VIDEO HOLDLD SUBPAGE SUBPAGE RE REVEAL VEAL HO SUBTITLE E SUBTITL 1 Turn on the power of the connected video equipment. 2 Press TV/VIDEO and select the applicable input source. The screen displays AV1, AV2, COMPONENT or TV mode at the upper right corner each time TV/VIDEO is pressed. END END E MPX SOUND MENU OK MENU M VOL CH TV/VIDEO SLEEP DIS.
BASIC OPERATION (Continued) Sound Volume BRIGHT WIDE TEXT TEXT TATE TV/ RO VIDEO POWER POWER 1 Press VOL (+) to increase sound volume. The segment of indicator increases. 2 Press VOL (–) to decrease sound volume. The segment of indicator decreases. T HOLDLD SUBPAGE SUBPAGE RE REVEAL VEAL HO SUBTITLE E SUBTITL END END E MPX SOUND MENU OK MENU M VOL MUTE CH VOL(+)/(–) To mute sound TV/VIDEO SLEEP 1 Press MUTE to temporarily turn off the sound. Screen displays the MUTE mark.
BASIC OPERATION (Continued) Changing the Channels Changing channels using CHANNEL SELECT on the remote control. • To handle the increasing number of channels available, this LCD TV set allows you to select up to 100 positions (Channels 0 to 99). One-digit and two-digit methods of selection can be used. Follow the procedure shown below to select channels. BRIGHT WIDE To select a one-digit channel (e.g.
SELECTING THE MENU ITEMS Selecting a Menu Item • This LCD TV set allows you to adjust the picture and sound, and set the channels and other features using the On-Screen Display. Select the desired menu item by following the steps below and then refer to the indicated page for details. SLEEP TIMER menu (Page 19) BRIGHT WIDE TEXT TEXT TATE TV/ RO VIDEO POWER T Press MENU to display the MENU screen. 2 Press a/b to select the desired menu item.
PRESET On-Screen Display Language Selection Upper control panel 3 1, 2, 4 PRESET 1 2 ■ MENU on the LCD TV set can also be used to select the language. 1 Press MENU (PRESET-1) on the upper part of the LCD TV set for more than 2 seconds to display the PRESET mode screen. 2 Press MENU (PRESET-1) twice to display the LANGUAGE select mode screen. Press MENU (PRESET-1) again to change the PRESET mode as shown below.
PRESET (Continued) Presetting the Channels (MANUAL) ■ Setting a channel to a desired TV station: 1 Press MENU (PRESET-1) on the upper part of the LCD TV set for more than 2 seconds. The AUTO mode screen appears. 2 Press MENU (PRESET-1) to display the MANUAL mode screen. Press MENU (PRESET-1) again to change the MANUAL mode as shown below.
PRESET (Continued) Channel Setting BRIGHT WIDE 1 Press MENU to display the MENU screen. 2 Press a/b to move the cursor to CH-SETTING. 3 Press c/d to display CH-SETTING screen. TEXT TEXT TATE TV/ RO VIDEO POWER T c/d HOLDLD SUBPAGE SUBPAGE RE REVEAL VEAL HO SUBTITLE E SUBTITL END END E MENU MPX SOUND OK MENU M MENU (MENU screen) MENU SLEEP TIMER PICTURE SOUND FEATURE CH-SETTING a/b SELECT: VOL CHANNEL SELECT TV/VIDEO SLEEP ENTER: EXIT: MENU CH DIS.
ADJUSTMENT Adjusting the SLEEP TIMER Setting To use Direct Key function BRIGHT WIDE POWER 1 Press SLEEP to display the SLEEP TIMER screen. c/d 2 Press SLEEP to set the sleep timer (in minutes). TEXT TEXT TATE TV/ RO VIDEO POWER T HOLDLD SUBPAGE SUBPAGE RE REVEAL VEAL HO SUBTITLE E SUBTITL END END E • Each time you press SLEEP, the timer changes as follows: MENU MPX SOUND OK MENU M MENU --- a/b VOL 60 - - - REMAIN 150 DIS.
ADJUSTMENT (Continued) Adjusting the PICTURE Settings BRIGHT WIDE 1 Press MENU to display the MENU screen. 2 Press a/b to move the cursor to PICTURE. 3 Press c/d to display the PICTURE menu screen.
ADJUSTMENT (Continued) Adjusting the SOUND Settings BRIGHT WIDE 1 Press MENU to display the MENU screen. 2 Press a/b to move the cursor to SOUND. 3 Press c/d to display the SOUND menu screen. TEXT TEXT TATE TV/ RO VIDEO POWER T c/d HOLDLD SUBPAGE SUBPAGE RE REVEAL VEAL HO SUBTITLE E SUBTITL END END E MENU MPX SOUND MENU SLEEP TIMER PICTURE SOUND FEATURE CH-SETTING OK MENU M MENU SELECT: a/b VOL CH 4 TV/VIDEO SLEEP Press a/b to move the cursor and select the desired adjustment item.
ADJUSTMENT (Continued) Adjusting the FEATURE Settings BRIGHT WIDE ■ The FEATURE items can be set by the user. TEXT TEXT TATE TV/ RO VIDEO POWER T c/d HOLDLD SUBPAGE SUBPAGE RE REVEAL VEAL HO SUBTITLE E SUBTITL 1 END END E Press MENU to display the MENU screen. MENU MPX SOUND OK MENU M MENU MENU SLEEP TIMER PICTURE SOUND FEATURE CH-SETTING a/b VOL CH SELECT: TV/VIDEO SLEEP 2 Press a/b to move the cursor to FEATURE. 3 Press c/d to display FEATURE screen. DIS.
ADJUSTMENT (Continued) Selected item Factory setting Setting change BRIGHTNESS [BRIGHT] Maximum brightness [NORMAL] Brightness 60% → Suitable for viewing in well-lit areas. Saves energy. [DARK] Brightness 20% → Sufficiently bright when viewing in dim areas. [AUTO] Screen brightness adjusts according to the ambient light of the room. AUTO POWER OFF (only TV mode) [OFF] This feature is inactive. [ON] The power of the LCD TV set is turned off when there is no signal for 5 minutes.
ADJUSTMENT (Continued) Adjusting the BRIGHTNESS Settings You can set the brightness of the screen. Directly setting the BRIGHTNESS BRIGHT WIDE TEXT TEXT TATE TV/ RO VIDEO POWER T SUBTITLE E SUBTITL END END E MENU MPX SOUND 1 Press BRIGHT to display the BRIGHTNESS screen. 2 Press BRIGHT to change the setting. BRIGHT HOLDLD SUBPAGE SUBPAGE RE REVEAL VEAL HO OK MENU M BRIGHT AUTO VOL NORMAL DARK CH BRIGHTNESS[BRIGHT] Note: • The BRIGHTNESS screen automatically disappears in 3 seconds.
ADJUSTMENT (Continued) Adjusting the DISPLAY MODE Settings You can set the orientation of the picture. Directly setting the DISPLAY MODE TEXT TEXT TATE TV/ RO VIDEO 1 Press DIS.MODE to display the DISPLAY MODE screen. 2 Press DIS.MODE to change the setting. T HOLDLD SUBPAGE SUBPAGE RE REVEAL VEAL HO SUBTITLE E SUBTITL END END E MENU MPX SOUND OK MENU DISPLAY MODE [NORMAL ] M VOL NORMAL MIRROR UPSIDE DOWN REVERSE + INVERT CH TV/VIDEO SLEEP ABC DIS.MODE DIS.
NICAM BROADCASTS SELECTION Enables selection of reception mode when receiving a NICAM signal. To let you enjoy NICAM broadcasting, this LCD TV receives NICAM stereo system, bilingual, and monaural broadcasts. BRIGHT WIDE TEXT TEXT Stereo TATE TV/ RO VIDEO POWER 49 (When stereo sound is received) NICAM STEREO T HOLDLD SUBPAGE SUBPAGE RE REVEAL VEAL HO SUBTITLE E SUBTITL END END E MENU MPX SOUND OK MENU M MPX VOL Bilingual CH TV set is receiving a bilingual broadcast.
A2 STEREO BROADCASTS Enables selection of reception mode when receiving an A2 stereo signal. To let you enjoy A2 stereo broadcasting, this TV receives A2 stereo system and bilingual broadcasts. BRIGHT WIDE TEXT TEXT TATE TV/ RO VIDEO POWER (When stereo sound is received) 49 STEREO Stereo T HOLDLD SUBPAGE SUBPAGE RE REVEAL VEAL HO SUBTITLE E SUBTITL END END E MENU MPX SOUND OK MENU M MPX VOL TV set is receiving a stereo broadcast.
Teletext ■ What is Teletext? Teletext is an information service organized like a magazine, which is provided by some TV stations in addition to regular television broadcasting. Your LCD TV set receives special Teletext signals broadcast by a TV station, processes the information and displays it graphically on the screen. News, weather and sports information, stock exchange prices, programme reviews and closed captioning for the deaf are among the many services available through Teletext.
Teletext (Continued) [1] Turning on and off Teletext mode BRIGHT WIDE 1 Select a TV channel that is broadcasting the Teletext programme. 2 Press TEXT. The Teletext screen appears. TEXT TEXT TEXT TATE TV/ RO VIDEO POWER T SUBPAGE HOLDLD SUBPAGE SUBPAGE RE REVEAL VEAL HO SUBTITLE E SUBTITL END END E MENU MPX SOUND OK MENU M VOL ● To turn off the Teletext mode, press TEXT again.
Teletext (Continued) HOLD [4] Using the TOP table When TOP Teletext is being broadcast, you can display the TOP table with the current programme data if one exists. TEXT 1 Press OK to display the TOP table. The Teletext page is temporarily turned off. 2 Press a/b to select the desired item. Press c/d to select topics (column 1) or subtopics (column 2) if they exist. 3 Press OK. A page associated with the selected item is displayed. 4 Press END to exit.
CONNECTING WITH EXTERNAL DEVICES You can enjoy picture and sound by connecting a VCR or a home video game system to the terminals located on the rear of the TV set. When connecting an external device, turn off the power of the main unit first to prevent any possible damage.
CONNECTING WITH EXTERNAL DEVICES (Continued) Connecting a VCR, DVD player or a Camcorder (AV-IN1/2/COMPONENT) To AV-IN1 terminal Video Audio (L) Audio (R) To audio/video output terminal Camcorder To S-VIDEO input terminal S-video VCR To S-video output terminal To COMPONENT output (Video) terminal To COMPONENT input (Video) terminal Y PB PR To COMPONENT output (Audio) terminal Audio (L) Audio (R) To COMPONENT input (Audio) terminal DVD Player To AV-IN2 terminal Audio (R) Audio (L) Video To audio/vide
CONNECTING WITH EXTERNAL DEVICES (Continued) Outputting video and audio (video output) You can output video and audio data from the TV set through the AV output terminals (AV-OUT). • When using as an OUTPUT terminal, select FEATURE in the MENU and set AV2 IN/OUT to OUT. (See page 23.) • The factory setting for AV2 IN/OUT is IN. Connect to a VCR, audio amplifier, etc. Note: • AV2 has 2 OUT modes (see page 23).
TROUBLESHOOTING ■ Before calling for repair service, check the following items for possible remedies to the encountered symptoms. TV set Problem Sound Picture Picture There is no picture or sound. There is no picture. There is no picture from AV-IN 1/2. There is no sound. There is no picture or sound, just noise. Check item • Make sure the AC adapter is properly inserted in the power outlet. • Reception other than those of broadcasting stations can be considered.
TROUBLESHOOTING (Continued) Antenna Problem The picture is not sharp. Check item • • • • The reception may be weak. The state of the broadcast may also be bad. Make sure the antenna is facing the right direction. Make sure the outside antenna is not disconnected. The picture moves. The picture is doubled or tripled. The picture is spotted. There are stripes on the screen or colours fade. ■ • Make sure the antenna is facing the right direction.
SPECIFICATIONS LCD COLOUR TV COMPARISON ITEMS MODEL LCD panel Number of pixels Video color systems TV Standard (CCIR) TV Tuning System TV function STEREO/BILINGUAL AUTO PRESET CATV 4-LINE DIGITAL COMB FILTER Brightness Lamp life Viewing angles Audio output Speakers AV1 AV2 IN/OUT Terminals COMPONENT Headphone jack OSD LANGUAGE Power requirement Weight Accessories LC-13S1M LC-15S1M LC-20S1M 13” (33 cm) Advanced Super 15” (38 cm) Advanced Super 19.
DIMENSIONAL DRAWINGS Unit: mm LC-13S1M 148 269 288 12° 2 1 124 323 236 35° 7 168.7 210 259 200.
DIMENSIONAL DRAWINGS (Continued) Unit: mm LC-15S1M 153 12° 1 292 319 2 129 363 249 35° 7 183.
DIMENSIONAL DRAWINGS (Continued) Unit: mm LC-20S1M 172 336 404 12° 2 PRESET 1 156 474 283 35° 5 228.5 263 356 300.8 411 403.
SHARP CORPORATION