OWNER’S GUIDE S3101UKJR S3101UKJR_IB_ENG_100729.
IMPORTANT SAFETY INSTRUCTIONS For Household Use Only WHEN USING YOUR SHARK STEAM MOP, BASIC SAFETY PRECAUTIONS SHOULD ALWAYS BE FOLLOWED, INCLUDING THE FOLLOWING: WARNING: READ ALL INSTRUCTIONS BEFORE USING YOUR STEAM MOP. DANGER OF SCALDING. Please use caution when using the steam mop. The steam emitted from the openings is very hot.
11. DO NOT unplug by pulling on power cord. To unplug, grasp the plug not the power cord. Do not use extension cords or outlets with inadequate current carrying capacity. 12. DO NOT put any objects into openings. Do not use with any opening blocked. 13. DO NOT put hands or feet under the steam mop. Unit gets very hot. 14. Use ONLY on flat, horizontal surfaces. Do not use on walls, counters or windows. 15.
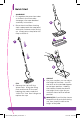
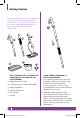
Quick Start ASSEMBLE Fit together the extension tubes as shown in the illustration. See page 2 for more detailed assembly instructions. 1 2 2 Place the micro-fiber cleaning cloth underneath the mop head, with quick fastener strips facing up. Simply press the pad to the mop to attach it. 1 3 3 FILL Remove the cap to fill the Water Tank. Using the filling flask and funnel, fill the tank, keeping the water under the “MAX FILL” line. Don’t forget to replace the cap.
Quick Start 4 5 PRIME STEAM 5 Plug in the mop. Wait 30 seconds for the unit to heat up and the steam to be ready. Push the handle toward the mop head in a pumping motion. To prime simply pump the handle 10-15 times to generate the steam. S3101UKJR_IB_ENG_100729.indd 5 QUICK TIP: Customize steam output by slow or fast mopping with a forward and backward motion.
THIS BOOK COVERS MODEL NUMBER: S3101UKJR 11 TECHNICAL SPECIFICATIONS Voltage: 220-240V., 50Hz. Power: 1550 Watts Water Capacity: 250 ml S3101UKJR_IB_ENG_100729.indd 6 Not to be disposed of with other household waste.
Contents Thank you for purchasing the Shark Steam Mop. GETTING STARTED 2 USING YOUR STEAM MOP 6 CARE OF YOUR STEAM MOP 8 TROUBLESHOOTING ORDERING REPLACEMENT PARTS 9 10 1 S3101UKJR_IB_ENG_100729.
Tile Getting Started When assembling your steam mop there may be a little water in or around the water tank. This is because we test all our steam mops 100% before you buy them, so you get a quality Shark® Steam Mop.
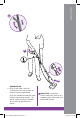
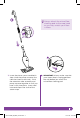
3 3 Insert the pieces you assembled in Step 2 into the pump actuator (the tube that leads to the tank). Push the extension tube assembly and pump actuator together in until you hear it click into place. Insert cord into cord clip on the shaft of the steam-mop. Always attach the micro-fiber cleaning pad to the mop head or you may scratch your floor surface. IMPORTANT: Always make sure that your Steam Mop is unplugged from the wall before you attach the micro-fiber cleaning pad.
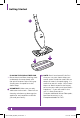
Getting Started 1 PLACING THE MICRO-FIBER PAD 1 Place the micro-fiber cleaning cloth underneath the mop head, with the quick fastener strips facing up. Simply press the pad on to the Steam Mop. IMPORTANT: Make sure you only add water to the tank. Chemicals or cleaning solution may damage the appliance and could be unsafe for you and your family. NOTE: Don’t be alarmed if the first time you use your Steam Mop, you notice water inside the water tank or drops of water in the packaging.
The water tank cap has an arrow to indicate the locked and unlocked position. 1 FILLING THE WATER TANK IMPORTANT: Before you fill up the tank, make sure your Steam Mop is unplugged from the wall. 1 First, remove the water tank cap by turning it counter clockwise to the unlocked position. See illustration for a visual explanation. 2 The filling flask and funnel included with your Steam Mop make filling the water tank as simple as getting a glass of water from the sink.
Using Your Steam Mop 1 Now comes the part you’ve been waiting for – it’s time to use your steam mop. When you use your steam mop for the first time or haven’t used the unit in awhile, it may take a minute or two for the water to make its way through the pump and into the heater to create steam. Get it started by pumping the handle a few times. If you’ve waited a few minutes and you still don’t see any steam, reference the troubleshooting section on page 9.
3 When your Steam Mop stops steaming, it could be out of water. Unplug the power cord from the electrical outlet and refill the water tank at anytime. 4 3 It takes about 30 seconds for the steam to get going. Now pump the handle a few times to prime the pump and activate steam. 4 Mop with a forward and backward motion to customize steam output automatically. QUICK TIP: If you find the Steam Mop difficult to push/pull during use, then simply increase the height of the pole.
Care of Your Steam Mop Always remove the microfiber cleaning pad from the Steam Mop head when you store your Steam Mop to avoid damage to your floors. KEEPING YOUR MICRO-FIBER CLEANING PAD AS GOOD AS NEW Your steam activated micro-fiber cleaning pad works wonders for you, so return the favor by giving it the care it deserves. 1 Wash pad in warm water. Wash separately from other laundry. Only use liquid detergent (no powder detergent). Don’t use any fabric softeners. Line dry. Do not tumble dry.
Trouble Shooting PROBLEM The Steam Mop will not turn-on. POSSIBLE REASONS & SOLUTIONS Your steam-mop should be securely plugged into a 220-240V electrical outlet only. Check your fuse or breaker. If your unit still doesn’t work, give us a call Freephone 0800 781 7831. Steam Mop will not make steam. Is there water in the water tank? If not, add water to your Steam Mop following instructions. Steam Mop leaves water on the floor.
Ordering Replacement Parts b a ORDERING REPLACEMENT PARTS To order additional parts and accessories, feel free to contact us at PART a 2 Micro-Fiber Pads b Carpet Glider PART NO. XT3250APUKJR XCG3101UKJR JML JML HOUSE, REGIS ROAD LONDON, NW5 3EG Freephone 0800 781 7831 10 S3101UKJR_IB_ENG_100729.
This appliance complies with the WEEE-Directive 2002/96/EC on the disposal of electrical and electronic equipment (WEEE). This appliance complies with the European directives for electromagnetic compatibility (EMC) 2004/108/EC and its revisions, as well as Low Voltage Directive (LVD) 2006/95/EC and its revisions. his marking indicates that this product should not be disposed with T other household wastes throughout the EU.
Notes 12 S3101UKJR_IB_ENG_100729.
Notes 13 S3101UKJR_IB_ENG_100729.
JML JML House, Regis road London, NW5 3EG info@JMLgroup.co.uk Freephone 0800 781 7831 Technical Details Model number: S3101UKJR 11 Input: 1550 Watts Main unit voltage: 220-240 V., 50 Hz PRINTED IN CHINA S3101UKJR.E.100729 Illustrations may differ from actual product. S3101UKJR_IB_ENG_100729.