Fable User guide v.1.3.
Contents Chapter 1: The Fable System at a glance Fable System Dongle Joint Module PC Software Chapter 2: Get started Install the Fable Software Install the Dongle Driver (Windows 7 & 8) Chapter 3: Basics Turning the Module On/Off Battery Management Wireless communication Write a Program Chapter 4: Troubleshooting Dongle not found Module not found Module overloaded Chapter 5: Safety, handling and support Important Safety and Handling Information Fable Support 2 2 5 6 8 9 9 12 13 13 14 15 Error! Bookmark not
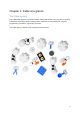
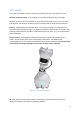
Chapter 1: Fable at a glance The Fable System The Fable Robot System is a modular robotic system that makes it easy and fun for anybody to build their own robots. While creating robots, students can learn about math, physics, programming, innovation, engineering and more. The Fable system consists of the components shown below.
Construction System The Fable modules are either passive (containing no electronics) or active (containing electronics, motors, sensors) and are assembled using a strong magnetic connector system. Figure 1 - Assemble your custom robots by snapping various modules together.
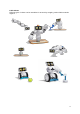
Fable Robots Different types of robots can be assembled in seconds by snapping various Fable modules together.
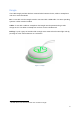
Dongle The Fable Dongle provides wireless communication between the PC, tablet or smartphone and one or several modules. PC: To use with a PC the Dongle must be connected with a USB cable1. On some operating systems a driver must be installed. Tablet: To use with a tablet or smartphone the Dongle must be powered using a USB charger or PC. The tablet or smartphone can then connect via Bluetooth.
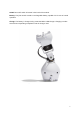
Joint Module The Fable Joint Module provides movement to Fable robots using two motors: X and Y. Wireless Communication: Joint modules are controlled wirelessly using the Dongle. Servos: The two servos are identified as X and Y and their position can be set from -90 to +90 degrees. The speed of movement can be controlled and the angle can be measured. Pairing: Joint Modules have a button which, if pressed, will change the LED color.
On/Off: An on/off switch is located in the back of the module. Battery: The joint module contains a rechargeable battery capable of 2-3 hours of normal operation. Charge: The battery is charged using a standard Micro-USB charger. Charging can take several hours depending on depletion and the charger used. Figure 4 - Joint Module shown from the back.
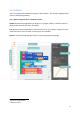
PC Software Users can program their robots by using the Fable software. The interface supports block-2 and text-3 based programming: The software supports three complexity levels: Simple: Block based programming for beginner or younger children. A limited number of blocks makes the interface easily accessible. Full: Blocks based programming for more experienced or older children. Support for more advanced features such as math, functions, logic and variables.
Chapter 2: Get started Install the Fable Software The newest version of the software can be downloaded and installed from www.shaperobotics.com/download Supported Operating Systems: ● Windows 7, 8 and Windows 10 ● Mac OS (See supported versions at www.shaperobotics.com/download) ● iOS for iPad. Once you have selected your operating system click the Save File button on the popup window.
Once it finished downloading go to the destination folder and double click on the FableSetup icon. Once you have double clicked the Fable-Setup icon you should see a dialog box with a progress bar indicating the status of the installation process. Plug in the Dongle to your PC’s USB port. If you’re running Windows 7 or 8 see the following section: Install the Dongle Driver (Windows 7 & 8). Start the PC Program by clicking this icon located in your Desktop.
To get started with programming Fable follow these instructions: 1. Turn on a Joint Module 2. Pair the Dongle with the module. 3. Create a test program as the one shown below. 4. Press the Run button located in the software’s menu. 5. If done correctly the Joint Module should move back and forth between two positions at 1 second intervals.Observe behavior 6. You can stop the program by pressing the Stop button. You can experiment with this program by changing the example code.
Install the Dongle Driver (Windows 7 & 8) A driver for the Dongle only needs to be installed in Windows 7 & 8. Step 1: Windows will alert you that the driver is not installed. Once this happens download the driver from www.shaperobotics.com/download and unzip in a folder. (See balloon 1). Step 2: Locate the Dongle within Windows’ Device Manager under Other devices, right click and select “Update Device Software”. (See balloon 2). Step 3: Browse to the the folder containing the driver that you downloaded.
Chapter 3: Basics Turning the Joint Module On/Off The on/off switch can be found on the back of the module, as highlighted in Figure 6 - Turn the switch left and right to turn the Joint module (letf) on or off.. On: When the module is on it can be programmed wirelessly, the module’s button will light up and the color will change when pressing the button. Off: When the module is off the colored light is off unless it is charging or the button is being pressed.
Battery Management The Joint Module contains a rechargeable LiPo Battery. Charging: The battery is recharged with a USB charger and can be charged while the module is either on or off. Timeout: To save battery the module will automatically turn off after being inactive for 10 mins. To turn it on again, the on/off switch must be toggled or the module’s button pressed.
Wireless communication Dongle and modules communicate wirelessly using radio signals. Channels: The radio signals can be on different channels, each of the channels is indicated by the Dongle’s or module’s LED color. If a Dongle and a group of modules are on the same channel they are able to communicate. Color pairing: The color on the modules and Dongle indicates the radio channel. To pair modules with a Dongle simply match the color by pressing their buttons.
Chapter 4: Troubleshooting Dongle not found Symptoms: The Dongle is not detected by the computer/software. The issue can be confirmed by inspecting the status window in the PC software. Possible issues and suggested solutions: ● Dongle is frozen - plug out and back in the Dongle from the USB port. ● Port is frozen - restart the computer ● Operating system is not supported - check list of supported OS. ● Driver not installed (Windows 7 & 8) - install driver and inspect Device Manager to verify.
Module not found Symptoms: The module does not show up with its ID in the graphical user interface. Possible issues and suggested solutions: ● The Dongle is not connected (see above). ● The joint module is not on. Even if it has a color it may be charging while turned off. Press the module’s button to see if the color changes, if it does it means it is turned on, if not then check the on/off switch. ● The Joint Module has crashed - try restarting the module by toggling the on/off switch.
Chapter 5: Safety, handling and support Important Safety and Handling Information This device complies with part 15 of the FCC Rules. Operation is subject to the following two conditions: (1) This device may not cause harmful interference, and (2) this device must accept any interference received, including interference that may cause undesired operation. Notice: Any changes or modifications not expressly approved by Shape Robotics for compliance could void the user's authority to operate the equipment.
device and Fable. Consult your physician and medical device manufacturer for information specific to your medical device. If you suspect Fable is interfering with your pacemaker, defibrillator, or any other medical device, stop using Fable. Extreme risks: Fable is not intended for use where the failure of the device could lead to death, personal injury, or environmental damage. Choking hazard: Some Fable accessories may present a choking hazard to small children.