
User's Manual


UTT Technologies Chapter 2 Hardware Installation
UTT Technologies http://www.uttglobal.com Page 27
2.4 Installation Procedure of U2000
1. Selecting the Proper Location
Before installing the U2000, you should make sure that it is powered off, and then select a
proper location to install the U2000. As the U2000 is designed according to the 11-inch
standard rack, you can install it in a standard rack. Also you can install it on a level surface
such as a desktop or shelf.
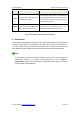
1) Installing the U2000 in a 11-inch Rack
See Figure 2-3, to install the U2000 in a 11-inch rack, firstly attach the rack-mount
brackets to the sides of the U2000 (one on each side) with the supplied screws and
secure them tightly, and then position the U2000 into the rack and use the supplied
screws to secure it in the rack.
Figure 2-3 Install the U2000 in a Rack
2) Installing the U2000 on a desktop or shelf
If you don¶t have a 11-inch standard rack, you may directly place the U2000 on a sturdy,
flat surface (such as a desktop or shelf) with a power outlet nearby.
Note
Please ensure that the desktop or shelf is stable and the power outlet is grounded
properly, and do not place heavy objects on the U2000.
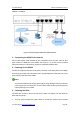
2. Connecting the U2000 to the LAN
See Figure 2-4, connect a standard network cable from a PC or switch to a LAN port of the
U2000. The U2000 will automatically adapt to any Ethernet device which is operating at