
User's Manual


UTT Technologies Chapter 7 Advanced Setup
http://www.uttglobal.com Page 194
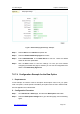
2) Configuring DHCP Relay1
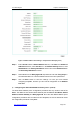
Step 1 Go to the Advanced > DHCP page, select the DHCP Relay Agent radio button
and then select the Relay Agent Settings tab to go to the setup page, see the
following figure.
Figure 7-50 DHCP Relay Agent Settings - Comprehensive Example (DHCP Relay1)
Step 2 Select LAN from the Interface drop-down list.
Step 3 Select the Enable DHCP Relay Agent check box.
Step 4 Enter 200.200.200.254 in the DHCP Server 1 text box. Select insert from the
Option text box, select ascii from the Relay Agent ID drop-down list and enter
Test_Relay1 in the associated text box. Leave the default values for the other
parameters.
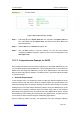
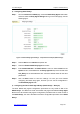
Step 5 Click the Save button to save the settings. Till now you have finished
configuring the DHCP relay agent, and then you can view its configuration in
the DHCP Relay Agent List.
3) Configuring the Other DHCP Agent Relays (DHCP Relay2 ~ Realy10)
The other DHCP relay agents¶ configuration procedures are very similar to that of the
DHCP Relay1. The difference is that each DHCP relay agent has different Relay Agent
ID. Since the other DHCP relay agents¶ configuration procedures are so similar to that of
the DHCP Relay1, the user is directed to review the configuration procedure of the DHCP
Relay1.