
User's Manual


UTT Technologies Chapter 7 Advanced Setup
http://www.uttglobal.com Page 186
Step 5 Click the Save button to save the settings. Till now you have finished
configuring the DHCP client, and then you can view its configuration and status
in the DHCP Client List.
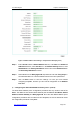
7.8.7.3 Configuration Example for the DHCP Relay Agent
1. Network Requirements
In this example, the DHCP clients reside on the subnet 192.168.16.0/254, and the DHCP
server¶s IP address is 200.200.200.254/24. Because the DHCP server and DHCP clients
reside on the different subnets, the Device acting as a DHCP relay agent is deployed to
forward DHCP messages between the DHCP server and DHCP clients. The DHCP relay
agent is enabled on the LAN interface, which is connected to the subnet where DHCP
clients reside. Then DHCP clients can obtain an IP address and other TCP/IP
configuration parameters from the DHCP server dynamically.
Note that in order to assign appropriate IP addresses to the DHCP clients, on the DHCP
server you should create a DHCP address pool whose address range is from
192.168.16.2 to 192.168.16.254. And also you should create a static route whose
destination network is 192.168.16.0/24. For more information about static route, please
refer to section 7.1.1 Static Route.
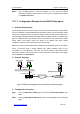
2. Network Topology
LAN1
DHCP Client DHCP Client
DHCP Server
LAN2
192.168.16.0/24
192.168.16.1/24
200.200.200.0/24
200.200.200.254/24
DHCP Relay
Switch
LAN
WAN
Figure 7-44 Network Topology Where the Device Acting as a DHCP Relay Agent
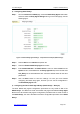
3. Configuration Procedure
Step 1 Go to the Advanced > DHCP page, and select the DHCP Relay Agent radio
button.
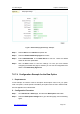
Step 2 Select the Relay Agent Settings tab to go to the setup page, see the following
figure.