
Installation Instruction


NAKe Series Non-contact Level Switch Installation Instruction
SHANGHAI HUIBO AUTOMATIC GAUGE CO., LTD
Address: Room 1611, Lijing Yangguang Building, NO.19 Wuning Road,
Shanghai,China
Web Site:www.china-huibo.cn Email: huiboshanghai@163.com
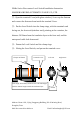
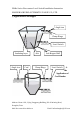
The angle iron is horizontally welded on the outer wall of the container.
Angle iron should passes through the insulating layer, if there is. Or,
put on the insulation after angle iron is welded. Of cause, the angle iron
could be welded on any other fixed position near the container if can
make sure the Level Switch forward the container and the distance
between the Level Switch and the container is less than 5cm.
Note: Make sure the Level Switch is installed outside of the insulation.
②、Mounting Clamp Rings:
Using 2 sets nut, spring shim and gasket fasten each clamp ring on
the welded angle iron.
Note: Using only 1 set nut, spring shim and gasket fasten the clamp
will damage the clamp.
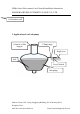
2. Installation of Level Switch
①、Take out the Level Switch and accessories from pakage. The
accessories include: Two clamp rings with six sets of nut, spring shim
and gasket, one waterproof cable lock, one antenna, and 2 screws
②、Record the Level Switch’s ID and the container number before
installation. The Level Switch’s ID is the lastt 4 digits of the certificate
number which is cured on module panel.