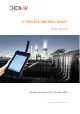
LT700H RTK ANDROID TABLET User Guide Mapping & Geospatial | October 2019 Make your work more efficient
Table of Content Table of Content Table of Content............................................................................................................... 2 Preface ............................................................................................................................ 4 Copyright ........................................................................................................................... 4 Safety Warnings ............................................................
Table of Content 4 Getting Start with LandStar 7 ................................................................................... 27 4.1 LandStar7 Installation ................................................................................................ 27 4.2 Connect the LT700H to internet ................................................................................ 28 4.3 Create a project .........................................................................................................
Preface Preface Copyright Copyright 2019 CHCNAV | Shanghai Huace Navigation Technology Ltd. All rights reserved. The CHCNAV and CHC Navigation are trademark of Shanghai Huace Navigation Technology Limited. All other trademarks are the property of their respective owners. Trademarks All product and brand names mentioned in this publication are trademarks of their respective holders. Safety Warnings The Global Positioning System (GPS) is operated by the U.S.
Preface CE Interference Statement Declaration of Conformity: Hereby, Shanghai Huace Navigation Technology Ltd. declares that this LT700H is in compliance with the essential requirements and other relevant provisions of Directive 2014/53/EU. A copy of the Declaration of conformity can be found at Shanghai Huace Navigation Technology Ltd.
Introduction 1 Introduction Thank you for choosing CHCNAV LT700H GNSS RTK Tablet. This user guide will provide useful information about your receiver. It will also guide you through your first steps of using LT700H in the field. 1.1 Technical Assistance If you have a problem and cannot find the information you need in the product documentation, contact your local dealer from which you purchased the LT700H. Alternatively, please request technical support using the CHCNAV Website (www.chcnav.
Introduction A Warning or Caution information is intended to minimize the risk of personal injury and/or damage to the equipment. WARNING - A Warning alerts you to a potential misused or wrong setting of the equipment. CAUTION - A Caution alerts you to a possible risk of serious injury to your person and/or damage to the equipment. 1.5 Use and Care The LT700H is designed to withstand the rough environment that typically occurs in the field.
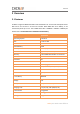
Overview 2 Overview 2.1 Features LT700H is a high-end GNSS RTK tablet under Android 8.1 OS. Its dust and waterproof level is IP67 and it can survive 1.5 m fall onto concrete. With 8000 mAh Li-ion battery, it can continuously work up to 12 h. The LT700H tracks GPS + GLONASS + GALILEO + BEIDOU (for details refer to 3.10.2 Select the Constellation Combination.) Item Specification Operating System Android 8.1 CPU 8-core 2.
Overview 2.2 Specifications Physical specifications Display ▪ Size: 8" IPS Glass touch screen ▪ Resolution: 1920 x 1200 ▪ Brightness: 450 cd/m2 ▪ Touch screen: Capacitive touch, 10 points touch screen, waterproof, gloves-supported ▪ Point touch pen: Mapping pen with high degree of accuracy ▪ Screen technology: IPS display panel Corning® Gorilla® Glass 3 Physical ▪ Dustproof and waterproof: IP67 ▪ Shock: Survives a 1.
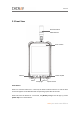
Overview 2.3 Front View Precision Helical GNSS Antenna Front Camera Volume Power On/Off Menu Return Homepage F1/F2 Function Power Button Power on: Press the button for 1-2 seconds, the Power Indicator will turn on and the boot screen will appear. The LT700H will enter the operating system after 30 seconds. Power off: Press the button for 1-2 seconds, the [SELECT] dialogue box will pop up, select [Power off] to turn off the device.
Overview Return: Press the button to go back to the last menu. Menu Button Click this button to bring out the start menu. Homepage Use the Homepage button to the main menu. F1/F2 Function Button This key is a shortcut key to the preset function or menu. USB Type C This interface is used for battery charging and data transmission between LT700H and PC by using a USB cable. Volume button These two buttons are used for increasing / decreasing the volume.
Overview 2.4 Back View 2.
Overview 2.6 Bottom USB Type-C Charging/Data Interface The tablet has a internal rechargeable Lithium-ion battery, charge the battery completely before using it for the first time. To charge the battery, please connect to the AC power via the USB cable and power adapter. WARNING - Charge the battery only in strict accordance with the instructions. Charging or using the battery in unauthorized equipment or in a wet environment can cause an electric short and damage to the tablet.
Basic Operation to the charging port. 2.7 Installation SIM Card Slot Micro-SD Card Please insert the SIM card and the MicroSD card in the direction of the diagram. 3 Basic Operation 3.1 Insert SIM Card and Power On Refer to 2.7 Installation to find the SIM card and TF card slot, and then insert the cards into slots correctly. Before powering on LT700H, please make sure to fully charge the battery. Then long press the power button to turn on LT700H and enter its home screen.
Basic Operation Click to go back to the previous menu. Click to return home screen. Click to see all the running apps and then you can close them by sliding them right or left. After powering on LT700H, click Settings—Network & Internet—SIM cards to turn on the SIM cards.
Basic Operation 3.2 Language & Input Click [Settings] –[System]- [Language & input] – [Language] to select language. If you have not found the language you want to choose, click [Add a language] to find the target language. 3.3 Set Date & Time Click [Settings] –[System]- [Date & time] and enter [Date & time] interface.
Basic Operation If you want to set date and time by yourself, please turn off the Automatic date & time first and then click Set date and Set time to start your settings. You can also customize your time zone and choose whether to use the 24-hour format in this interface. 3.4 Display Click [Settings] – [Display] to enter Display interface. Click Advanced to view all the options.
Basic Operation Brightness adjusting: Click Brightness level to adjust it according to your preference. Sleep: Click to optimize the inactivity time LT700H needs to close the screen. Font size: Click Font size to enter Font size interface and then Slide the green dot to change the font size.
Basic Operation 3.5 Wi-Fi Click [Settings] – [Network & Internet] – [Wi-Fi] to switch on the button. Select Wi-Fi and type in its password to connect. After connecting Wi-Fi, the Network info can be checked.
Basic Operation 3.6 Bluetooth Click [Settings] – [Connected device] – [Bluetooth] to turn on the Bluetooth. Find nearby devices and pair with it.
Basic Operation 3.7 USB Connection For connection or data transmission between LT700H and PC, please use the USB data cable as shown below. Click [Settings] – [System] – [Developer options] – [USB debugging] to make sure this function is switched on. After USB data cable connecting with PC, wait until the Allow USB debugging dialogue pops up, and then click OK. You can also use third party software to manage the documents and data stored in LT700H and install software like GNSS Tool into it.
Basic Operation 3.8 Use Camera Make sure that the battery is charged and installed in the receiver. Click to select recording the video or panorama mode. Click to take a photo.
Basic Operation Click to configure related parameters. 3.9 Log in 4G After inserting your SIM card, click [Settings] – [Network & Internet] – [Mobile Networks] – [Advanced] – [Preferred network type] and select corresponding network type of your SIM card. Then turn on Mobile data and click Data usage to see data usage.
Basic Operation 3.10 Location 3.10.1 Turn on The Location Service Click [Settings] – [Security & Location] – [Location] – [On] to switch on location service. 3.10.2 Select the Constellation Combination On the [Location] panel, the choose [Location Mode], and the user can choose the constellation/constellations.
Basic Operation For LT700H, there are six options: ALL: The device will use all data to do the positioning. Note that this is the recommended setting to achieve optimal positioning performances.
Basic Operation 3.12 Edit F1/F2 Function Key The F1/F2 Function Key can be edited to launch the APPs in the device. Enter the edit interface via [Settings] – [System] – [Gestures] – [F1 F2 Function Key]. Check the APP for corresponding function key in [F1 Settings] / [F2 Settings].
Getting Start with LandStar 7 4 Getting Start with LandStar 7 4.1 LandStar7 Installation 1. Open Google Play store and search for LandStar 7 2.
Getting Start with LandStar 7 3. Wait for the installing, and the ‘APP installed’ shows up when the installation finished. 4.2 Connect the LT700H to internet Please select Wi-Fi or mobile network to enable Internet to allow a connection to your GNSS RTK Corrections Service provider. 4.3 Create a project (1) Power on the LT700H: Long press the power button for 3-5 seconds. (2) Launch the LandStar 7 software.
Getting Start with LandStar 7 (3) Tap [Projects] - [Project] to create or open a project. (4) Tap [New] to create a new project.
Getting Start with LandStar 7 (5) Input the project name, author and the time zone of working region. (6) Tap [Coordinate System] to choose the coordinate system of the project. (7) Tap [Add] to add pre-define coordinate system in the list.
Getting Start with LandStar 7 (8) Select the continent and region according to your working area. (9) Select the proper coordinate system to use. (10) Tap [Select] to confirm. (11) Selected coordinate system is available in the pre-define list, tap [Select] to confirm.
Getting Start with LandStar 7 (12) Check the parameters of the coordinate system and tap [Accept] to confirm.
Getting Start with LandStar 7 (13) Tap [OK] to finish the project setting.
Getting Start with LandStar 7 4.4 Connect to the LT700H GNSS Module (1) Tap [Config] - [Connect]. (2) Select Manufacturer as [CHC], Device Type as [Local], Device Name as [LT700H], Connection Type as [Local].
Getting Start with LandStar 7 (3) When connected to the LT700H GNSS, the message “Connected to receiver!” appears. 4.5 CORS / RTK Network Correction Login (1) Tap [Config] - [Work Mode] to create or accept a work mode.
Getting Start with LandStar 7 (2) Tap [New] to create a new work mode. (3) Select the work mode as [Auto Rover], datalink as [PDA Network], protocol as [Ntrip], type in the corresponding Ntrip [IP] and [Port]. Tap [Download] button to load the mountpoints source table. (4) Input the username and password of your NTRIP account. Note: If the selected mountpoint does not contain the RTCM 1021 - 1027 messages, leave the related RTCM message setting buttons set to “NO”.
Getting Start with LandStar 7 (5) Tap [Save]. (6) Input the name of the new work mode and tap [OK].
Getting Start with LandStar 7 (7) Select the new work mode in the [Work Mode List] and tap [Accept]. (8) Check the information of NTRIP account and change it as need. Tick on Correct, [Don’t remind me next time] when there is nothing need to change. (9) Click [Ok]. 4.
Getting Start with LandStar 7 GNSS correction data from RTK Network. (2) Tap the [Survey] - [Map] to start your work. (3) Tap [Survey] icon to collect the points.
Getting Start with LandStar 7 4.7 Sky Plot Click Sky Plot and see how many satellites (including GPS, GLONASS, BDS, GALILEO and SBAS) the device is currently tracking.
CHC Navigation Building D, NO. 599 Gaojing Road, Qingpu District, 201702 Shanghai, China Tel: +86 21 542 60 273 | Fax: +86 21 649 50 963 Email: sales@chcnav.com | support@chcnav.com Skype: chcnav_support Website: www.chcnav.com This document is intended for general information purposes only.
1) FCC 15.19 This device complies with part 15 of the FCC Rules. Operation is subject to the following two conditions: (1) This device may not cause harmful interference, and (2) this device must accept any interference received, including interference that may cause undesired operation. 2)FCC 15.21 Warning: Changes or modifications to this unit not expressly approved by the part responsible for compliance could void the user’s authority to operate the equipment. 3) FCC 15.
Specific Absorption Rate (SAR) information: This Smart Phone meets the government's requirements for exposure to radio waves. The guide lines are based on standards that were developed by independent scientific organizations through periodic and thorough evaluation of scientific studies. The standards include a substantial safety margin designed to assure the safety of all persons regardless of age or health. FCC RF Exposure Information and Statement The SAR limit of USA (FCC) is 1.