
Use Manual
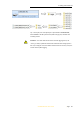
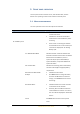
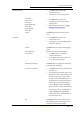


Table Of Contents
- INTRODUCTION
- GETTING STARTED WITH I70
- FRONT PANEL OPERATION
- BASE STATION SETUP AND OPERATION
- ROVER STATION SETUP AND OPERATION
- CONFIGURING THROUGH A WEB BROWSER
- POSITION SUBMENU
- ACTIVITY SUBMENU
- GOOGLE MAP SUBMENU
- TRACKING TABLE SUBMENU
- TRACKING INFO. TABLE SUBMENU
- TRACKING SKYPLOT SUBMENU
- SATELLITE ACTIVATION SUBMENU
- DESCRIPTION
- ANTENNA CONFIGURATION SUBMENU
- REFERENCE STATION SETTINGS SUBMENU
- RECEIVER RESET SUBMENU
- LANGUAGES SUBMENU
- USER MANAGEMENT SUBMENU
- USB FUNCTION SWITCH SUBMENU
- HCPPP SETTINGS SUBMENU
- 1PPS SUBMENU
- LOG SETTINGS SUBMENU
- FTP PUSH SETTINGS SUBMENU
- FTP PUSH LOG SUBMENU
- DATA DOWNLOAD SUBMENU
- IO SETTINGS SUBMENU
- DISCRIPTION SUBMENU
- MOBILE NETWORK SETTING SUBMENU
- EMAIL ALARM SUBMENU
- HTTP SUBMENU
- HTTPS SUBMENU
- FTP SERVICE SUBMENU
- DESCRIPTION SUBMENU
- WIFI SUBMENU
- BLUETOOTH SETTINGS SUBMENU
- RADIO SETTINGS SUBMENU
- BUZZER SETTING SUBMENU
- FIRMWARE INFO SUBMENU
- HARDWARE VERSION
- CONFIG FILE
- SYSTEM LOG DOWNLOAD SUBMENU
- USER LOG
- FIRMWARE UPDATE SUBMENU
- GNSS BOARD UPGRADE
- RADIO UPGRADE
- UPGRADE ONLINE
- GNSS REGISTRATION SUBMENU
- CLOUD SERVICE SETTING SUBMENU

3. Front panel operation
i70 GNSS Receiver User Guide Page 27
Mode Rover Ntrip/IP
The title of this configuration screen.
Status Logged
Indicates current status of Ntrip: Status Not
Logged or Status Logged.
Users need to use the web interface to
configure the settings to log on Ntrip (see
7.5.1. IO Settings submenu → RTK Client for
instruction) before.
Note – Make sure a valid SIM card has been
inserted in the receiver.
OK
Click Enter button to save the settings and back
to the top-level menu, and then this working
mode will take effect.
Cancel
Click Enter button to cancel the settings and back
to the second-level menu.
Rover UHF
Set up the receiver as a rover station using
internal UHF.
Click Enter button to enter the
configuration screen.
Mode Rover UHF
The title of this configuration screen.
Channel 1
Click Enter button to change the channel from 1
to 9.
Protocol CHC
Indicates the current protocol.
OK
Click Enter button to save the settings and back
to the top-level menu, and then this working
mode will take effect.
Cancel
Click Enter button to cancel the settings and back
to the second-level menu.
Note – The operation menus of front panel may vary from different firmware
versions of your receiver. The menus described in this chapter are based on
firmware version 1.1.41.