TG-T1 Version: Data: User Guide V1.0 2017/9 Shanghai HowayGIS InfoTech Co., Ltd.
http://en.howaygis.com/ Table of Contents 1. Introduction ................................................................................... 1 1.1. Feedback ............................................................................... 1 2. Overview........................................................................................ 1 2.1 Physical Specifications............................................................ 1 2.2 Electrical Parameters .....................................................
http://en.howaygis.com/ TG-T1 User Guide 1. Introduction Thank you for using the TG-T1 device. These instructions will guide you on how to quickly use the device in regards to opening the equipment correctly and common work scenarios. For items you encounter that are not covered in these instructions or if you have problems using this device, you can either contact your dealer or Howay directly at Email: supports@howaygis.com 1.1.
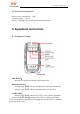
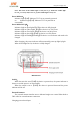
http://en.howaygis.com/ 2.2 Electrical Parameters Device Power Consumption:1.6W Charging Voltage:12V /1A Battery:3400mAh.7.2V Sustainable for more than 8 hours 3. Equipment Instructions 3.1 Equipment Image Front View GPS Antenna: Build-in GPS antenna, please don’t block when used. Bluetooth Indicator: Indicator Light【On】indicates the Bluetooth connection is successful.
http://en.howaygis.com/ Note: This status of the satellite light are only for TG_T. While the satellite light for TG_U is always off; As for TG_H, the satellite light is always on. Power Indicator: Indicator Light【Off】Indicates TG-T1 is not currently powered on. Indicator Light【On】Indicates TG-T1 is powered on successfully. Power Indicator Light; Indicator Light on Four lights【On】the device is fully charged.
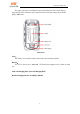
http://en.howaygis.com/ The 9-pin connector is a multiplexed port that charges the device when using a 9-pin DC IN cable. GPS data can be output from the serial port using a 9-pin Fisher plug to DB9 cable. Rear View Lock: The battery cover and the battery itself lock to prevent battery shake. Battery: The TG-T1 device has a 3400mAH 7.2V battery that supports over 9 hours of work use.
http://en.howaygis.com/ Side View Top View 3.2 Operating Instructions A Unboxing Protocol Upon receiving the device, check that you have received all included accessories including host, battery, power adapter, 9-pin DC IN cable, and an arm. B Installing the battery Remove the TG-T1 device and battery from the box, open the back cover, and properly install the battery into the device. C Booting the device Turn the power switch to【ON】and make sure the power indicator light turns on.
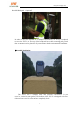
http://en.howaygis.com/ Remove the band from the box, secure the armband to the TG-T1 using the arm hole, and then attach the TG-T1 to the armband. Release both hands to attach. Portable —Engineering Clothing(Optional) Engineering clothing from our company is based on actual operation of the device, safety, and convenience. The clothing is yellow in color and made of reflective material to improve visibility for workers.
http://en.howaygis.com/ Portable Backpack(Optional) In order to meet the demands of a complex environment, we set up a backpack to store the TG-T1 in. The top of the backpack has a short centering pole pouch that an antenna can be placed in if you encounter harsh environmental conditions. ◆Portable Positioning The TG-T1 has a compact body that provides convenience. It can even be carried in your pocket. The bottom of the TG-T1 is designed to be flat.
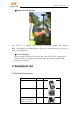
http://en.howaygis.com/ ◆High-precision positioning The TG-T1 as a built-in high precision positioning module that supports RTK functionality and high-precision needs. An external antenna can also be used as an RTK device. ◆ TG-T1 Charging Use the charger connected by 9-pin DC IN. Connect the TG-T1 charging port. When the device is charging, the lights will light up and when completely lit, charging is completed. 4. Equipment List 4.
http://en.howaygis.com/ 9-pin DC IN 1 Armband 1 4.
FCC Statement Any Changes or modifications not expressly approved by the party responsible for compliance could void the user’s authority to operate the equipment. This device complies with part 15 of the FCC Rules. Operation is subject to the following two conditions: (1) This device may not cause harmful interference, and (2) This device must accept any interference received, including interference that may cause undesired operation.