
User's Guide


Get started with the CM3 series (quick start).
Quick starts with a fixed solution using the CM-Survey software to set up the external station
1-N mode. The previous instrument installation is detailed in Chapter 3 Receiver Field Work
Requirements.
1.1 Connecting the instrument
The CM3 series uses WiFi or Bluetooth to connect instruments.
Connect CM3 Series receivers
When the CM-Survey software is turned on after the host is turned on, click Connect
Instrument to enter the Connect instrument interface and connect the SN number of the CM3
Series receiver using Bluetooth/WiFi (Bluetooth password:1234) , click Connection,
CM-Survey will prompt "Connection succeeded" when the connection is successful.
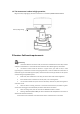
1.2 Set the base - the external base
Connect to the base, turn on FL3 Radio Search CM3 Bluetooth for a configured connection,
and set to CM3 external work mode.
1.3Set up the rover
Connect the rover, enter the Instrument Settings interface, click on rover, new station
working mode: configuration protocol, channel, Baud rate, save and apply this working mode
successfully, the rover settings are completed.
1.4 Create a new project
Regardless of the job mode, you must first create a new project to manage the data. Enter
Project Management, click New, enter the project name, creator, select the creation time and
time zone, use or create new coordinate system parameters, click OK, that is, complete the new
project.
1.5 Sitecalibration
The first time you go to a measurement area, you need to dositecalibration to match the
known point coordinates.
(1) Enter known point coordinates: Data Management → Point Management→ Add.
(2) Field measurement control points (if the longitude and latitude coordinates of the
control points are known, enter the longitude and latitude coordinates in the Data Management
→Point Management→ Add).
Note: (1) (2) order can be reversed.
(3) Select the coordinate system in the Coordinate System → Coordinate Parameters and
enter the correct central meridian (if there is a projected high input projection height).
(4) Enter the Coordinate System→ the → add, the GNSS point selects the measured
coordinates (or the latitude and longitude of the input), and the known points select the input
plane coordinates (NEH). If both the known point plane and elevation are used, select the
"horizontal and vertical" correction in the usage mode, the Horizontal correction if only plane
coordinates are used, and if only elevation coordinates are used, select the Vertical correction,
and select all control points in turn.
(5) Click on "Calculation" in the "Coordinate System" → "Conversion Parameters" interface,