
User's Guide


3 PC-side web page Set up receiver instructions
The process
of operation
Detailed description
Note
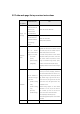
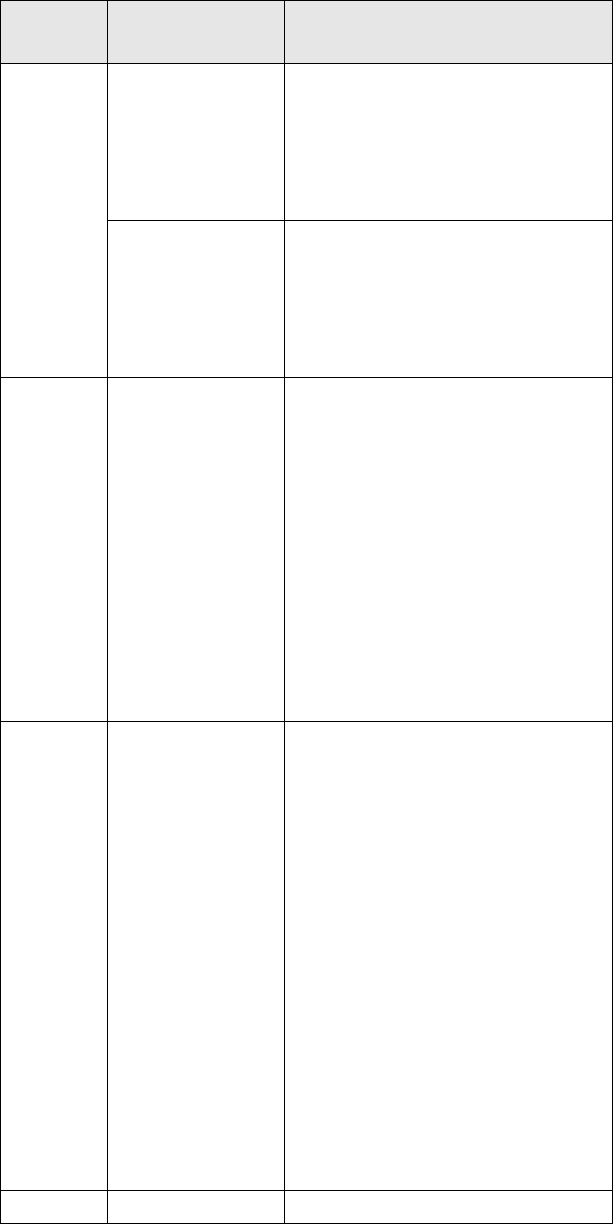
1.Login the
web page
First step:turn on
receiver WiFi,Search for
receivers on your
computer or other
WiFi-enabled device;
Default name: Receiver SNnumber
Second step:open google
chrome browser, Enter
the website 192.168.1.1
to enter the login
interface;
Default user name: admin
Default password: password
2.Receiver
status
Click the "Receiver
Status" on the left side of
the page. You can check:
[The receiver
position]
[Receiver activity]
[Google Map]
The receiver position interface shows the
longitude and latitude of the receiver's current
phase center, dop value, the satellite used, the
satellite tracked, and the receiver clock.
The receiver activity interface can view satellite
information tracked by the receiver, current UTC
time, receiver runtime since power-on, internal
storage and available storage, battery power,
whether to connect to external power supply.
Google Map shows the current location in Google
Map.
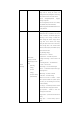
3.Satellites
Click the "Satellites" on
the left side of the page.
You can check:
[Satellite tracking
table]
[Satellite tracking
map]
[Star chart]
[Satellite settings]
[Satellite tracking table]You can see the satellites
tracked by the receiver, displaying information
about each satellite tracked in the form of a list,
including satellite number, satellite type, altitude
angle, adhesion angle, L1 signal-to-noise ratio, L2
signal-to-noise ratio, L5 signal-to-noise ratio, B1C
signal-to-noise ratio, B2A signal-to-noise ratio,
and whether to use it.
[Satellite tracking map]You can view satellite
information as an icon, and you can check the
type of satellite you want to view and the
signal-to-noise ratio to see the information.
[Star chart]Displays a satellite type map.
[Satellite settings]Satellite systems can be enabled
or disabled.
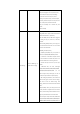
4.Receiver
Click the "Receiver
[Summary]View GNSS receiver information and