CM3 GNSS Receiver User Guide 2021-11-10 Release Shanghai EFIX Geomatics Co.
Preface The purpose of this book This article is a user manual for the Shanghai-based CM3 series, which is the instruction manual.
content in the form of upgrades, so please pay attention to our official website (www.efix-geo.com) The latest release information. Technology and services The message board section has been opened on the website, if you have questions can be left through the "message board", or directly call the technical consultation phone:400-602-8152, we will answer your questions in a timely manner.
Preface .............................................................................................................................................. 2 The purpose of this book .................................................................................................................. 2 Introduction to this book .................................................................................................................. 2 Experience requirements ..................................................
Safety Directions The following directions enable the person responsible for the product, and the person who actually uses the equipment, to anticipate and avoid operational hazards. The person responsible for the product must ensure that all users understand these directions and adhere to them. The product must not be disposed with household waste. Dispose of the product appropriately in accordance with the national regulations in force in your country.
Get started with the CM3 series (quick start). Quick starts with a fixed solution using the CM-Survey software to set up the external station 1-N mode. The previous instrument installation is detailed in Chapter 3 Receiver Field Work Requirements. 1.1 Connecting the instrument The CM3 series uses WiFi or Bluetooth to connect instruments.
if the residuals are small, indicating that the correction is qualified, click on "Application" and select "Yes" in the pop-up prompt. Note: (1) Known points are best distributed at the edges of the entire job area, for example, if point correction is done with four points, the measuring job area is best inside the quads connected to the four points.
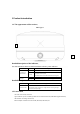
1 Product introduction 1.1 The appearance of the receiver CM3 Figure: ① ② Detailed description of the indicator The CM3 indicators above are: differential data indicator, power indicator.
1.3 The instrument is taken in high quantities Using the auxiliary height gauge, the bottom of the antenna is selected by means of measurement Auxiliary Height Gauge 2 Receiver field work requirements Precautions: 1. The distance between the station mode, the base station scaffold and the station whip antenna scaffold is recommended to > more than3mto avoid interference with satellite signals by radio stations. 2.
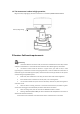
① ② ⑨ ⑩⑩ ③ ④ 错误! ! ① ⑤ ⑥ ⑦ ⑧ ⑨ (1) Whip antenna(2)Radio antenna connection base(3)Extend rod(4)aluminum disc (5) Scaffolding(6)FL3Radio(7) Radio Power Cord(8)Battery (9) Host(10) Auxiliary Gauge(11)Base 2.1 FL3 radio settings In external station job mode, use the radio panel to turn on the key to open the station, and use the left and right switch keys and up and down keys to configure the station.
9 419.050 25 445.063 41 438.125 10 410.050 26 445.075 42 440.125 11 453.550 27 445.088 43 441.125 12 455.550 28 445.100 44 442.125 13 457.550 29 445.113 45 443.125 14 459.550 30 445.000 46 444.125 15 461.550 31 441.000 47 446.125 16 463.550 32 442.000 48 447.125 TT450s 0 Arbitrarily writable 1 411.050 17 465.550 33 443.000 2 412.050 18 467.550 34 444.000 3 413.050 19 469.550 35 445.000 4 414.050 20 451.550 36 446.000 5 415.
3 PC-side web page Set up receiver instructions The process Detailed description Note of operation First step:turn on receiver WiFi,Search for receivers on your Default name: Receiver SNnumber computer or other 1.Login web page the WiFi-enabled device; Second step:open google chrome browser, Enter Default user name: admin the website 192.168.1.1 Default password: password to enter the login interface; The receiver position interface shows the longitude and latitude of the receiver's current Click 2.
configuration configuration" on the left reference station information. side of the page. You can [Antenna parameter settings]Antenna parameter check: settings can be set antenna quantity, antenna [Summary] manufacturer, antenna type, antenna number, [Antenna antenna height, height cut-off angle, PDOPlimits.
data found by the receiver, restoring the factory settings refers to clearing the receiver and reverting to the factory configuration, and turning off the receiver means to turn off the receiver. [Account management]Interface language switching is supported。 [Account management] Accounts can be added, saved, deleted, and passwords modified; [HCPPP settings]Select the HCPPPcalendar time in the drop-down box.
ftp push -- You can set ftp push to turn off [FTP push settings]You can set up 3 FTP servers, click to modify the pop-up FTP push settings window can set the server IP, port, remote directory, local push directory, server description, username, password. FTP push can set up the FTP server to be pushed, otherwise select Off. [FTP push records]A list of realistic FTP push records.
the machine support output data types, can be set whether the output and output frequency. If differential data needs to be output, it needs to be set to self-starting base station mode, with an external radio station typically with a Baud rate of 9600. [Bluetooth] Data output Baud Rate, Differential Data,RawData,HCPPPData,HRCData,GPGGA,GPGS V,GPRMC,GPZDA,GPGST,GPVTG,GPGSA,respective ly, the machine supports the output data type, can be set whether the output and the output frequency.
[Bluetooth settings]Includes local name, MACaddress, PINcode, default 1234(do not modify, this will invalidatethe NFCfunction). [Radio settings] Set the station status, power on whether to start, radio protocol, station step value, air baud rate, radio power, radio frequency, etc.
phone search and connect to the receiver; Second step: open the smart phone browser, enter the remote address Default username: admin 192.168.1.1 in the address Default password: password bar, enter the login interface; [The receiver position]The interface shows the longitude and latitude of the receiver's current phase Click the "Receiver Status" center, the DOP value, the satellite used, the satellite on the left side of the page. tracked, and the receiver clock. You can check: 2.
[RTK client]Connection protocols include NTRIP, APIS_ROVER, which support CORS and handbook network rover stations, respectively. Under the NTRIP protocol, CORS can be logged in by setting the IP, port, source list, username, password. under the APIS_ROVER protocol, you can log on to the remote network server and use it as a mobile station for the network RTK. [TCP/UDP_Client/Ntrip Serve] 1 、 [TCP/UDP_Client/Ntrip Serve]The protocol is optional for TCP,UDP,NTRIP1,NTRIP2protocols.
self-starting base station mode. [Radio] The differential data format of the built-in radio transmission and the data forwarding switch, sending differential data, need to be set to the self-starting base station mode, the radio module must be turned on power-up, set power and frequency, etc. Click the "Module" on the [WiFi settings] Set power status, power-on start-up, left side of the page. You 8.Module WIFI mode, SSID, MAC.
Slope Height Vertical Height Control Points Step3Record Record the name call, instrument SNnumber, instrument height, start observation time. Step4Collect static data Turn on the receiver, set the receiver to static mode, the receiver will automatically start recording static after searching for enough satellites; Receiver records static process do not touch scaffolding or instruments, try to avoid human interference, arrange for special guards.
After the whole point storage --- select the whole point, the recording duration needs to be set to a value that can be divisive by 1440 minutes The loop storage --- automatically overwrites the thread's early data after the set storage space has been exceeded After a single acquisition --- select Yes, that is, after recording a file with a set duration, stop, or not as a continuous record Storage locations --- optional internal and external storage, which is external storage Storage space --- reserves memo
Note: Web mode focuses on settings, you can set how many sets of data are logged on and off, and ftpmode focuses on data export, so data export is recommended using ftp mode or Type-C data line export. 5.4 Static accuracy test Static measurement accuracy refers to the degree to which the static measurement baseline vector results of the device under test conform to the known baseline vector (horizontal and vertical components). Static measurements are tested on outdoor reference points.
6 RTK setup method and tilt measurement 6.1 CORS login settings 1.The handbook has a network after loading the SIM card; 2.Turn on the CM-Survey software, Bluetooth or WIFI to connect the receiver; 3."Instrument Settings" → "Mobile Station" → "New" → "Handbook Network": network protocol to select CORS, enter the server address and port, get the source list, choose to use the source list, enter username and password, save and apply. 6.
2)At this point, you will go to the initialization interface and follow the interface prompt steps to initialize. The tilt measurement icon is green after successful initialization , you can use tilt measurements. 2) Enter the name and instrument height before the measurement and click on the measurement icon The measuring point is automatically saved to point management after acquisition is complete.
7 Firmware upgrade method 7.1 Upgrade via web page Web firmware upgrade, select Browse to add the corresponding .binfile, click OK to upgrade, note: less than50% of the battery will remind you that the upgrade is not possible. The receiver firmware upgrade is complete after the update is complete (approximately3minutes). 7.2 Upgrade via USB stick 1、Turn off the receiver. 2、Insert a USBstick containing the upgrade file (e.g.update_cm3_v2.1.7.2_b20210706.
7.3 The data line (mnt directory) upgrade The receiver is turned on, the receiver is connected to the computer using the Type-Ccable, and the upgrade file(e.g.update_cm3_v2.1.7.2_b20210706 .bin) iscopied to the receiver mntdirectory and the receiver is restarted. After both lights are on and flashing at the same time, press the power key to enter the upgrade and cancel the upgrade twice in a row.
Appendix 1 use and precautions Measurement instrument is a complex and sophisticated equipment, in the daily carrying, handling, use and preservation, only through the correct use and proper maintenance, can better ensure the accuracy of the instrument, extend its service life.
Appendix 2 of the main technical indicators Satellite tracking OS Beidou All-Constellation LINUX Waterproof breathable Support film Receiver characteristics The initializa 5s ③ tion time The data output rate 1Hz Initializa tion reliabilit >99.99% y Appearance A streamlined cylinder The appearance of the receiver Button A power button 1 correction data indicator Indicator 1 power indicator Plane accuracy: ±(2.5 plus -6 0.5×10 ×D) mm Static accuracy Elevation accuracy: ±(5 plus -6 0.
technology supplying system Battery life (4). RTK mode for12hours, with external direct current and automatic switching of built-in battery power External power 5V DC supply Size 12.4cm×13.
How to download Tilt USB Download FTP Download Precision MEMS tilt sensor for measuremen accuracy of less than 30degrees Auxiliary measurement t Electronic bubbles ≤3cm Receiver center automatic measurement can be achieved, really freeing your right hand The output NMEA 0183,PJKplane coordinates, The data output format How it is output Query functional Built-in web pages ity Set the function binary codes BT/WIFI Query receiver status and settings information Receiver mode of operation, communicati