
Instructions / Assembly


Tech Support: 800.653.8567 | info@tacomarine.com | tacomarine.com
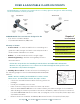
FIXED & ADJUSTABLE CLAMP-ON MOUNTS
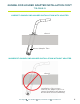
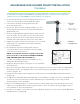
2) Drill and Prepare the Rotation/Set Pin Hole
IMPORTANT – Before drilling, ensure there are no electrical wires inside the pipe or tube.
• It is best to “center-punch” the mark prior to drilling the 1/4” hole.
• This will help keep the drill bit from “wandering/moving” when beginning to drill.
• Apply grease to the tip of a 1/4” metal drill bit.
• After center-punching the marked location, carefully and squarely drill a hole through
only one wall of the T-top/tower piping.
• Deburr the drilled hole.
• Wipe o any excess grease and metal chips from the area and parts.
3) Install the Fixed or Adjustable Clamp-On Mount
• Remove the ShadeFin from the Clamp-On Mount prior to installing the mount onto the
T-top tube/tower pipe.
• Position the ANTI-ROTATION PIN, which is fixed into the lower cap, into the drilled hole.
• Install the upper support tube (see page 8) down onto the other side of the pipe with the
drain hole facing down to the deck.
• Using a light oil or grease on the threads of the fasteners, install all four and proceed to
evenly hand-tighten the fasteners.
** Do not over tighten or the aluminum threads may strip. **
• We recommend using a torque wrench set to:
• 3 foot-pounds (lubricated threads) or
• 4 foot-pounds (dry threads)
• Re-check the torque of the fasteners after 24 hours, as the Clamp-On Mounts may settle
into the T-top tube/tower pipe.
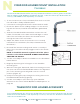
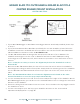
4) Attaching the ShadeFin (once the Fixed or Adjustable Clamp-On Mount is secured)
• With the locking pin depressed, slide the mounting post into the open end of the Fixed or
Adjustable Clamp-On Mount. The alignment pin on the mounting post will guide it into the
correct position [Figure A].
• Verify the locking pin pops through the locking hole on the Mount [Figure A].
• If you’re using the Fixed Clamp-On Mount, you are now ready to open and enjoy your
ShadeFin. Continue to the section titled “Operation & Deployment” on page 9.
• If you’re using the Adjustable Clamp-On Mount, continue to step 5.
5) Setting the ShadeFin Angle with the Adjustable Clamp-On Mount
• To adjust the upward and downward angle of the ShadeFin, slowly loosen the Sure-Grip
Knob on the top of the mount. Do this while maintaining one hand firmly on the long,
bottom, aluminum plate of the ShadeFin.
• When the ShadeFin begins to move freely up or down, adjust it to your desired position
and tighten the Sure-Grip Knob until it’s firmly in place. There should not be any wiggle
room for the ShadeFin to move up and down.
• You are now ready to open and enjoy your ShadeFin. Continue to the section titled
“Operation & Deployment” on page 10.
7